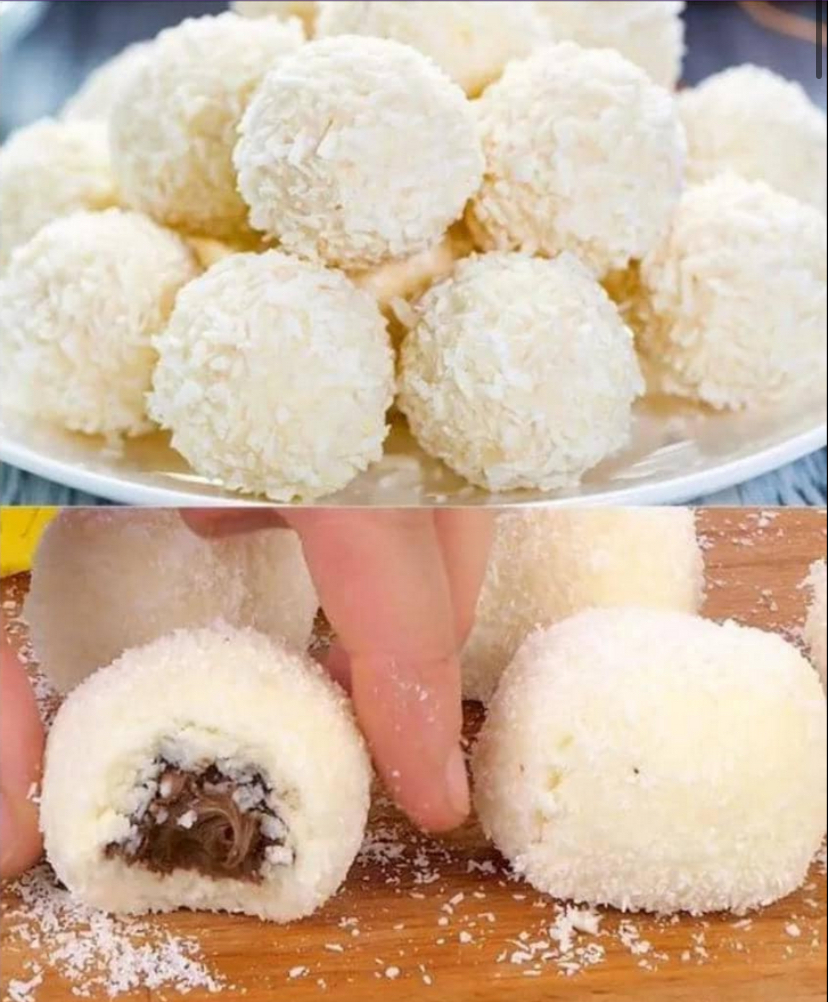
Traditional recipe for real Scottish snowballs. Delicious sandwiches filled with jam and covered with a coconut glaze.
We have a few recipes that Grandma wanted to share here at Baking with Granny (which I still urge her to share with me!). One thing he wanted to revise, modernize and perfect before sharing was… Scottish snowballs.
When Grandma first told me about snowballs, I was sure she was talking about Tunnocks Chocolate Coconut Marshmallow Snowballs. And she herself is great, let’s face it!But no, grandma was talking about her snow cakes that she made at the bakery over three decades ago. Scotch
Snowballs are a whole different treat and just as delicious. One grandma remembers fondly, both were made in a bakery and have had many customers enjoying them. And when she shared a sneak peek of it on Instagram, I was surprised and delighted to see how many people knew what it was and were patiently waiting to post this recipe!
INGREDIENTS:
°250g flour
°100g sugar
°1 large egg
°0.5 packets baking powder
°5 ml oil
°100 g apricot jam
°100 g grated coconut
PREPARATION STEPS
In a bowl, whisk the eggs with the sugar. Add the oil and mix, then add the flour and baking powder. Mix until the paste is homogeneous.
Preheat the oven to 180°C (vi). Form balls with your hands, place them on a baking tray lined with baking paper and bake for 10 minutes.
Dip the meatballs in the hot apricot jam, then in the grated coconut and enjoy!
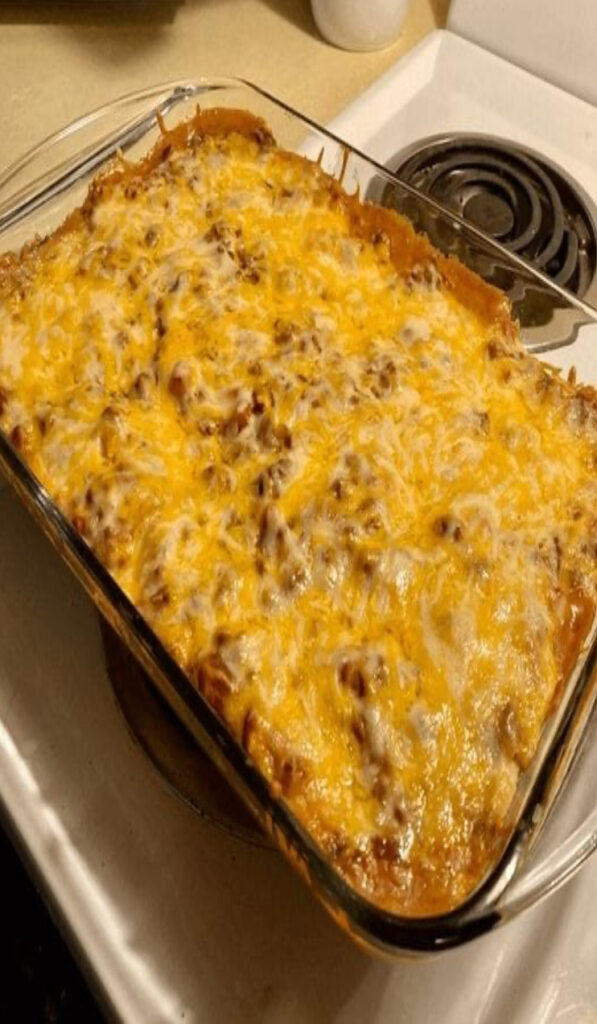
Pressed for time but craving something delicious for dinner? This Easy Mexican Casserole is a perfect choice, combining lean ground beef, flavorful ranch-style beans, and crunchy tortilla chips, all topped with melted cheese, creamy chicken, and a dollop of sour cream.
I’ve always had a penchant for homemade Mexican cuisine, often opting for enchiladas. However, I decided to mix things up with this casserole—it’s a delightful twist on our typical Mexican dinner nights.
You’ll need these ingredients:
1 pound of lean ground beef
1 can of Ranch Style beans
1 bag (10-12 ounces) of tortilla chips, crushed
1 can of Ro-tel tomatoes
1 small onion, chopped
2 cups of shredded cheddar cheese, split into halves
1 packet of taco seasoning
1 can of cream of chicken soup
1/2 cup of water
Sour cream and salsa, for garnish
Here’s how to whip up the Easy Mexican Casserole:
Step 1:
Start by heating your oven to 325°F.
Step 2:
Use a sizable skillet to brown the ground beef, then drain any excess fat. Combine the beans, Ro-tel tomatoes, chopped onion, taco seasoning, chicken soup, and water with the meat. Let this mixture simmer on medium-low heat until it’s thoroughly combined and warmed.
Step 3:
Take a 9×13-inch casserole dish and lightly grease it. Create a base layer with the crushed tortilla chips. Over the chips, spread a layer of the beef and bean mixture, then sprinkle half of the cheddar cheese. Repeat these layers once more. Cover the dish with foil and place it in the oven. Let it bake for 20-30 minutes, or until it’s hot and bubbly.
Step 4:
After removing the casserole from the oven, let it rest for 5-10 minutes. This is the perfect time to gather everyone at the table. Serve the casserole topped with a spoonful of sour cream and a generous scoop of salsa.
Enjoy this comforting and quick twist on a Mexican classic that’s sure to become a new favorite!
I’m sure most of us have a few rolls of paper towel in the kitchen at all times. And although this household product is great for cleaning and wiping up spills, paper towel can also work wonders in the fridge.
Yes – in the fridge! It may sound odd, but paper towels are the secret weapon when it comes to keeping produce fresh for longer.
According to Reader’s Digest, paper towels in the fridge are actually a great way to ensure that your vegetables stay fresh for an even longer period of time.
This is a great solution for those who are looking to enjoy their vegetables and are tired of watching them wither away inside of the fridge.
It all starts by lining your produce drawer with paper towels every single time that you bring some fresh produce home.
The hack works best as long as the paper towels are replaced each time. If the produce is brought home inside of a singular bag, throw a paper towel inside with them.
The other helpful aspect of this comes into play when the produce drawer is not getting as dirty as it once did. That’s a major plus for those who do not want to spend their days cleaning the fridge.
Few things make me more frustrated than food waste. Especially with the price of fresh produce these days, it pains me to see fruits and veggies go bad before we’ve had a chance to finish them. This is where paper towel comes in.
Before placing your produce in the crisper drawers, line them with paper towel. If you have bags of spinach or lettuce, add a sheet or two of paper towel into these bags as well.
Over time, your fruits and veggies release the water they’ve been storing. When produce sits in this water for periods of time, it becomes soggy and wilts.
The paper towel absorbs this excess moisture, leaving your fruits and veggies fresher for longer.
Maybe you already knew about this hack, but if you didn’t, now is the time to try it!
Something as simple as a few sheets of paper towel can make all the difference when it comes to storing your produce, decreasing your food waste, and saving you money in the long run.
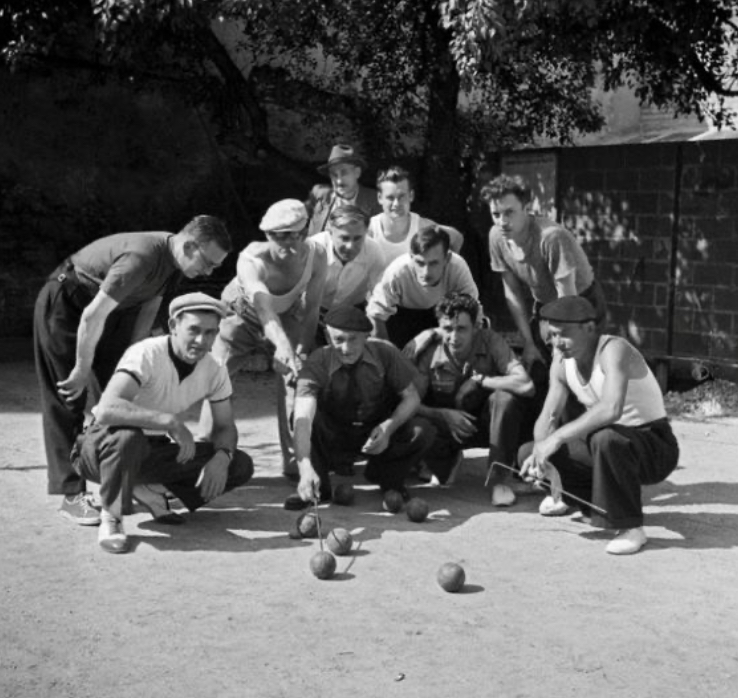
In the realm of outdoor leisure activities, few games embody the spirit of camaraderie and competition as beautifully as Boule or Pétanque. Originating in the South of France, these games have been cherished for generations, and their allure continues to captivate players around the world. While the game itself is steeped in tradition and history, the vintage Boule/Pétanque set in a wooden box represents a piece of that history in its own right. This article explores the charm and allure of these vintage sets, particularly those made of iron with chrome enamel.
A Timeless Tradition
Boule, often referred to as Pétanque, is a centuries-old sport that gained popularity in the 20th century. Its roots can be traced back to the ancient game of Bocce, and it has evolved into a beloved pastime, particularly in Mediterranean cultures. This tradition remains strong today, and the vintage Boule sets serve as a tangible link to this rich history.
Aesthetics and Craftsmanship
One of the defining features of vintage Boule sets is the exquisite craftsmanship that goes into making them. The wooden box itself is a work of art, often featuring intricate detailing, fine inlays, and a luxurious finish that harks back to a bygone era of woodworking. The iron Boules are a marvel of precision engineering, featuring chrome enamel that not only adds to their aesthetic appeal but also offers protection against the elements, ensuring they stand the test of time.
The combination of wood and chrome enamel iron gives these sets an air of elegance and sophistication that modern versions can’t quite replicate. It’s a testament to the enduring quality of craftsmanship from a bygone era.
For enthusiasts and collectors, a vintage Boule set is a prized possession. These sets, often emblazoned with the insignias of legendary manufacturers like Obut, provide a sense of nostalgia that is hard to beat. Owning a vintage set is akin to owning a piece of history, and each set often comes with a unique story and character. The patina on the iron balls and the box adds to their charm, reminding us of the countless games played and memories made with them.
A Social Bond
Boule is not just a game; it’s an opportunity for people to come together, socialize, and form lasting bonds. The vintage Boule sets in wooden boxes offer a touch of class to any gathering. Whether it’s a casual game in the backyard or a more competitive match on a professionally designed court, these sets are a statement of style that draws people together.
Vintage Boule sets make for extraordinary gifts. Whether given to a friend, family member, or colleague, they carry a timeless appeal and a touch of sophistication. These sets can be a perfect gift for a housewarming, a wedding, or any occasion where you want to offer something unique and meaningful.
The vintage Boule/Pétanque set in a wooden box, crafted from iron with chrome enamel, is not just a game; it’s a work of art, a piece of history, and a symbol of timeless tradition. The melding of classic aesthetics with the enduring quality of craftsmanship results in a set that stands out in the modern era. Owning one of these sets is a testament to a love for tradition, the art of craftsmanship, and the joy of friendly competition. So, whether you’re a collector or simply someone who appreciates quality and elegance, consider adding a vintage Boule set to your collection and be prepared to enjoy hours of outdoor fun while relishing in the aesthetics of days gone by.
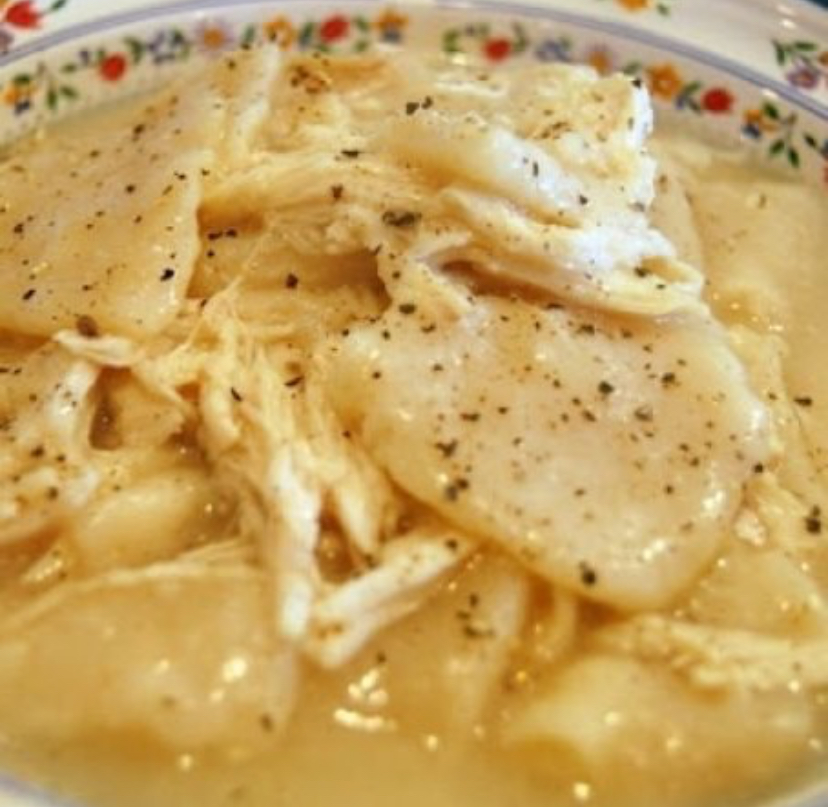
Mix the flour, baking powder and salt in a bowl. Mix the butter with the dry ingredients using a fork or mixer. Add the milk and stir with a fork until the dough forms a ball.
Sprinkle your work surface generously with flour. You will need a rolling pin and something to cut the gnocchi.I like to use a pizza cutter. I also like to use a small spatula to lift the pasta from the cut surface.
Roll out the dough thinly with a rolling pin generously dusted with flour. Dip a knife in flour and cut the noodles into squares about 5 x 5 cm each. It’s okay if they’re not correct.Look at the. Some will be larger, some smaller and some might have a funny shape.
Using a floured spatula, place them on a generously floured plate. Simply sprinkle some flour between the gnocchi layers.
To cook them, bring the broth to a boil.Add the meatballs one at a time, stirring constantly. If you add flour on top, the broth will be thicker.
Cook them for about 15-20 minutes or until they no longer taste like noodles.
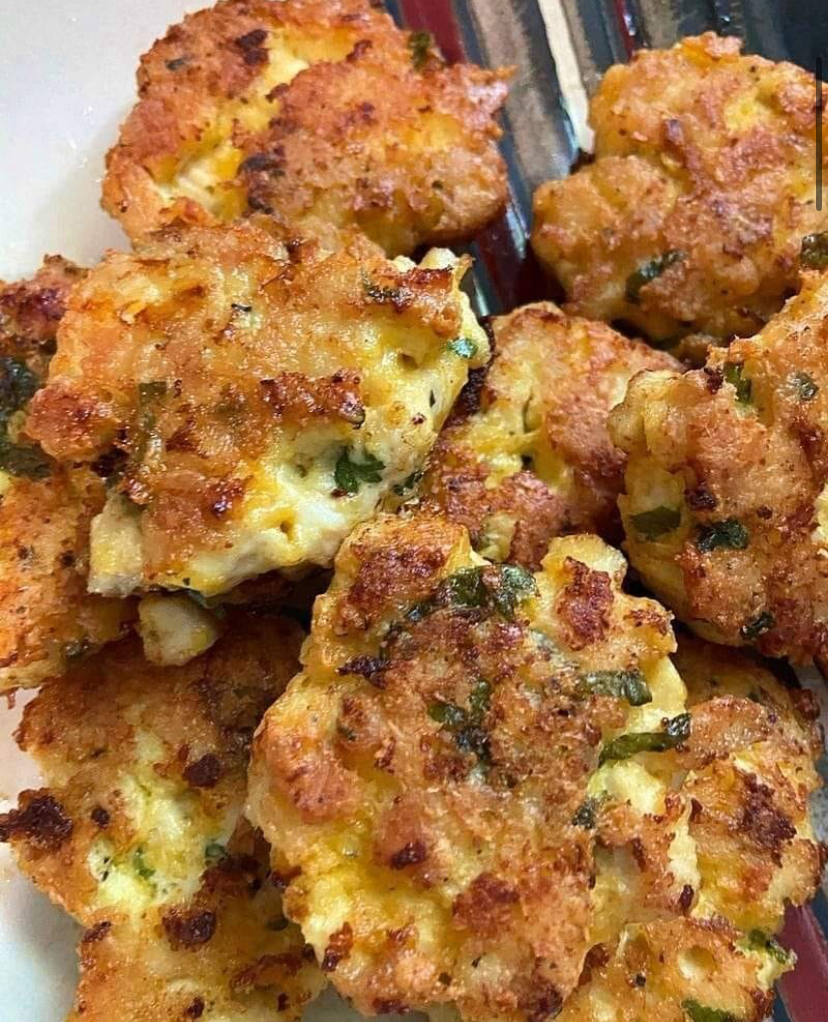
or 1 1/2 pounds chicken breasts (3 large) or 2 large eggs or 1/3 cup mayonnaise or 1/3 cup all-purpose flour, cornstarch or potato gluten-free starch or 4 ounces mozzarella (1 1/3 cup chopped) or 1 1/2 tablespoons chopped fresh dill or 1/2 teaspoon salt or to taste or 1/8 teaspoon black pepper or 2 tablespoons plenty of light olive oil for frying ( or any hot frying oil) Ingredients for Garlic Aioli (optional) or 1/3 cup mayonnaise or 1 pressed garlic clove or 1/2 tablespoon lemon juice or 1/4 teaspoon salt or 1/8 teaspoon black pepper
How to Make Cheesy Chicken Nuggets
or Cut chicken into 1-inch cubes with a sharp knife and place in a large bowl. Tip: If the chicken breast is partially frozen, it will be a little easier to cut. o Add the remaining dough ingredients to the bowl: 2 eggs, 1/3 cup mayonnaise, 1/3 cup flour, 1 1/3 cup grated mozzarella, 1 1/2 tablespoons dill, 1/2 teaspoon salt and 1/2 tablespoon 8 teaspoons black pepper or season to taste. Stir the mixture well, cover with plastic wrap and refrigerate for 2 hours or overnight. o Heat a large nonstick skillet over medium heat and add 2 tablespoons oil.Once the oil is hot, add the chicken mixture a heaping tablespoon at a time. Flatten the top slightly with a spoon and cook uncovered on the first side for 3-4 minutes, then turn and cook on the second side for 3 minutes, or until the top is golden brown and the chicken is cooked through* Repeat. Repeat with the rest. Meatballs, adding more oil if needed. o For the aioli (if using), combine all ingredients in a small bowl or measuring cup and stir until smooth. Recipe Notes *To check if it is done, cut the cake in half. The chicken inside should be completely white. If the chicken pot pie darkens too quickly, lower the temperature.
There are a surprising amount of activities you can’t do until you reach a certain age, like drive a car and rent a hotel room. On the flip side, you apparently can become too old to do certain things, too. That includes one rather commonplace habit: wearing jeans.
The fashionistas believe it’s possible to age out of your favorite jeans. There’s a certain number, however, when experts advises dropping that denim in a donation bin. And this isn’t just a matter of personal preference; the blogger even backs up her claim with statistics.
The data was collected by CollectPlus, a UK courier company that recently surveyed 2,000 national shoppers. They were asked to share their shopping habits and wardrobe preferences—all the way down to their perfect pair of jeans.
Based on the final data, the respondents seemed to agree that people shouldn’t be trying to squeeze into denim past the age of 53. The reason? It’s not because you’re making a fashion faux pas, though. In truth, it just becomes harder to find a pair that fits by that age.
Sadly, the numbers spell bad news for denim devotees. One in 10 of respondents over the age of 50 reported trying on up to six styles before finding the perfect pair, the researchers said. The study also found that most people experience peak stress levels while jeans shopping by age 53. Six percent of shoppers even became so upset they burst into tears.
Of course, finding the perfect pair of blue jeans might as well be rocket science, no matter how old you are. In fact, research shows people spend an average of five to eight days searching for jeans. So it’s no surprise that most people don’t buy a new pair for another three years at minimum.
If you still want to rock your favorite pair of denims until you retire, we will cheer you on.
Leftover Mashed Potato Cheese Puffs offer a scrumptious solution for extra mashed potatoes, combining the homely taste of potatoes with the gooey joy of melted cheese. These puffs are perfect for enhancing any meal, be it an appetizer, a side, or a casual snack.
Leftover Mashed Potato Cheese Puffs Recipe:
Ingredients:
3 cups of mashed potatoes
1 cup of shredded cheese (like cheddar or mozzarella)
1/4 cup of all-purpose flour
2 tablespoons of grated Parmesan cheese
2 tablespoons of fresh chives, chopped
1/3 cup of sour cream
Salt, to taste
2 eggs, beaten
Instructions:
Oven Prep: Heat your oven to 400°F (200°C) and lightly oil a muffin pan.
Combine Eggs and Sour Cream: Whisk the eggs and sour cream in a bowl until smooth.
Add Cheeses and Chives: Introduce the shredded cheese, Parmesan, chives, and a pinch of salt to the mix, stirring well.
Fold in Potatoes: Carefully mix in the mashed potatoes until the mixture is uniform.
Fill Muffin Tin: Spoon the potato mixture into the muffin cups, filling them to the brim.
Bake: Place the tin in the oven for 20-25 minutes, or until they’re puffed and golden.
After a brief cooling period, dislodge the puffs and they’re ready to serve. Pair these golden Cheese Puffs with any main dish, particularly roasted meats, or offer them as a standalone treat at your next social gathering.
Turn those remaining mashed potatoes into a cheesy, crispy delight that’s bound to be a hit any day!
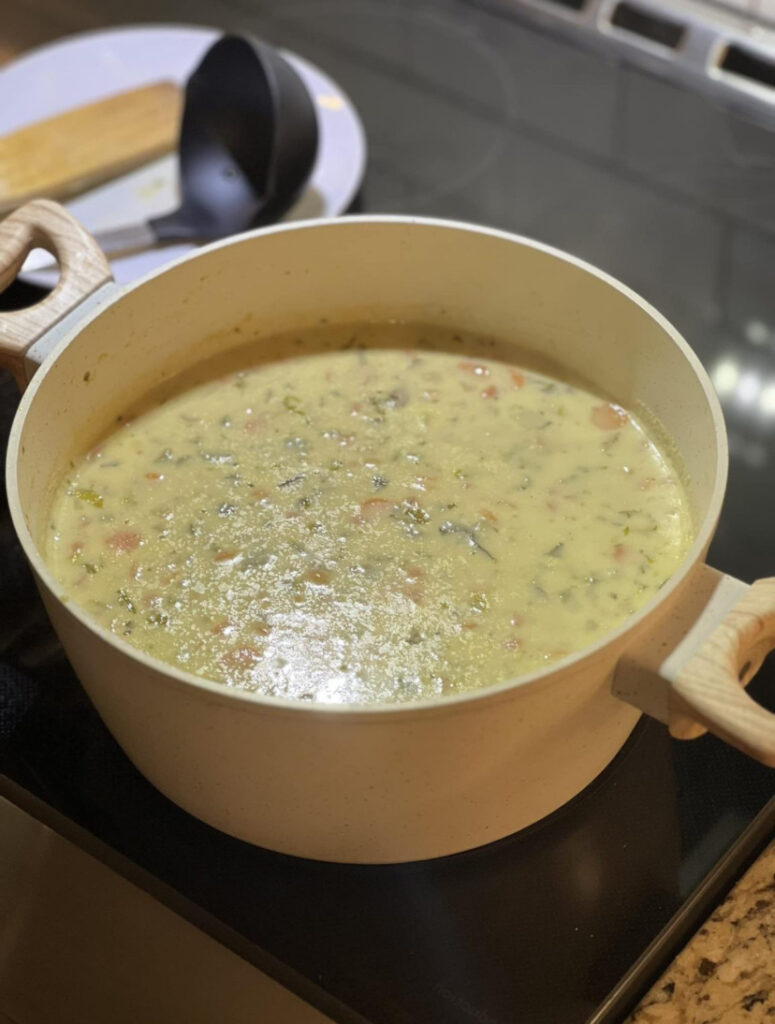
Panera Broccoli Cheddar Soup is comfort food at its best and tastes just like Panera. This soup is an easy dinner that hits the spot and is quick enough to get you through the week. This broccoli cheese soup competes for the 1 soup recipe on this blog with this slow cooker potato soup.
I know this broccoli cheddar soup recipe is floating around on blogs, but it’s my job to share recipes that I really love and this is one of them.
I know this recipe tastes just like Panera’s delicious broccoli cheddar soup because I ate it at least once a week during my last pregnancy.
It was the ONE thing I was looking forward to and I’m sure the people at Panera knew my name. They serve Panera Cheese Broccoli Soup with a warm, crusty baguette. My God.
This almost makes me want to get pregnant again.
INGREDIENTS:
1/4 cup melted butter
1/2 medium onion, chopped
1/4 cup flour
2 cups half cream
2 cups broth or chicken stock
1/2 pound broccoli (approx . 3 cups), chopped
1 cup julienned carrots (you can purchase matchstick carrots in the produce section)
1/4 teaspoon nutmeg (optional, but adds flavor)
8 ounces grated sharp cheddar cheese, (2 cups)
Salt and pepper
PREPARATION:
1.Melt 1/4 cup butter and sauté the onion until soft. Dust the mixture with flour. Cook and stir over medium heat for 1 to 2 minutes.
Halve & half and chicken broth.
Add broccoli and carrots. Cook over low heat for 20-25 minutes until broccoli and carrots are tender.
Add salt and pepper.You can leave the soup in chunks or puree and stir about 1 cup of soup to make a smoother soup (that’s what I do). Return heat to low and add the cheese. If the temperature is too high, the soup can become grainy. Add nutmeg if necessary.