Home Blog Page 15

Mexican Wedding Cookies

0

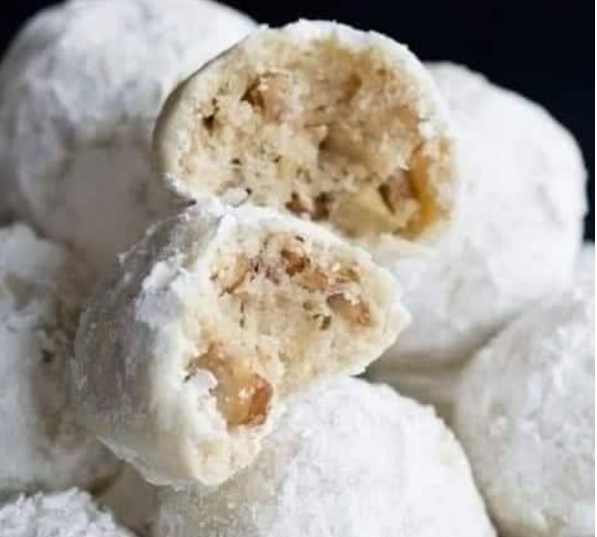
Beautifully round, buttery, pecan dotted cookies are rolled in sweet blizzard of snowy white powdered sugar and they’ll leave you savoring every tender bite.

Ingredients
1 cup unsalted butter
1/2 cup powdered sugar
1/4 tsp salt
2 tsp vanilla extract
2 Tbsp cornstarch
2 cups all-purpose flour
1/2 cup finely chopped Pecans
1 1/2 cups powdered sugar

Directions
Step 1
Preheat oven to 350°F (180°C). In the bowl of an electric stand mixer fitted with the paddle attachment, mix butter on medium speed until creamy, about 20 seconds. Blend in 1/2 cup powdered sugar and salt. Mix in vanilla.

Step 2
Sprinkle cornstarch over mixture (just so it doesn’t blend into one area) then with mixer set on low speed slowly add in flour and mix just until combined. Stir in Pecans.

Step 3
Scoop dough out 1 Tbsp at a time and roll into a ball, then place balls on ungreased baking sheets and bake in preheated oven for 13 – 15 minutes, until bottom edges are lightly golden (for anyone having problems with spreading, just chill the dough balls for 1 hour then transfer to baking sheet and bake and that should help).

Step 4
These are a cookie that I think are best when they aren’t moist in the center so I’d say don’t under bake them. These actually are a cookie that are meant to be dry. Dry but a melt in your mouth kind of dry.

Step 5
Remove from oven and allow to cool several minutes then while cookies are still warm, pour 1 1/2 cups powdered sugar into a bowl and roll cookies in powdered sugar.

Step 6
Transfer to a wire rack to cool, then once cookies are cool, roll in powdered sugar once more, this time generously coating them (I pressed it into the powdered sugar to give it a thick coating). Store cookies in an airtight container

Grandma’s Old-Fashioned Bread Pudding with Vanilla Sauce

0

Just like Granny made it, you’ll love this classic Old Fashioned Bread Pudding with Vanilla Sauce recipe! This warm and comforting recipe is best served any time of the year with your favorite brand of vanilla ice cream.

Ingredients

4 cups (8 slices) cubed white bread

1/2 cup raisins

2 cups milk

1/4 cup butter

1/2 cup sugar

2 eggs, slightly beaten

1 tablespoon vanilla

1/2 teaspoon ground nutmeg

Sauce Ingredients:

1/2 cup butter

1/2 cup sugar

1/2 cup firmly packed brown sugar

1/2 cup heavy whipping cream

1 tablespoon vanilla

How To Make Grandma’s Old-Fashioned Bread Pudding with Vanilla Sauce
Heat oven to 350°F. Combine bread and raisins in large bowl. Combine milk and 1/4 cup butter in 1-quart saucepan. Cook over medium heat until butter is melted (4 to 7 minutes).
Pour milk mixture over bread; let stand 10 minutes.

Stir in all remaining pudding ingredients. Pour into greased 1 1/2-quart casserole. Bake for 40 to 50 minutes or until set in center.
Directions for Sauce:
Combine all sauce ingredients except vanilla in 1-quart saucepan.Cook over medium heat, stirring occasionally, until mixture thickens and comes to a full boil (5 to 8 minutes).
Stir in vanilla
To serve, spoon warm pudding into individual dessert dishes; serve with sauce.Store refrigerated.

Enjoy!

Cheesy Garlic Pull-Apart Bread

0

I have often believed that the key to good garlic bread is all in having the courage to use an obscene amount of butter, and I stand by that belief. But in this case, it’s not just about the butter… it’s also about the cheese. A whole lot of cheese. This simple skillet bread uses a couple of kitchen shortcuts and a generous amount of garlic, butter, and cheese to make a pull-apart bread that’s soft but oh-so-cheesy and nearly impossible to stop snacking on.

I mean, just look at that stretchy cheese action! Hard to resist, right? And luckily it’s super easy to achieve. This doesn’t require any kneading or rising or actual bread-baking skills, since it relies on pre-fab refrigerated biscuit dough.

Ingredients:

2 (16-ounce) tubes refrigerated buttermilk biscuits
1/2 cup (1 stick) salted butter, melted
1/2 teaspoon Italian seasoning
4 cloves garlic, minced
2 1/2 cups Monterey Jack cheese, grated
1/3 cup Parmesan cheese, freshly grated

PREPARATION:

Preheat oven to 350°F and grease a large 14 or 15-inch cast iron skillet with butter or nonstick spray.
In a small bowl, mix together the melted butter, garlic, and Italian seasoning. Cut each biscuit into quarters and dip into butter mixture. Arrange dough pieces in bottom of skillet.
Tuck Monterey Jack in and around dough pieces, then drizzle any remaining butter mixture over the top. Sprinkle with Parmesan cheese and bake until golden brown, 25-30 minutes.

Enjoy !

HOT FUDGE PUDDING CAKE

0

Hot Fudge Pudding Cake is a simple homemade cake batter that bakes into a beautiful chocolate cake. Warm fudge is hidden inside resulting in a gooey delicious center!I don’t even know where to begin with this heavenly cake. How do I explain how insanely delicious and AMAZING this Hot Fudge Pudding Cake is? 😉 I’m really hoping the pictures speak for themselves, but just in case they don’t I’ll try and fill you in. Hot Fudge Pudding Cake is a super simple homemade cake batter that bakes into a beautiful chocolate cake with warm fudge hidden inside. The chocolate flavor is spot-on and the combo of cake with creamy fudge is perfection. It’s basically a dream-come-true dessert.

This Fudge cake is seriously the best and could not be easier to make. From start to finish it’s ready in about 40 minutes. I was so excited to cut right into it and see the warm and gooey fudge oozing out. 🙂

INGREDIENTS:

1 cup sugar
½ cup cocoa powder
1 cup all-purpose flour
2 teaspoons baking powder
¼ teaspoon salt
½ cup milk
4 tablespoons butter, melted
1 large egg yolk
2 teaspoons vanilla extract
½ cup semisweet chocolate chips
1 cup boiling water

INSTRUCTIONS:

1-Preheat oven to 350 degrees F. Spray an 8-inch square baking pan with cooking spray. Whisk ½ cup sugar with ¼ cup cocoa powder and set aside.
2-Whisk the flour, remaining ½ cup sugar, remaining ¼ cup cocoa, baking powder, and salt in a large bowl. Whisk milk, butter, egg yolk, and vanilla in medium bowl until smooth. Stir milk mixture into flour mixture until just combined. Fold in chocolate chips (batter will be stiff).

3-Using a rubber spatula, scrape batter into prepared pan and spread into corners. Sprinkle reserved cocoa and sugar mixture evenly over the top. Gently pour boiling water over cocoa. Do not stir.
4-Bake until the top of the cake is cracked, sauce is bubbling and a toothpick inserted into cakey area comes out mostly clean, about 22-24 minutes. Cool on rack for at least 10 minutes. Serve warm with vanilla ice cream.

SLOW COOKER CUBE STEAKS WITH GRAVY

0

Made this last night and it was delicious!! Cubed steak wasnt tough at all. Will definitely make again!

Slow Cooker Cube Steak and Gravy is an easy-to-make, hearty, down-home comfort meal, perfect for a busy day! This recipe is a cinch to adapt, a meal that the entire family will love, and budget-friendly, of course!

It is nice to get the cooking done early in the day while the kids are at school. Serve with mashed potatoes or noodles.

Ingredients :

1 large onion, thinly sliced

1/3 c. all-purpose flour

1 tsp. garlic powder

1 tsp. onion powder

1/2 tsp. black pepper

6 (about 4 oz. each) beef cube steaks (I usually buy the family pack of cube steak, and cut them in half if the slices are really big-I don’t pay attention to the weight of the package, there’s always plenty of gravy)

1 Tbsp. canola oil

3 c. water, divided

1 envelope brown gravy mix (I use the reduced sodium brown gravy mix)

1 envelope mushroom gravy mix

1 envelope onion gravy mix

Hot mashed potatoes, cooked rice or cooked noodles

Directions :

Spray the inside of a 3-5 quart slow cooker with nonstick cooking spray. Place the sliced onions in the slow cooker.

Combine flour, garlic powder, onion powder and pepper in a large resealable plastic bag. Add steaks, a few at a time; shake until completely coated.

Heat the oil in a large skillet over medium heat. Add the steaks, a few at a time, and cook until lightly browned on each side. Place the browned steaks on top of the onions in the slow cooker. Pour 2 c. water over all. Cover; cook on Low for 8 hours or until meat is tender.

In a bowl, whisk together the 3 gravy mixes with remaining 1 c. water. Add to slow cooker; cover and cook on Low for 30 minutes longer.

Serve over mashed potatoes, rice or noodles. 6 servings.

ENJOY!

Ginger water: the healthiest drink to burn all the fat in the abdomen, neck, arms, back and thighs!

0

The digital realm brims with numerous diet suggestions, culinary recipes, and organic weight loss remedies. While many have been tried and tested, only a few have stood out with proven results. One such remarkable formula is Ginger Water.

Why Ginger Water for Weight Loss?

Ginger Water isn’t just another natural remedy. It promises efficient weight loss, especially targeting stubborn areas like the hips and stomach. The days of struggling with these problem zones are over with this potent solution.

More than Just Weight Loss

Not only is it an effective weight loss solution, but Ginger Water also brings a plethora of health benefits:

Lowers Cholesterol: Keeps cholesterol in check, reducing the risks associated with high levels.

Regulates Blood Pressure: It helps in maintaining healthy blood pressure levels, reducing the risk of clot formation.

Combats Inflammation: Known for its medicinal properties, it can stave off conditions like arthritis.

Antioxidant Rich: Ginger water combats the adverse effects of free radicals.

Anti-Cancer: Its profound medicinal properties provide a shield against various cancers.

How to Prepare Ginger Water

Ingredients:

Thin slices of ginger root

1.5 liters of water

Optional: A splash of lemon juice

Method:

Bring the water to a boil and introduce the ginger slices. Allow it to simmer for 10-15 minutes. After it cools slightly, strain and, if desired, add some lemon juice. For best results, drink a glass in the morning before breakfast and another before dinner.

The Magic of Ginger

Ginger is rich in manganese and gingerol – both crucial for metabolic activities. It’s also known to keep cholesterol levels in check, further safeguarding the cardiovascular system.

Digestion & Nutrient Absorption

Ginger’s magic doesn’t end with metabolism. It aids in nutrient absorption by stimulating enzyme secretion. This miraculous root, with its rich antibiotic attributes, has been Asia’s secret weapon against infections for centuries.

A study by the University of Maryland’s Department of Medicines confirms the efficacy of ginger tea in fighting infectious diseases and cold symptoms.

Digestive Health

Ginger addresses digestive discomforts, from bloating and constipation to promoting efficient digestion.

Boosts Immunity

Daily consumption of ginger fortifies the immune system, making it robust against infections and diseases. It’s also a natural remedy for joint pain and inflammation.

GARLIC BUTTER JUICY PORK CHOPS

0

Garlic Butter Baked Pork Chops are juicy, tender, and super-flavourful thanks to the amazing butter sauce. You need less than 20 minutes to make this pork chop recipe. If you like healthy pork chop recipes, this pork chop recipe is for you.

Ingredients

2 medium-sized pork chops, heritage breed

2 tbsp of grass-fed butter, melted

4 cloves of minced garlic

3 sprigs of thyme

tbsp of olive oil

salt and pepper to your liking.

Preparation

Prepare the oven. Preheat it to 380 degrees.
Sprinkle the pork chops well with salt and pepper to your liking.
Melt 5 small spoonfuls of butter in a microwave or store to make the butter sauce. Feel free to add more if desired.

Add the thyme and chopped garlic to the melted butter. Stir well and keep this aside to rest.
Heat the olive oil in a cast-iron skillet over medium heat. Add the pork chops to the hot oil and sear for about 4 minutes on each side until golden brown.

Pour the garlic butter mixture over the pork chops and transfer the skillet to the oven. Bake the pork chops until the internal temperature reached about 145 to 150 degrees.
Remove the pan from the oven when the pork chops are done. Spoon over the butter sauce left in the pan.
Serve right away.

Enjoy!

Brown Sugar and Bacon Baked Beans

0

I love those recipes that we all grew up with, they are just too good to miss out on.Baked beans are such classic summer cookout/bbq food… and really easy to make yourself! Don’t reach for a can of pre-seasoned and full of preservatives beans… whip up these easy and lip-smackingly delicious brown sugar and bacon baked beans instead! Your mouth will thank you.

Brown sugar and bacon baked beans is a classic summer meal, with different varieties to suit your taste.

Baked beans are such a classic dish, and there are so many different types! Your beans might be more savory, sweet, or smoky, depending on your preferences and where you live.

This is a tried and true recipe !! if you want to satisfy your sweet tooth, you cannot go wrong here. This is the way my Mother always made, just give a shot it won’t fail you !

Ingredients

°6 slices of bacon
°2 cans (16 ounces) baked beans
°1 onion, diced
°¼ cup yellow mustard
°¾ cup ketchup
°1 cup packed brown sugar
°1 Granny Smith apple – peeled, cored and diced

Instructions

Preheat oven 350 degrees F (175 degrees C). Cook the bacon in a large skillet or in the microwave until most of the fat is released, but the bacon is still flexible. Drain on paper towels and set aside.
In a 9-inch square baking dish, combine the baked beans, onion, mustard, ketchup, brown sugar and apple. Garnish with slices of bacon.
Bake uncovered for 45 minutes in the preheated oven, until the bacon is crispy and the beans are bubbly.

Enjoy !Instructions

Preheat oven 350 degrees F (175 degrees C). Cook the bacon in a large skillet or in the microwave until most of the fat is released, but the bacon is still flexible. Drain on paper towels and set aside.
In a 9-inch square baking dish, combine the baked beans, onion, mustard, ketchup, brown sugar and apple. Garnish with slices of bacon.
Bake uncovered for 45 minutes in the preheated oven, until the bacon is crispy and the beans are bubbly.

Enjoy !

Banana pudding cheesecake squares

0

These Banana Pudding Cheesecake Bars are irresistible!! A banana blondie crust gets topped with creamy banana pudding cheesecake creating one of the most delicious cheesecake recipes ever!!

Banana pudding is one of the most important recipes in family holiday traditions. We are very careful with the ingredients and the process, using only Nilla flakes and pure vanilla extract, and always making our cream from scratch.

Ingredients:

To prepare blondie crust:

1/2 cup melted unsalted butter

A cup packed light brown sugar

1 large egg yolk

1/2 cup all-purpose flour

a pinch of salt

1/4 c mash ripe banana

1 tsp pure vanilla extract

To prepare the cheesecake sauce:

2/3 cup whipped cream

16 oz cream cheese 2 pcs

1 cup granulated sugar

3.4 ounce instant banana pudding 1 package

1/2 cup of milk

1 teaspoon vanilla

Instructions

Preheat the oven to 350 degrees and prepare an 8×8 baking tray with the nonstick coating of your choice.
In bowl, beating butter also sugar together to mixed. Next, whisk together the egg yolks, flour, salt, banana, and vanilla until well blended.

Add the blonde mixture to the pan and bake for 15-20 minutes, until set.

Let it cool down to room temperature and prepare the filling.
To prepare the cheesecake sauce:
Using a hand mixer, whip the heavy cream in a medium bowl until stiff peaks form and refrigerate to stiffen.
In another bowl, beat the cream cheese until smooth and fluffy, using a hand mixer.
Slowly add sugar, banana pudding, milk, and vanilla extract. Beat until well incorporated.

Gently fold whipped cream into cream cheese mixture.
Taste and add a little powdered sugar if you like it sweeter.
Spread the cheesecake layer evenly over the blondie crust and refrigerate for at least 2 hours or until completely set.
Garnish with nila chips and serve.

Enjoy!

Lunch Lady Brownies

0

A delightful throwback to school days.

Certain classic cafeteria dishes have a knack for winning hearts, and these luscious brownies, reminiscent of lunch ladies’ special treats, undoubtedly top the list. The very first bite takes you down memory lane, rekindling those sweet school day moments.

The brownies possess a softness that’s unparalleled, and the frosting simply dissolves the moment it hits your palate. Oh, how we’ve longed for these school-time delights!

Lunch Lady Brownies

Ingredients:

For the Brownies:

1/2 cup butter, melted

1 cup granulated sugar

2 eggs

3 teaspoons vanilla extract

1/4 cup unsweetened cocoa powder

1 cup all-purpose flour

For the Frosting:

2 tablespoons butter, softened

3 tablespoons milk

2 tablespoons unsweetened cocoa powder

1 1/2 cups powdered sugar

Steps:

Preheat the oven to 350˚F. Arrange a 9”x9” baking pan with foil, extending it over the edges for easy removal later.

For the batter: In a bowl, blend the sugar and melted butter until it’s light and fluffy. Introduce eggs and vanilla, mixing until seamlessly combined.

Gradually fold in flour and cocoa powder, ensuring a consistent color. Pour this batter into your baking dish and let it bake for about 20-25 minutes. It’s done when a knife reveals few moist crumbs upon insertion. Ensure you don’t overbake for that perfect texture.

As the brownies cool, whip up the frosting. Combine butter, milk, cocoa powder, and powdered sugar in a bowl. Adjust texture with milk or powdered sugar, if needed.

Apply the frosting on slightly warm brownies, allowing it to meld seamlessly. Once set, slice, and employ the foil to lift them out effortlessly.

Indulge in a blast from the past with each bite! 🍫🏫