Home Blog Page 5

Salted Caramel Banana Bread

0

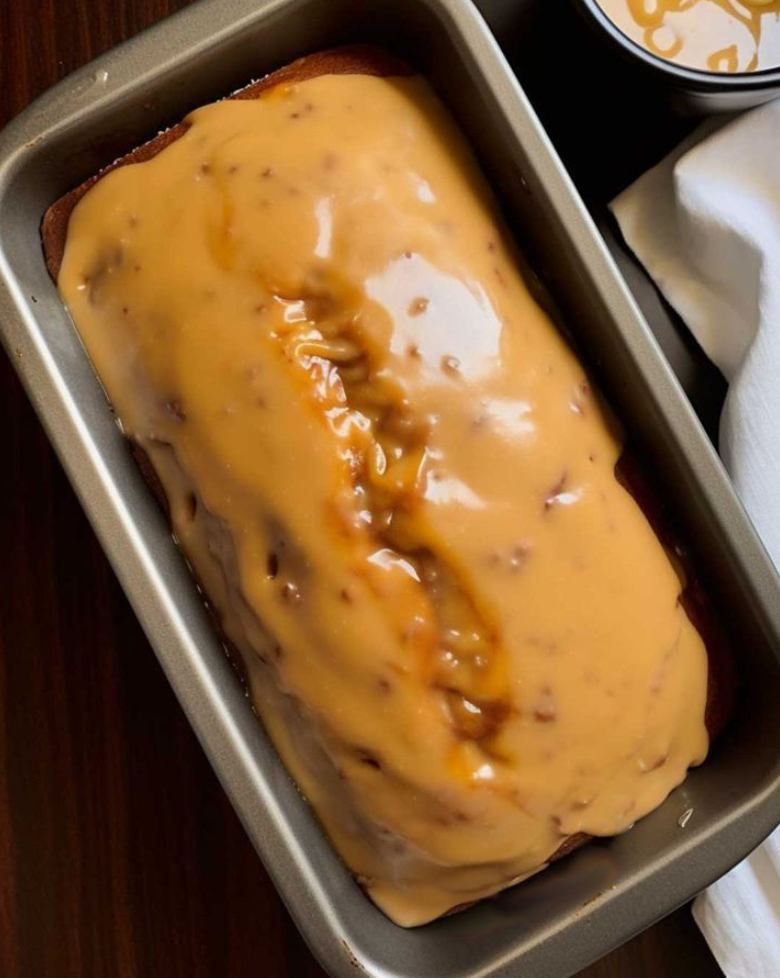
ndulge within the sweet and salty goodness of Salted Caramel Banana Bread! This luscious treat combines the abundance of ready bananas, the gooeyness of caramel, and a touch of salt to form a heavenly combination that will have you coming back for more. The beginnings of this dish can be followed back to the classic banana bread, which has been a cherished staple in kitchens around the world. The expansion of salted caramel takes it to a entire modern level, making a idealize adjust of flavors.

INGREDIENTS

  • 2 mugs flour
  • 1 glass squashed bananas
  • 2 eggs
  • 1/2 container unsalted butter, softened
  • 3/4 container granulated sugar
  • 4 tbsp milk
  • 1 tsp vanilla extract
  • 2 tsp preparing powder
  • 1 tsp heating soda
    For the salted caramel sauce:
  • 1 glass light brown sugar
  • 1/2 glass overwhelming cream
  • 1/4 glass salted butter
  • 1/2 tsp salt

INSTRUCTIONS

1. Preheat broiler to 350°F (175°C). Oil a 9×5-inch daydream pan.
2. In a huge bowl, cream 1/2 container mellowed unsalted butter with 3/4 container granulated sugar.Include 2 eggs, 4 tbsp drain, and 1 tsp vanilla extract.
3. In a partitioned bowl, whisk 2 glasses all-purpose flour, 2 tsp heating powder, and 1 tsp heating pop. Slowly include to damp blend, at that point overlay in 1 container pounded bananas.
4.Pour banana bread hitter into the arranged daydream skillet. Prepare for 60 minutes, until a toothpick comes out clean. Cool on a wire rack.
5. For the salted caramel sauce, soften 1/4 glass salted butter in a pot.Mix in 1 glass pressed light brown sugar. Include 1/2 glass overwhelming cream and 1/2 tsp salt. Bring blend to a bubble and after that stew for 5 mins. Evacuate from warm to cool.
6.Sprinkle caramel sauce over bread serving.
Enjoy your Banana Bread with Salted Caramel Sauce!

My nana made these every Thanksgiving and again at Christmas! They always made the house smell amazing and were a breeze to make!

0

Delight in Easy Cranberry Crescent Rolls: A Sweet & Tangy Indulgence

Welcome to the world of Easy Cranberry Crescent Rolls, where the perfect balance of sweet and tangy comes alive in every bite! These crescent rolls, brimming with luscious cranberry sauce, are an absolute treat for any time of day. Cranberries, a star of the holiday season, bring a vibrant and festive flair to your table, be it Thanksgiving, Christmas, or any celebratory gathering.

Versatility is the charm of these Easy Cranberry Crescent Rolls. Imagine enjoying them warm as a solo delight, paired with your favorite coffee or tea on a tranquil morning. Or, introduce them to your brunch menu, where they can shine alongside scrambled eggs, crisp bacon, or a bowl of fresh fruit. For a dessert twist, a drizzle of sweet icing and a scoop of vanilla ice cream can elevate these rolls to a whole new level of deliciousness.

Recipe: Easy Cranberry Crescent Rolls

Ingredients:

1 can refrigerated crescent roll dough (8 count)

Cranberry sauce, canned or homemade

Optional: Powdered sugar for a delightful dusting

Instructions:

Oven Prep: Begin by preheating your oven as per the crescent roll package’s instructions.

Roll Preparation: Unroll the crescent dough and separate it into individual triangles.

Roll and Shape: Gently roll up the crescent rolls, tucking the cranberry sauce inside to create the classic crescent shape.

Bake to Perfection: Bake the rolls as directed on the crescent roll package.

The Final Touch: Once baked, let them cool slightly and dust with powdered sugar for an extra touch of sweetness.

These cranberry crescent rolls are more than just a treat; they’re a fusion of traditional flavors and modern convenience. Ideal for breakfast, brunch, or dessert, they’re set to become a beloved staple in your culinary repertoire. So why wait? Gather your ingredients and start baking these Easy Cranberry Crescent Rolls today!

Got $2 bills? They may be worth more than you think

0

Do you have a $2 bill stashed somewhere in your belongings? If so, you might be harboring a potential treasure. While $2 bills are less frequently seen in everyday transactions, they have an intriguing history and could be valuable to collectors.

Delving into the $2 Bill’s Past

For more like this, follow Tips for the Home.

Ever wondered about the origins of the $2 bill? Introduced in 1862 during the Civil War era, it was a strategic move to reduce reliance on coins. The bill initially showcased Alexander Hamilton, the inaugural Secretary of the Treasury. As years rolled by, the design witnessed transformations, featuring various significant figures and landmarks.

Historical Worth of the $2 Bill

The appeal and worth of the $2 bill have seen ups and downs. In the early 1900s, these bills were undervalued due to decreased demand. However, collector interest surged in the 1920s and 1930s, amplifying their value. By the mid-20th century, they reverted to being valued less than their nominal worth.

Assessing the Present-Day Value

In today’s market, the valuation of a $2 bill is influenced by factors like its age, quality, and rarity. Certain versions, hailing from specific years or having unique serial numbers, can command impressive prices. For instance, a 1953 series $2 bill with a red seal and a star on its serial number might fetch up to $500.

If you’re in possession of $2 bills, it’s pivotal to ascertain their worth. Engage in online research or consult an expert for an appraisal. If your bills are rare or well-preserved, consider retaining them or offering them to enthusiasts. If they’re common or worn out, their worth might just be their face value.

Final Thoughts

The $2 bill, with its rich backstory, could be a cherished item for collectors. If you stumble upon one, don’t hastily dismiss its value. Research, evaluate, and then determine its fate. You never know, your inconspicuous $2 bill could just be your ticket to a jackpot!

This dish is a massive hit with my old man! He goes back for seconds regularly and keeps reminding me to put it on the menu again soon

0

If you’re in the mood for a dish that’s both satisfying and soul-warming, our Cheesy Asparagus Casserole is the perfect choice. This delightful recipe combines a rich blend of flavors and comforting textures, guaranteed to become a treasured addition to your culinary collection.

I remember the first time I made this Cheesy Asparagus Casserole for a family event. It was an instant hit! The joy and satisfaction on everyone’s faces as they savored each bite was a heartwarming sight. The dish was quickly devoured, and many asked for the recipe. This experience reinforced the idea that great food has the power to unite people, sparking conversation, laughter, and lasting memories.

Cheesy Asparagus Casserole Recipe

Ingredients:

2 bundles of asparagus

1/3 cup grated Parmesan cheese

1/8 cup shredded Pepper Jack cheese

1 tbsp butter

1/2 cup heavy cream

1/2 oz soft cream cheese

1 tbsp chicken broth

1/4 tsp each of paprika and Italian seasoning

1/2 tsp garlic powder

Salt and pepper to taste

1/2 tsp red pepper flakes (optional)

1/3 cup cooked and crumbled bacon (store-bought or homemade)

Instructions:

Preheat your oven to 375°F (190°C).

In a saucepan, melt butter and mix in soft cream cheese, heavy cream, and chicken broth. Let it simmer for 2 minutes.

Blend in Parmesan and Pepper Jack cheese until smooth. Add paprika, Italian seasoning, garlic powder, salt, and pepper. Include red pepper flakes if desired.

Arrange asparagus in a baking dish and cover with the cheese sauce.

Top with crumbled bacon.

Bake for 20-25 minutes until the casserole is bubbly and thoroughly heated.

Ready to serve and enjoy!

This Cheesy Asparagus Casserole is more than just a dish; it’s a culinary experience that brings people together. It’s a celebration of cheesy delight and the natural taste of asparagus, destined to become a household favorite. So, keep this recipe close, invite your loved ones, and create unforgettable moments around this exquisite casserole.

Cherry Layer Cake with Cherry Cream Cheese Frosting

0

I love those recipes that we all grew up with, they are just too good to miss out on.
For those of you who want to ignore this recipe because cherries are not a fruit you like, please hold tight! You do not have to love cherries to really like this recipe. This is a super moist layer cake, filled with cherry pieces and topped with cream cheese frosting. It also comes out to be a gorgeous color!

This cake is the perfect dessert for any type of celebration, even for no reason at all. Growing up, we always got to pick out what type of cake we wanted for our birthdays.To Make this Recipe You’ Will Need the following ingredients:

Ingredients:

+For cake:
°3 c sifted cake flour
°2½ t baking powder
°1 t salt
°1 cup unsalted butter, room temperature
°Half a cup of vegetable ghee
°1½ cups sugar
°Half a c of maraschino cherry juice
°Half a c of whole milk
°Half a t of almond extract
°16 cherries, cut to eighths
°5 egg whites
+To make Frost:
°8 oz (1 piece) cream cheese
°½ c (1½ pieces) unsalted butter
°Half a cup of maraschino cherry juice
°6 cups confectioners’ sugar

Directions

For cake:
Preheat oven to 350°F, generously and flour two cake pans with a 9-inch round cake (line the bottoms with parchment, if desired) and set aside.
Sift flour, baking powder, also salt together in a bowl; Sit aside.
Cream butter, shortening & sugar in bowl for five min, until fluffy.
Measure the milk, almond extract, and cherry juice into one liquid measuring cup together. BegiStartnning and end with the dry ingredients, add the wet and the dry to the cream mix. Beat well after every addition. Fold the cherry.
Beat egg whites in a separate bowl. Adding half of the egg white to mixture to lighten it. Fold in rest egg whites until well mixed.
Divide mix between pans also bake for 30 to 35 min,
Cool cakes in pans on wire racks for 10 minutes.
To make frosting:
Beat butter, cream cheese and half the confectioners’ sugar. Add cherry juice.

Enjoy !

CRACK GREEN BEANS

0

These crack green beans have the power to turn a green bean hater into a raving green bean fan! Smothered in a delicious sweet and savory glaze, then topped with lots of bacon, this green bean recipe will be a favorite at your house! The best part? It can be made on the stovetop, in the oven, OR in your crock pot!

As an Amazon Associate, I earn from qualifying purchases. This post may contain affiliate links which means I may earn a small commission when you click on the links and make a purchase.
Green beans are such a “vanilla” veggie, as my kids would say (AKA: BORING). However, throw in some bacon, a little butter, sugar, and some savory flavors and you have yourself one addicting green beans recipe!

You can serve this simple dish up any day of the week, but it works particularly well on your holiday table alongside turkey, cranberry sauce, and other amazing side dishes like this old-fashioned pea salad!

Ingredients

5 (8-ounce) cans of green beans, drained
12 slices bacon, chopped, cooked to crisp and drained
2/3 cup brown sugar
1/4 cup butter, melted
7 teaspoons soy sauce
1 1/2 teaspoons garlic powder

How To Make Crack Green Beans

Put the drained beans in a 9×13-inch pan. Add the cooked bacon pieces.
Mix the brown sugar, butter, soy sauce, and garlic powder. Pour over the beans and bake 40 minutes at 350°F.
Toss to coat and mix every things, serve.

The Famous KFC Coleslaw Recipe

0

You’ll Need:

1 tbsp of finely grated onion.
⅓ cup of sugar.
½ cup of mayonnaise.
¼ cup of well shaken buttermilk.
¼ cup of whole milk.
1 ½ tbsps of white vinegar.
2 ½ tbsps of fresh lemon juice.
½ tsp of salt.
⅛ tsp of black pepper.
8 cups of finely diced cabbage.
¼ cup of shredded carrot.

How to:

Mix together all of the ingredients in a large bowl except for the carrot and cabbage.

Once the mixture is smooth and well combined, mix in the cabbage and carrot and stir to coat.

Refrigerate covered for 4 hours at least.
Stir before serving and Voila!

Easy, peasy and creamy! I once served this salad with fried chicken and rice, it felt like we were in KFC! Give this a shot, you will surprised!

So amazing! This was a staple at our Thanksgiving dinner but we also ate it all year round! That good!

0

Ingredients:

3 lbs russet potatoes, thinly sliced

3 cups heavy whipping cream

Salt and pepper to taste

2 minced garlic cloves (optional)

1 tsp minced fresh thyme (optional)

Instructions:

Preheat oven to 350°F (175°C).

In a large bowl, mix heavy cream with salt, pepper, garlic, and thyme (if using) for an even coating.

Grease a 9×13 casserole dish. Evenly layer the potatoes in the dish, then pour the cream mixture over.

Bake uncovered for about 45 minutes, until the potatoes are tender and the top is golden brown.

Let it cool slightly before serving.

Perfect for family gatherings or a comforting weeknight dinner, this easy scalloped potatoes recipe is sure to be a hit. Its creamy layers and crispy top create a delightful blend of flavors and textures. Try this recipe and enjoy the heartwarming goodness of scalloped potatoes!

4 tips for your red anthurium to easily fill with flowers

0

Easily Bloom Your Red Anthurium with These Tips! Do you own a red anthurium that hasn’t bloomed yet? You’re not alone. Despite its stunning red flowers making it a popular houseplant, often it’s not given the right care to encourage blooming. Here are four essential tips to help your red anthurium, or Anthurium andreanum, burst into vibrant flowers.

Perfect Home Decor with Red Anthurium

The red anthurium is an indoor plant, perfect for home decoration with its striking, durable, and unique flowers, plus its heart-shaped leaves add an elegant touch.

Encouraging Your Red Anthurium to Bloom

Originating from the tropical regions of Central and South America, these plants thrive in warm, humid conditions. Avoid direct sunlight, which can harm the leaves. Place it near a north-facing window for filtered light.

Regular Watering is Crucial

Red anthuriums love humidity but despise waterlogging. Regular watering is key, ensuring the soil’s top layer isn’t overly moist.

Creating the Right Humidity

Achieving the right humidity is vital. Instead of relying on humidifiers or pebble trays, mist the leaves occasionally to maintain leaf moisture.

Opt for Liquid Fertilizer

During the growing season (spring to autumn), use a balanced, medium-strength liquid fertilizer every two weeks to promote health and flower growth.

Winter Care for Red Anthuriums

In winter, reduce fertilizer application as the plant enters a dormant phase.

Periodic Pruning

Regularly inspect your plant for dry or yellowish leaves and prune them to encourage flowering. Repot annually or biennially into a larger pot with well-draining substrate to avoid root binding.

Maintain Ideal Temperature

Keep your red anthurium in a temperature range of 15-24°C. Avoid cold drafts and extreme temperatures to prevent shock and ensure optimal flower growth.

Follow these tips to transform your red anthurium into a blooming beauty, enhancing your home with its elegant, vibrant flowers.

Why You Should Always Sleep With Your Bedroom Door Closed

0

While the tranquil nights where you snooze with your bedroom door ajar may symbolize comfort, especially with furry companions wandering at will or keeping an ear out for family members, it’s crucial to reconsider this habit from a safety perspective.

The act of simply shutting your bedroom door while you sleep, seemingly inconsequential, has profound implications, particularly concerning fire safety.

🚪 The Life-Saving Impact of a Closed Door

A closed bedroom door can be your shield, granting you crucial additional minutes to escape in the precarious event of a fire. A concerning fact arises: the common use of synthetic materials in modern homes dramatically reduces your escape time in a fire from what used to be approximately 17 minutes to a mere three.

A stark demonstration by the UL Firefighter Safety Institute visually highlighted the significant difference in fire damage between a bedroom with the door left open and one with the door firmly shut. The former was entirely engulfed, while the latter significantly impeded the fire’s ruthless progression.

🔥 “Close Before You Doze” – A Nationwide Wake-Up Call

Arising from such compelling demonstrations, the “close before you doze” campaign is not just a catchphrase; it’s a life-saving mantra. Keeping your bedroom door closed can serve as a temporary barrier against the inferno, mitigating smoke damage and reducing inhalation risks while you navigate your escape.

🚨 Essential Safety Reminders for Every Household

But closing the door is merely one facet of a spectrum of safety measures:

Ensure the installation of smoke alarms across all home levels and adherence to the current safety codes.

Rigorously maintain and check carbon monoxide detectors.

Devise a comprehensive escape plan, delineating clear escape roles and routes for every household member.

While contemplating the prospect of a house fire is indeed unsettling, embracing appropriate precautions can significantly mitigate potential catastrophes. In your pursuit of safety, adopting the simple act of closing your bedroom door could be a decision that saves lives.

As we gently traverse through our nightly dreams, let’s ensure the safety of ourselves and our loved ones by adopting this protective measure. Wishing you safe and serene slumbers, everyone!

Note: It’s essential to verify and adhere to the most recent safety guidelines and practices as outlined by local and international safety authorities.