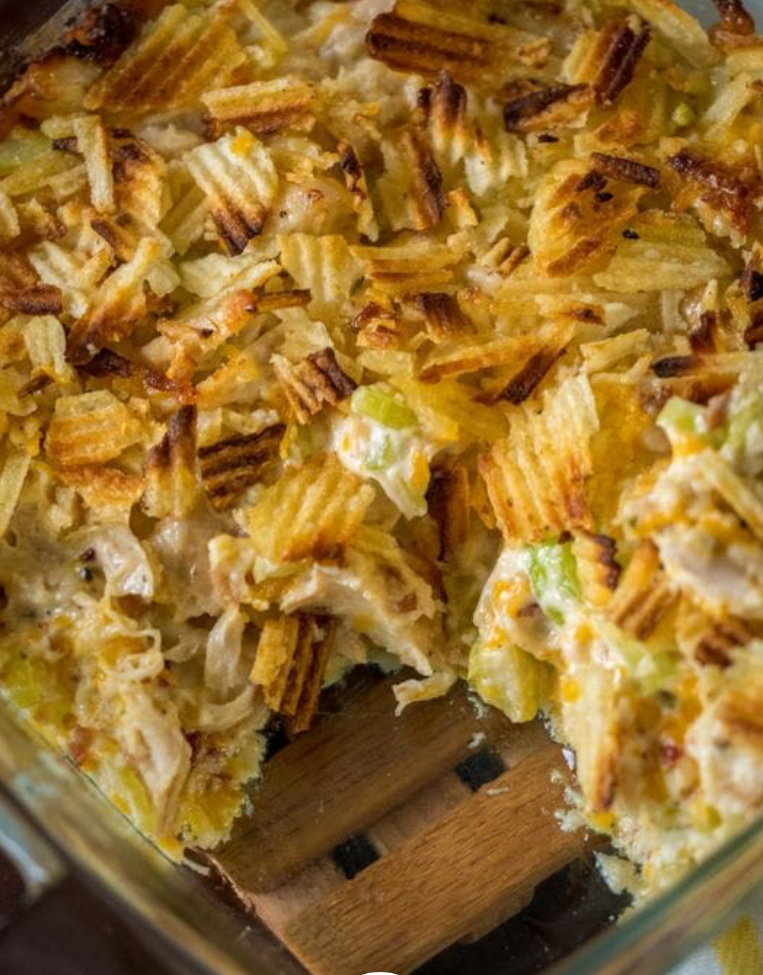
Crispy Hot Chicken Salad Casserole is a classic side dish that you can find at just about any picnic, backyard barbecue, or game day get-together, but you don’t generally find too many variations on the classic version. Now, we love chicken salad just as much as the next person, but we decided it needed to have some new life breathed into it – which we did by turning it into a casserole!
INGREDIENTS
3 cups cooked chicken, shredded or chopped
1 cup sharp cheddar cheese, grated
1 cup potato chips, slightly crushed
1 1/4 cups mayonnaise
1 cup celery, finely chopped
1/4 cup bacon, cooked and crumbled
1 tablespoon dry ranch mix
1/2 tablespoon lemon juice
1 teaspoon Worcestershire sauce
1/2 teaspoon onion powder
kosher salt and freshly ground pepper, to taste
How To Make Crispy Chicken Salad Casserole
Preheat oven to 350º F and lightly grease a square baking dish with butter or non-stick spray.
Place chicken, cheese, celery and bacon in a large bowl.
In a smaller bowl, whisk together mayonnaise, ranch mix, lemon juice, Worcestershire sauce and onion powder, and season with salt and pepper.
Stir mayonnaise mixture into chicken until everything is evenly coated, then transfer everything to greased baking dish.
Top baking dish with crushed potato chips, then place in oven and bake for 25-30 minutes, or until mixture is hot and bubbly and cheese is melted.
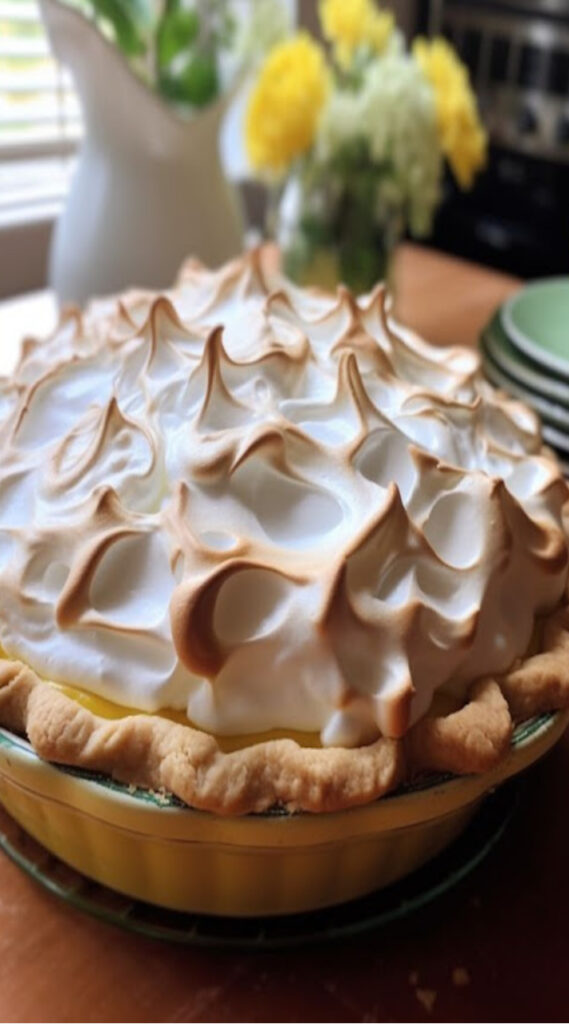
My grandma’s lemon meringue pie isn’t merely a dessert; it’s an epitome of warmth, family, and cherished memories. As a child, family gatherings always featured the beloved pie, its zesty lemon filling, and delicate meringue forming a symphony of flavors that danced on our palates. Observing grandma, as she crafted each layer with sheer precision, while the tantalizing aroma of fresh lemons wafted through the air, is a memory that’s imprinted in my mind.
This recipe is not just a portal to bygone moments of childhood, but a symbol of unity, creating exquisite, memorable instances with every bite. If your heart seeks a dessert that masterfully marries indulgence with freshness, Grandma’s Lemon Meringue Pie stands as an eternal classic, captivating your senses and enveloping your soul with its timeless charm.
Grandma’s Lemon Meringue Pie: A Recipe Close to the Heart
Ingredients:
1 pre-baked pie crust
1 ½ cups granulated sugar
⅓ cup cornstarch
¼ teaspoon salt
1 ½ cups water
⅔ cup fresh lemon juice
2 tablespoons unsalted butter
4 large egg yolks, lightly whisked
1 tablespoon lemon zest, grated
4 large egg whites
¼ teaspoon cream of tartar
½ cup granulated sugar
Instructions:
Preheat the oven to 350°F (175°C).
In a medium saucepan, combine sugar, cornstarch, and salt, gradually introducing water and lemon juice while whisking to a smooth consistency. Incorporate butter and position the saucepan on medium heat. Constantly stir until the concoction thickens and achieves a boil. Allow boiling for 1 minute, then withdraw from heat.
In a separate bowl, blend the beaten egg yolks and slowly introduce about 1 cup of the hot lemon concoction, whisking continuously until well amalgamated. Transfer the egg yolk mix back into the saucepan, mixing consistently with the remaining lemon mixture. Reintroduce to heat, achieving a gentle boil, and perpetually stir for an additional 2 minutes.
Withdraw from heat, mix in the grated lemon zest, and pour the luscious lemon filling into the pre-baked pie crust, setting it aside.
In another bowl, whisk egg whites and cream of tartar on a medium setting until soft peaks emerge. Gradually introduce sugar, amplifying to high speed, and continue to beat until stiff peaks take shape. Delicately spoon the meringue atop the hot lemon filling, ensuring it reaches the edges to perfectly seal the pie.
Bake for 12-15 minutes until the meringue gloriously golden. Allow it to cool thoroughly on a wire rack before delighting in each slice.
Slice and immerse yourself in each delectable bite of Grandma’s Lemon Meringue Pie, reveling in the dreamy lemon filling and pillowy meringue that render this dessert genuinely phenomenal.
The essence of this recipe transcends the mere concept of dessert – it’s a heartfelt link to yesteryears and a vibrant opportunity to craft fresh, treasured memories. Be it a festive occasion, a convivial family gathering, or a simple moment of self-indulgence, Grandma’s Lemon Meringue Pie persistently stands as a sweet reminder of the love and joy meticulously baked into this exceptionally stunning dish. One bite, and you’ll comprehend why this recipe beckons to be preserved and revisited, time and time again.
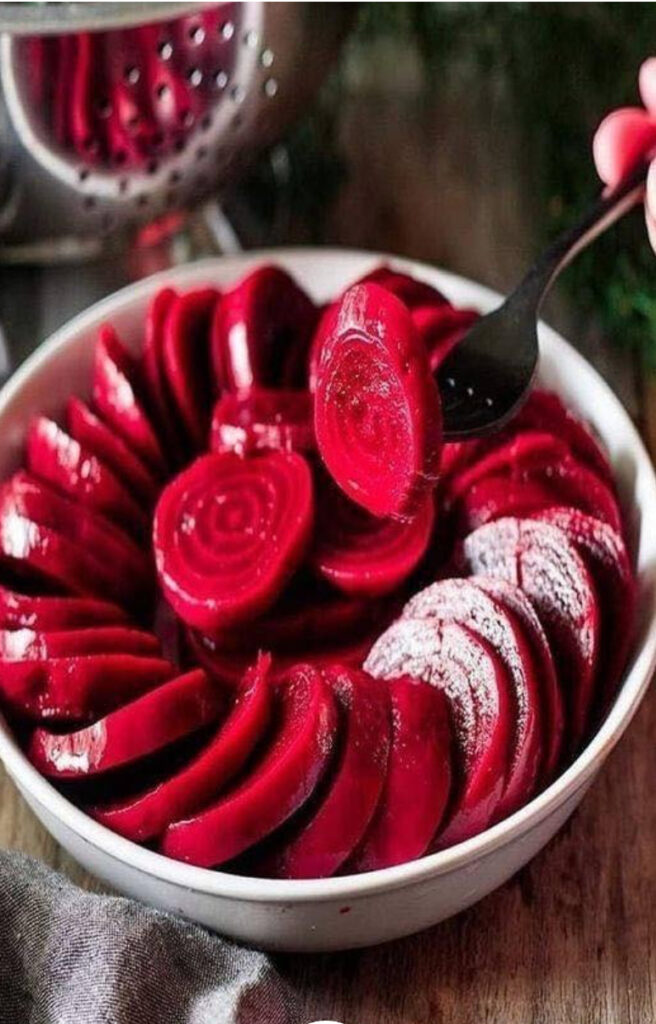
In today’s fast-paced world, maintaining a healthy lifestyle is more crucial than ever. Our bodies can accumulate toxins over time, and one effective way to detoxify and support weight loss is through a natural colon cleanse. A beetroot and lemon juice cleanse is a delicious and nutritious option that not only flushes out colon waste but can also aid in shedding those extra pounds.
The Power of Beetroot and Lemon:
Beetroot: Often hailed as a superfood, beetroot is rich in essential nutrients, including fiber, vitamins (like vitamin C and B-complex), minerals, and antioxidants. The fiber content in beetroot supports digestive health and helps in moving waste through the colon efficiently.
Lemon: Lemons are packed with vitamin C, which boosts the immune system and aids digestion. They also have a mild diuretic effect, promoting the removal of toxins from the body. The citric acid in lemons supports the production of digestive enzymes, further enhancing digestion.
Preparing Your Beetroot and Lemon Cleanse:
Ingredients:
2 medium-sized beetroots
1 lemon
Water
Method:
Wash and Peel the Beetroots: Start by washing and peeling the beetroots to remove any dirt or debris. Cut them into small, manageable pieces.
Prepare the Lemon: Roll the lemon on a hard surface, applying slight pressure. This will make it easier to extract the juice. Cut the lemon in half and remove the seeds.
Blend It All: Place the beetroot pieces and lemon halves (without seeds) in a blender. Add a cup of water to facilitate blending.
Blend Until Smooth: Blend the ingredients until you achieve a smooth, vibrant-colored juice. If the consistency is too thick, you can add more water.
Strain (Optional): If you prefer a clearer juice, strain the mixture through a fine sieve or cheesecloth.
How to Incorporate the Cleanse:
Timing: It’s generally recommended to consume this cleanse in the morning on an empty stomach or at least 30 minutes before a meal.
Frequency: You can enjoy this cleanse 2-3 times a week or as desired. It’s essential to listen to your body and not overdo it.
Benefits of the Beetroot and Lemon Cleanse:
Colon Cleansing: Both beetroot and lemon have natural cleansing properties that help flush toxins and waste from the colon, promoting digestive health.
Weight Loss Aid: The fiber in beetroot promotes a feeling of fullness, reducing overall calorie intake. Lemon’s diuretic effect can help shed excess water weight.
Nutrient Boost: This cleanse is rich in vitamins and antioxidants, providing essential nutrients for overall health.
Improved Digestion: The combination of these ingredients supports better digestion by stimulating the production of digestive enzymes.
Enhanced Immunity: The vitamin C content in lemon strengthens the immune system, helping your body fight off illnesses.
Important Considerations:
Allergies: Be mindful of any allergies you may have to beetroot or lemon.
Stomach Sensitivity: Some individuals may experience stomach discomfort if they consume beetroot juice on an empty stomach. If this happens, try diluting the juice with more water.
Hydration: Ensure you stay adequately hydrated throughout the day, as both beetroot and lemon can have mild diuretic effects.
In Conclusion:
The beetroot and lemon juice cleanse is a delightful and refreshing way to support your colon health and aid in weight loss. It’s important to remember that while this cleanse can be a valuable addition to your routine, it should complement a balanced diet and overall healthy lifestyle. As always, it’s advisable to consult with a healthcare professional, especially if you have underlying health conditions or concerns. Enjoy this vibrant juice and embark on your journey towards a healthier you!
Moonshine, with its roots in homemade distilling traditions, has taken on various flavors and forms over the years. One of the more recent and delicious innovations is Orange Creamsicle Moonshine, combining the sweet, nostalgic taste of creamsicles with the kick of moonshine. Here’s how to make your own batch of this delightful concoction:
Ingredients:
1 1/2 cups of white sugar
4 cups of water
1 cup of orange juice concentrate (thawed)
2 teaspoons of vanilla extract
2 cups of 190-proof grain alcohol (or high-proof vodka)
1 cup of half-and-half (or heavy cream for a creamier version)
Equipment:
Large saucepan
Funnel
Large mixing bowl
Glass jars or bottles for storing
Instructions:
1. Simple Syrup:
a. In a large saucepan, combine the white sugar and water.
b. Bring the mixture to a boil over medium-high heat, stirring until the sugar completely dissolves.
c. Remove the saucepan from heat and let the simple syrup cool to room temperature.
2. Moonshine Base:
a. In a large mixing bowl, combine the cooled simple syrup, thawed orange juice concentrate, and vanilla extract. Mix thoroughly.
b. Slowly pour in the grain alcohol (or high-proof vodka), stirring continuously to combine.
3. Creamy Finish:
a. If you prefer a creamier texture, gently stir in the half-and-half (or heavy cream). This step gives your moonshine that classic creamsicle creaminess.
4. Bottling:
a. Use a funnel to pour the Orange Creamsicle Moonshine into glass jars or bottles for storage. Seal them tightly.
5. Aging:
a. Store your Orange Creamsicle Moonshine in a cool, dark place for at least a few days to allow the flavors to meld and mellow.
6. Serving:
a. Once it’s aged to your liking, serve your moonshine over ice or in small, chilled glasses.
Notes:
Be cautious when handling high-proof alcohol. Ensure proper ventilation while mixing.
Remember to consume moonshine responsibly and in moderation, as it can be very potent.
Feel free to adjust the sweetness and creaminess to your taste by adding more or less sugar, cream, or alcohol.
This Orange Creamsicle Moonshine recipe captures the essence of a beloved childhood treat with an adult twist. Whether you sip it straight or use it as a base for cocktails, it’s sure to be a hit at gatherings or as a homemade gift. Enjoy responsibly!
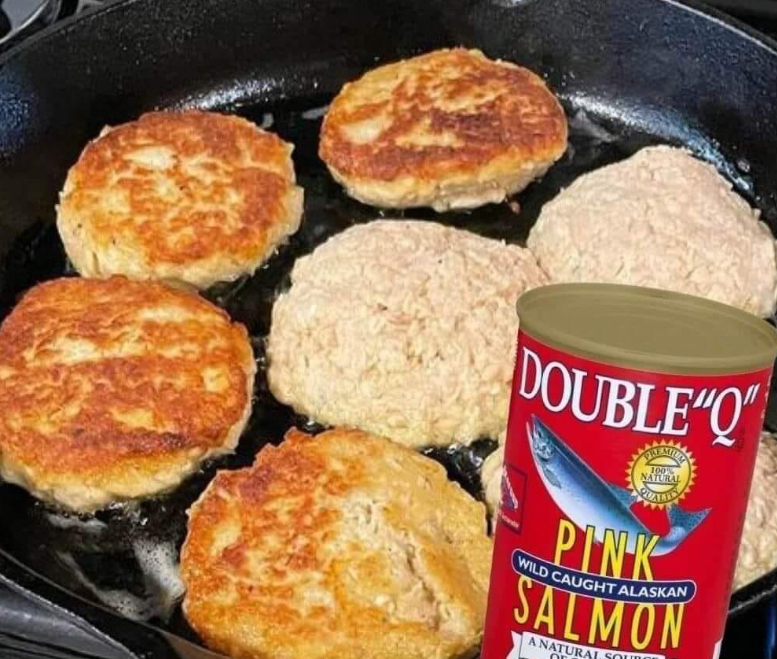
Southern Fried Salmon Patties are an easy recipe. My southern mom made these all the time. How about you? Do they bring back some memories? They are easy to make and the best I’ve ever tasted!!!
Ingredients
1 (14 3/4 ounce) canned salmon
1/4 cup onion, finely chopped
1/4 cup cornmeal
1/4 cup flour
1 egg
3 tablespoons mayonnaise
How To Make Southern Fried Salmon Patties
Open salmon and drain thoroughly. Place drained salmon in mixing bowl and flake evenly with a fork.Add onion, corn meal, flour, mayonnaise, and egg. Stir until well blended.Shape the mixture into patties about the size of an average burger or less.Cook in oil in skillet over medium heat until browned on each side. Turn once while frying.Note: The mayonnaise helps the patties hold their shape and keeps them from being too dry.
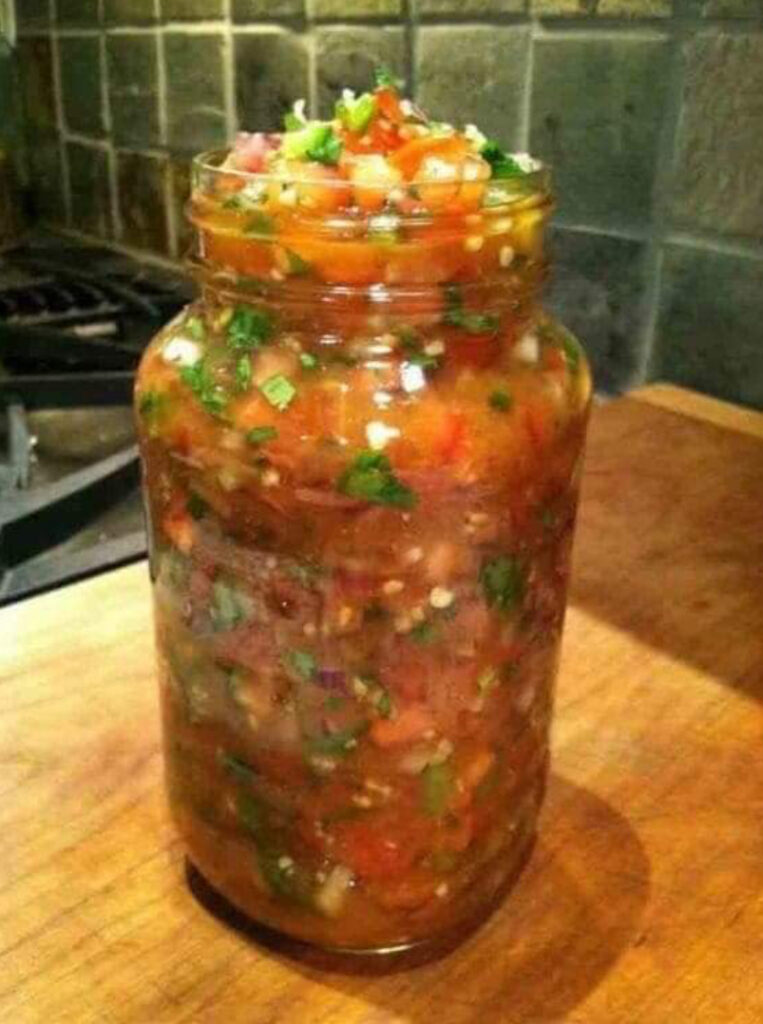
Do you love pico de gallo like I do? It’s a classic Mexican tomato dip (or sauce) that adds a fresh, healthy, low-calorie boost of flavor to just about any Mexican meal.
Pico de gallo makes a great party appetizer with tortilla chips or use as a topping for tacos. Huge hit in my house!
How to Make the Best Pico de Gallo
Here are my top tips to ensure that you make the best pico de gallo you’ve ever had.
1) Use ripe red tomatoes.
Ripe tomatoes are absolutely key to making great pico de gallo. Sad pink tomatoes do not make good pico de gallo. Roma tomatoes are a good choice since they are less watery, but use the most beautiful red, ripe tomato variety available. Core your tomatoes and remove the seeds before chopping. Use every last bit of the red tomato flesh inside!
In the winter, you can use cherry tomatoes, which tend to have good flavor year-round. Be prepared to chop them into small pieces, and perhaps give the finished product some extra time to marinate since cherry tomatoes tend to be more firm than most.
2) Chop your ingredients very finely.
Chop your tomato, onion, jalapeño and cilantro finely and you will be rewarded with more flavor in every bite. This is worth the extra effort!
3) Let the onion, jalapeno, lime and salt marinate while you chop the tomatoes and cilantro.
I learned this trick from this recipe. I’ve tested pico de gallo both ways (marinated onion/jalapeño vs. tossing all the ingredients together at once). The marinated onion/jalapeño batches were indeed my most flavorful batches.
Full disclosure: It’s possible that my tomatoes for those batches were better, so I’m not entirely convinced that the method made the difference. This “step” doesn’t take any extra time, though, so I recommend it.
4) Let your pico rest for 15 minutes before serving.
This step gives the flavors time to mingle and brings out their best. As the tomatoes and remaining ingredients rest, the salt draws the moisture out of the ingredients and condenses their flavor.
Try your pico de gallo before and after marinating, and you’ll see what I mean! If you won’t be serving the pico de gallo immediately, you can refrigerate it for several hours or even overnight.
5) Serve with a slotted spoon.
Tomatoes release a good amount of moisture, so you will see some tomato juice pool at the bottom of your bowl. The easiest solution here is to serve your pico de gallo with a slotted spoon or large serving fork.
This way, you don’t transfer a ton of moisture with your pico. Say no to soggy nachos!
Ingredients
1 cup finely chopped white onion (about 1 small onion)
1 medium jalapeño or serrano pepper, ribs and seeds removed, finely chopped (decrease or omit if sensitive to spice, or add another if you love heat)
¼ cup lime juice
¾ teaspoon fine sea salt, more to taste
1 ½ pounds ripe red tomatoes (about 8 small or 4 large), chopped
½ cup finely chopped fresh cilantro (about 1 bunch)
How To Make Pico De Gallo
In a medium serving bowl, combine the chopped onion, jalapeño, lime juice and salt. Let it marinate for about 5 minutes while you chop the tomatoes and cilantro.
Add the chopped tomatoes and cilantro to the bowl and stir to combine. Taste, and add more salt if the flavors don’t quite sing.
For the best flavor, let the mixture marinate for 15 minutes or several hours in the refrigerator. Serve as a dip, or with a slotted spoon or large serving fork to avoid transferring too much watery tomato juice with your pico. Pico de gallo keeps well in the refrigerator, covered, for up to 4 days.
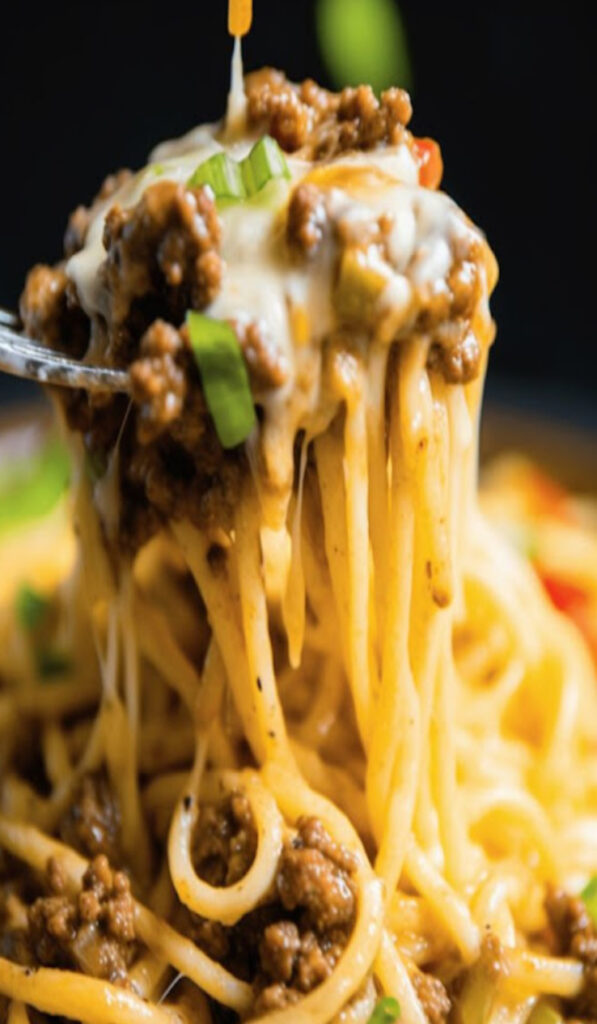
Venture beyond the conventional spaghetti and jazz up your dinner routine with the Taco Spaghetti Bake! A seamless blend of the robust flavors from Mexican tacos and the classic comfort of Italian spaghetti, this dish is bound to make its mark at your family meals.
The Genesis:
On a cold night, with the family seeking a fusion of warmth and zest, we happened upon this delightful creation. The first mouthful was a journey – the comforting familiarity of spaghetti entwined with the spicy charisma of taco ingredients. A unanimous decision was reached; Taco Spaghetti Bake was going to be a mainstay in our dinner repertoire. Each serving now is a reminder of that delightful culinary discovery.
Recipe for Taco Spaghetti Bake:
Ingredients:
1 lb lean ground beef
8 oz Velveeta cheese, cubed
1 oz taco seasoning packet
10 oz can of diced tomatoes and green chilies (keep the juice)
10.5 oz can of cream of chicken soup
1.5 cups shredded cheddar cheese
8 oz spaghetti pasta
2/3 cup water
Instructions:
Preheat your oven to 350ºF.
Boil spaghetti until it’s al dente, drain and put aside.
In a skillet, sauté the ground beef until browned. After draining the excess fat, bring the skillet back to the stove.
Stir in the taco seasoning, water, chicken soup, diced tomatoes with their juice, and Velveeta cubes. Keep stirring until the cheese melts into a harmonious mixture.
Now, blend in the spaghetti, ensuring it’s all well-coated.
Transfer the spiced spaghetti concoction into a baking dish, layering it with shredded cheddar.
Allow it to bake for around 25-30 minutes, or until you notice the cheese is molten and bubbly, and the sides have turned a beautiful golden hue.
Embellish with toppings of your choice.
Once out of the oven, let it stand for a while to cool, and then it’s time to dive into the Taco Spaghetti Bake!
Closing Note:
Every bite is a testament to the rich tapestry of flavors that this dish brings to the table. So, whether it’s a regular weeknight or a special occasion, this Taco Spaghetti Bake promises to be the star of the meal. Don’t put it off; let your kitchen radiate with the aroma of this fusion favorite tonight!
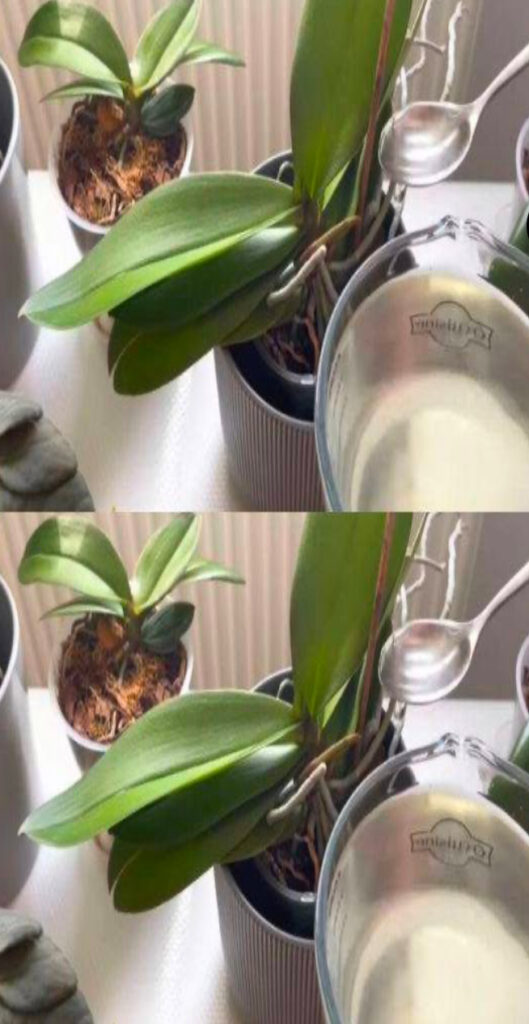
Orchids have always held a special place in the hearts of plant enthusiasts, revered for their intricate patterns and mesmerizing colors. These flowers, often associated with elegance and mystique, have specific care requirements to thrive. One of the little-known secrets in orchid care is the use of a particular fertilizer. Just a single tablespoon of this miracle additive can unlock a cascade of blooms, making your orchid not only thrive but bloom continuously.
The Miracle of Fertilizing:
Fertilizing plants is akin to providing them with essential vitamins and nutrients. For orchids, this is no different. They need a balanced mix of nutrients, but what sets them apart is the proportion in which they need it. While regular plant food might sustain them, the secret formula with the right balance can make them flourish beyond belief.
Why One Tablespoon?
The principle here is “less is more.” Over-fertilizing can harm the orchids more than it can help. A concentrated formula means that a tiny amount, just one tablespoon, is enough to provide the orchids with all they need. This measured dose ensures they don’t suffer from nutrient burn and can absorb everything effectively.
Continuous Blooming – A Sight to Behold:
When orchids receive the right amount of nutrients, they produce stronger, healthier blooms. And with the continuous provision of this optimal environment, non-stop blooming becomes a reality. Your orchids will be the centerpiece, capturing attention with their relentless display of beauty.
Conclusion:
Caring for orchids might seem daunting, but with the right tools and knowledge, you can unlock their full potential. The next time you think of pampering your orchids, remember that sometimes, all they need is one tablespoon of the right stuff.
I hope this expanded content serves your needs. Let me know if there’s anything else I can help with!
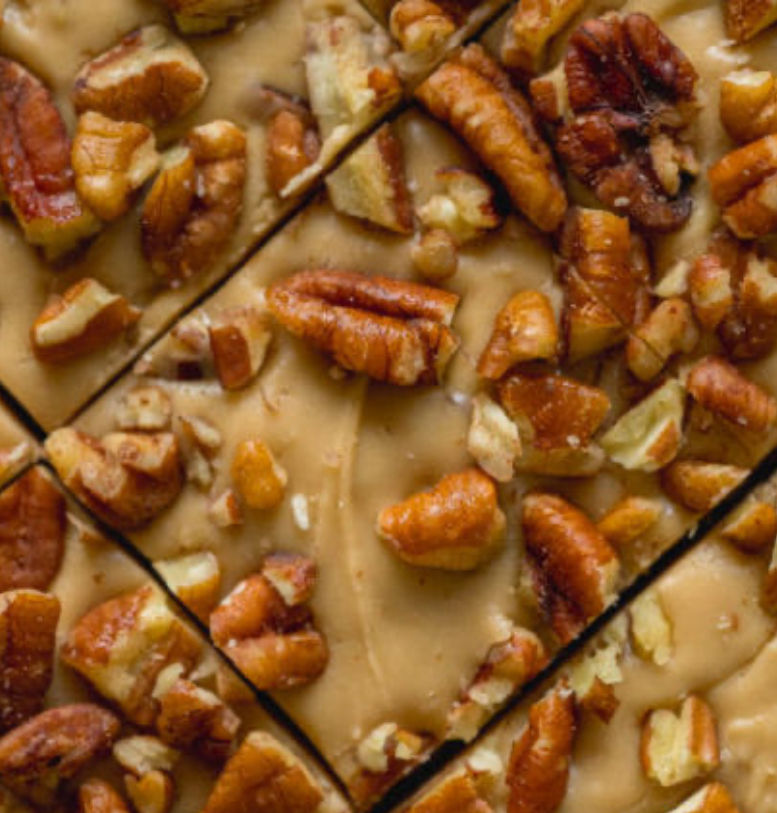
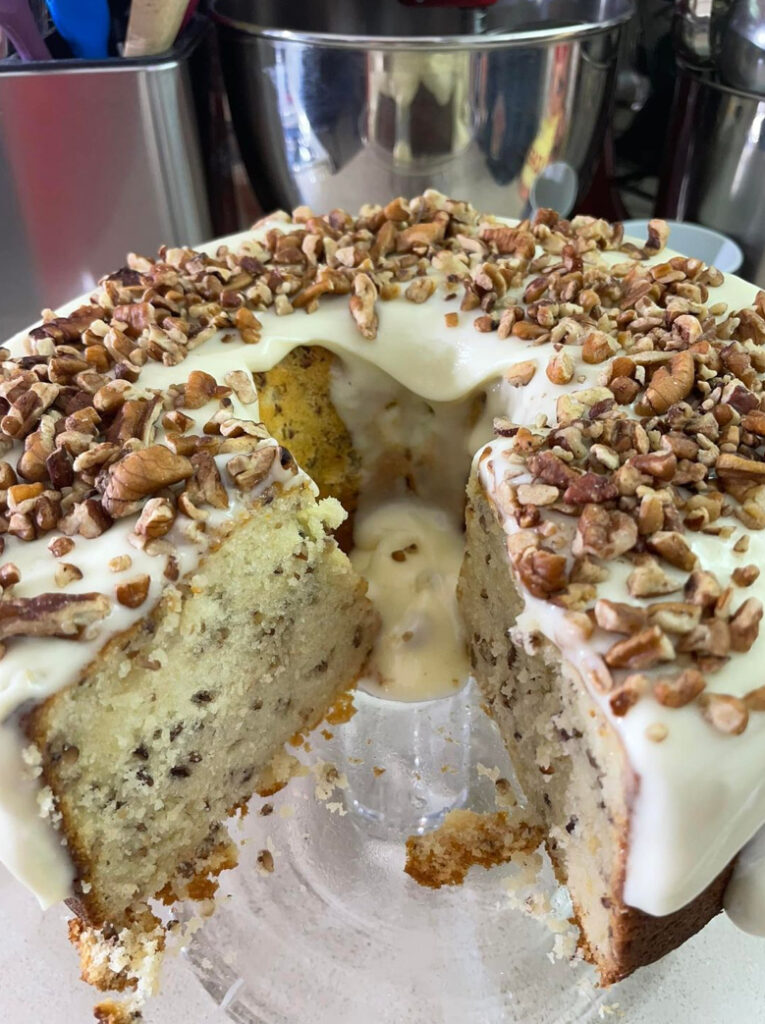
Pecan desserts are a southern tradition. From adding them to layered desserts to making them the stars of the show in cakes and pies, pecans are a classic addition to so many different desserts. Over the years, I’ve put pecans in all kinds of recipes.
Ingredients
3 Cups Cake Flour
2 Cups Sugar
1 Cup Packed Brown Sugar
3 Sticks Butter (Room Temperature)
5 Eggs (Room Temperature)
1 C Whole buttermilk (Room Temperature)
1/2 Tsp Baking Powder
1/4 Tsp Salt
1 Tablespoon Vanilla Extract
1 Tablespoon pound cake extract
2 Cups Toasted Pecans
Thick Glaze
2 cups Powdered Sugar
4 oz Butter
4 oz Cream Cheese
4 tsp half and half
How To Make Butter Pecan Pound Cake
Cream butter and sugar together until smooth(about 3-7 minutes)
slowly add eggs 1 at a time
add flavors
add flour and milk
starting with flour and ending with flour
stir in chopped pecans
pour in greased tube pan
Bake 325 Degrees for 1 hour 10 minutes. Check after 45 minutes. Mine was ready at 1 hour .
Insert a toothpick in the center of the cake and if the toothpick comes out with batter on it leave your cake in for the complete baking time.
The toothpick must come out clean.
Let cool in pan on wire rack for 20 mins. Then place on cake plate. Make sure to cover so cake won’t dry out. A tight-fit cake pan would be perfect.