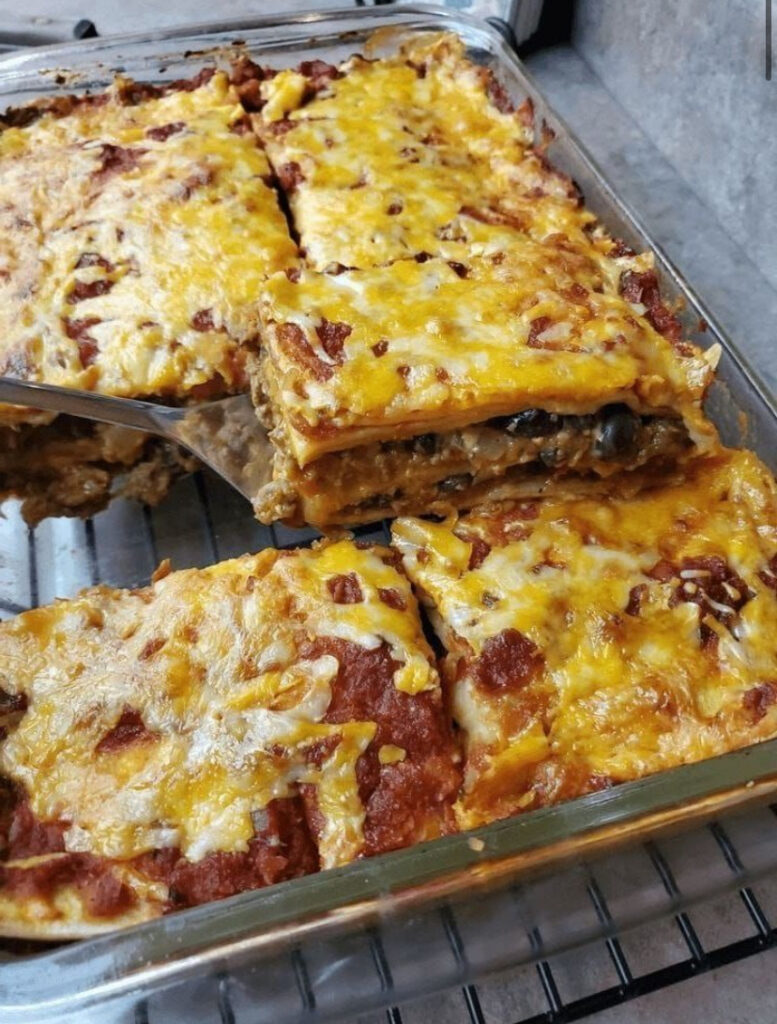
This Mexican Taco Lasagna recipe is a delicious twist on traditional Italian lasagna with layers of corn tortillas, ground beef, refried beans, taco sauce and cheese. It can be made in advance and also frozen. Easy and great for the whole family!
INGREDIENTS
1 pound ground beef
1 package taco seasoning
1/4 cup water
1 can diced Ro*Tel tomatoes and peppers, drained
1 can nacho soup
1/4 cup sour cream
1 cup grated cheddar
12 soft 8-inch tortillas
Guacamole, cilantro, sour cream for garnish, choice
HOW TO MAKE MEXICAN TACOS LASAGNA
Preheat the oven to 350 degrees.Spray a 9×9 baking pan with nonstick spray.
Place the meat in a large pan over medium heat, breaking it up as it cooks. After cooking, pour off the fat.
3.Add taco seasoning and water to pan and cook for 2 minutes.
Place the tomatoes, cheese soup and cream in a medium bowl. Add the cooked meat.
5.Place 3 tortillas in the bottom of the prepared baking dish. Place 1/3 of the meat mixture on top.
Repeat the layers and finish with a layer of tortillas on top. Sprinkle with cheese.
Bake for 20 minutes or until cake is hot and melted.
Serve sprinkled with chopped cilantro, guacamole and more sour cream if desired.
Simple and effortless ! My complete household loves this recipe so much. If it have been for them, I’d be making this each day! Give it a shot, you’ll love it!To Make this Recipe You’ Will Need the following ingredients:
Ingredients :
Chocolate Cake:
– two cups all-purpose flour
– two cups granulated sugar
– 3/4 cup Dutch-processed cocoa powder sifted
– two tsp baking soda
– 1 tsp baking powder
– 1 tsp salt
– half of cup vegetable oil
– 1 cup buttermilk room temperature
– 1 cup warm water
– two massive eggs room temperature
– two tsp vanilla
– Chocolate Swiss
Meringue Buttercream:
– 5 massive egg whites
– 1 half of cups granulated sugar
– 1 half cups unsalted butter room temperature
– eight oz desirable nice darkish chocolate chopped, melted, cooled
Instructions :
Chocolate Cake:
– Preheat oven to 350F, grease two 8″ spherical baking pans and dirt with cocoa powder. Line bottoms with parchment.
– Place all dry components into the bowl of a stand mixer geared up with a paddle attachment. Stir to combine.In a medium bowl whisk all moist elements (pour warm water in slowly as now not to cook dinner the eggs).
– Add moist components to dry and combine on medium for two – three mins. Batter will be very thin. Pour evenly into organized pans. I used a kitchen scale to make sure the batter is evenly distributed.
– Bake for forty five minutes or till a cake tester comes out typically clean.Cool 10 minutes in the pans then flip out onto a wire rack to cool completely.
Chocolate Swiss Meringue Buttercream:
– Place egg whites and sugar into the bowl of a stand mixer, whisk till combined.**Place bowl over a double boiler on the range and whisk continuously till the combination is warm and no longer grainy to the contact (approx. 3mins).
– Or registers 160F on a sweet thermometer.Place bowl on your stand mixer and whisk on med-high till the meringue is stiff and cooled (the bowl is no longer heat to the contact (approx. 5-10mins)).Switch to paddle attachment. Slowly add cubed butter and combine till smooth.
– Add cooled melted chocolate and whip till smooth.Assembly:Place a layer of cake on a cake board or plate. Top with approx. 1 cup of buttercream and unfold evenly.
– Place 2d layer on pinnacle and do a skinny crumb coat on the cake. Chill for 20mins.Place 1 cup of frosting on pinnacle and serve.
3 cups shredded cooked chicken, cooked, leftover or rotisserie 1 (11-ounce) small can corn, drained 1 (10 ounce) can Rotel diced tomatoes with green chilies (not drained) 1 packet taco seasoning 1 cup sour cream 2 cups shredded Cheddar Jack or Cheddar Cheese, divided 1 packet cornbread mix 1 egg, lightly beaten
Preparation:
Hot oven375F. n a bowl, mix together chicken, corn, diced tomatoes, taco seasoning, sour cream, and 1 cup of cheese. Transfer into a 10-inch cast iron pan or a casserole dish that is approximately the same size. Mix together cornbread mix, whatever liquid your cornbread packet calls for, egg, and remaining cheese. Pour on top of chicken mixture. Place in oven and bake for about 25 minutes. Let cool slightly before cutting. Adapted
Calling all mushroom lovers! These creamy garlic parmesan mushrooms are waiting for you! Sautéed in garlic butter until tender and then tossed in the most AMAZING creamy parmesan sauce, these easy mushrooms will be off the plate and in your mouth in less than 10 minutes!
Mushroom dishes are perfect for any dinner and occasion. Try out this chicken and mushroom dish, this fantastic mushroom risotto, and this mushroom soup. They will knock your socks off!
Believe it or not, mushrooms were once on my do not make list. They aren’t my favorite, and I never knew how to cook them up and make them delicious. Until I found out that mushrooms taste incredible if sautéed in a creamy sauce. So that’s where this recipe came in! These mushrooms have made me a little obsessed. You can use them on the side or cook this up as a meal for lunch. Trust me; you will be so happy that you did!
It begins with sautéing them in butter and fresh minced garlic until tender. But then bring on the heavy cream and turn this dish into something fantastic! The heavy cream, parmesan, garlic, and cream cheese… Well, they are the best mushrooms that you will ever eat! Not only are they delicious, but they go with just about everything. Cook them up with some pork chops, some simple and easy rolls, and a quick salad and you will have a meal for the books!
Ingredients
2 tablespoons butter 1 tablespoon olive oil 8 cloves of garlic, minced 8 oz whole baby bella mushrooms ⅓ cup heavy cream 2 tablespoons cream cheese, softened ⅓ cup fresh grated parmesan cheese ¼ teaspoon onion powder ¾ teaspoon dried oregano salt and pepper, to taste fresh parsley, to garnish
Instructions
Rinse and clean the mushrooms and pat dry melt butter and olive oil in a skillet over medium heat Add mushrooms and cook until browned, around 5 – 7 minutes
Add garlic, cream, cream cheese, parmesan, onion powder, and oregano and cook for 5 – 10 minutes, until sauce is thick and creamy Salt and pepper to taste Garnish with fresh parsley and serve
Caramel Pecan Dream Bars are a delectable delicacy that has a buttery, crumbly crust that is topped with the enticing tastes of caramel and toasted nuts. Every single mouthful of these bars has the ideal proportions of sweetness and nuttiness, making them the ideal treat for anybody who needs something sweet. Whether you’re hosting a special event or you just have a yearning for a delectable treat, these heavenly bars are guaranteed to dazzle your guests and fulfill your desires for a sweet pleasure.
These Caramel Pecan Dream Bars really are dreamy and if it weren’t for The Recipe Tin Project, I never would have known they existed. They take approximately five minutes to get into the oven and they rely mostly on kitchen shortcuts that are easy to keep in your pantry so they’re the type of dessert that’s easy to whip up on a moment’s notice. It’s hard not to fall in love with a dessert bar that’s sticky, sweet, and full of toffee flavor so it’s easy to see why Emily took the time to commit this one to paper. And I’m sure glad she did.
The Recipe Tin Project is a project where I cook my way through an old recipe tin full of vintage recipes. But you might have already guessed that. It’s chock full of old recipe cards, most of which seem to be from the ’60s and ’70s. I love food history, and the idea is to breathe new life into these recipes from the past and maybe learn a technique or two from them along the way. The recipes come from different people with different handwriting and some have sweet illustrations while others are on plain (often smudged and stained) index cards. They are sure to become a favorite among family and friends, and you can enjoy them any time you require a sweet indulgence.
Ingredient
FOR THE CRUST: 1 box yellow cake mix 1/3 cup soft margarine 1 egg
FOR THE FILLING: 1 (14 oz) can sweetened condensed milk 1 cup pecans, chopped 1/2 cup bits o’ brickle baking chips
PREPARATION
Preheat oven to 350°F and grease a 9×13-inch baking pan with nonstick spray. Mix together the cake mix, margarine, and egg and press into the bottom of the prepared pan.
Pour filling ingredients (sweetened condensed milk, pecans, bits o’ brickle) over the base and bake 25-30 minutes. Let cool before cutting. Enjoy!
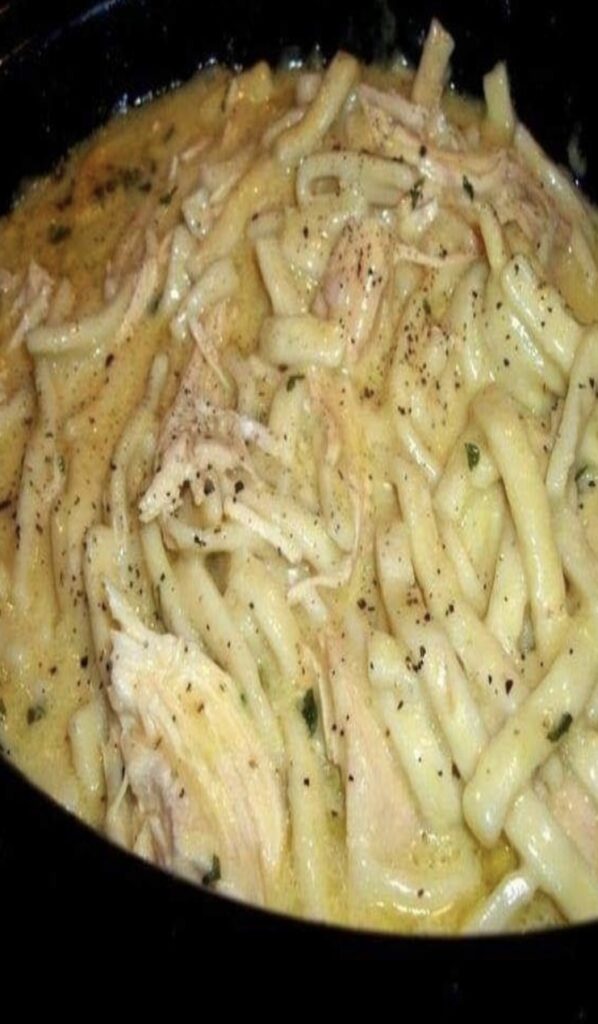
Imagine wrapping your hands around a bowl of something hearty, creamy, and utterly delicious. That’s exactly the warm embrace of comfort our Crock Pot Chicken and Noodles bring to your table. It’s not just a dish; it’s a melange of tender, flavorful chicken and rich, creamy noodles that weave a tapestry of taste with every bite. And for those with discerning taste buds, even they will be scooping up every last delightful morsel. Get ready to add a new beloved dish to your family’s culinary collection!
I’m beyond excited to share my love for this recipe! I’ve always stuck strictly to the script, occasionally tossing in a bag of mixed veggies for an extra dash of color and nutrients. However, a little experiment last week – using both white and dark meat – took me on a surprisingly delightful culinary detour. With the store out of frozen noodles and a bag of cheese ravioli winking at me from the next freezer section, I hesitantly ventured off-recipe – a rare move for a dedicated recipe follower like me! The result? An utterly creamy, delicious dish that whispered notes of a crustless pot pie with every bite.
🍲 Hearty Crock Pot Chicken and Noodles
Ingredients:
2 cans of cream of chicken soup
2 cans of chicken broth (15oz each)
1 stick of butter or margarine
1 lb of chicken breasts (fresh or frozen)
1 package of frozen egg noodles (24 oz) – I used Reames.
Directions:
Layer Your Flavors: Place the chicken at the bottom of the crockpot, cascading over it the chicken broth and soup. Crown this layer with the stick of butter, then set the crockpot to a low setting for a luxurious 6-7 hour simmer.
Shred and Return: Post simmering, extract the chicken, shred it finely, and usher it back into the crockpot.
Noodle Time: Introduce the frozen noodles to the mix, cooking for an additional 2 hours, and giving it a gentle stir every 30 minutes until perfection is achieved.
(Recipe adapted from allrecipes.com)
Every spoonful of this Crock Pot Chicken and Noodles promises not just a meal, but a comforting, culinary experience that cradles you in its hearty and homely embrace. A recipe that’s bound to secure a spot in your family’s dinner rotation, it invites you to not just eat, but revel in every comforting bite. So, dive into a bowl and wrap yourself in its comforting warmth today!
If you’ve never made a peach cobbler before, it may seem a little intimidating. This Lazy Man’s Pie Peach Cobbler recipe is one of the easiest recipes I have on my website (and one of the most delicious!) There are so many different peach cobbler recipes available on the internet. On my website alone, I have multiple recipes! If you’re looking for a traditional, standard, peach cobbler recipe, I highly recommend you check out my peach cobbler easy recipe. This recipe is fool-proof and delivers you an incredibly amazing peach cobbler as a result.
Ingredients:
1 stick butter or margarine 1 C. milk 1 C. sugar 1 C. flour 1 tsp. baking powder Dash of salt 1 qt. fruit, sweetened (peaches, cherries, blackberries, etc)
Directions:
Melt butter in baking pan. Mix flour, sugar, baking powder, salt, and milk. Pour batter in pan on top of butter; cover with fruit.
Do not stir; batter will rise to the top as it bakes and absorbs the flavor of the fruit.
Bake at 350 degrees for 1 hour. Serve warm with whipped cream or ice cream.
In the midst of winter, when seasonal sicknesses such as colds and the flu become prevalent, seeking protective strategies becomes paramount. While antibiotics often become a go-to, they can sometimes pose risks to our health. Thankfully, a natural alternative exists: a potent combination of lemon and garlic, capable of fortifying your immune system against the chill of winter ailments.
The Healing Duo: Lemon and Garlic
Lemon and garlic stand out as remarkable health enhancers, celebrated for their beneficial properties and proficiency in amplifying our immune defenses, making them invaluable partners in mitigating and alleviating the symptoms of colds and the flu.
Garlic: Enriched with sulfur compounds, specifically allicin, garlic boasts antioxidant, antibacterial, and antiviral qualities. It enhances the immune system, diminishes inflammation, and battles infections.
Lemon: Brimming with vitamin C, lemon fortifies the body’s natural defenses while offering antioxidant and anti-inflammatory benefits. Lemon juice is a popular remedy to pacify a sore throat and alleviate nasal congestion.
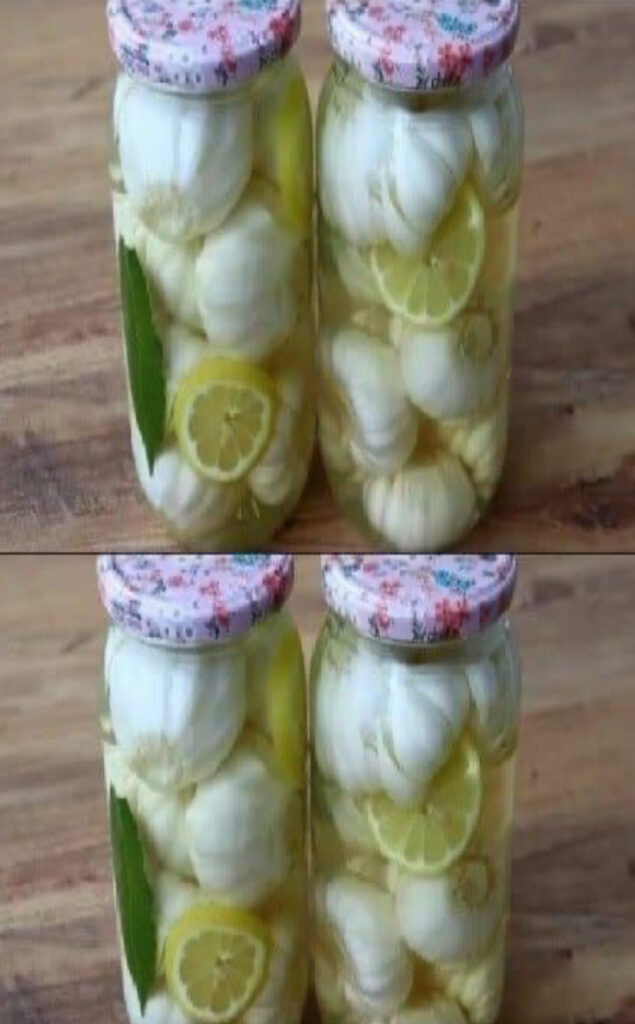
Craft Your Own Natural Antibiotic with Lemon and Garlic
Here’s a straightforward recipe to concoct your own natural antibiotic, with the accessible and affordable ingredients of lemon and garlic.
Ingredients:
1 organic lemon (preferred)
3-4 cloves of garlic
1 small glass jar with a secure lid
Instructions:
Prepare the Ingredients:
Thoroughly wash the lemon and slice it thinly.
Peel and finely chop the garlic cloves, or lightly crush them to unleash their essential oils.
Combine and Store:
Place the lemon slices and chopped garlic into the glass jar.
Secure the lid and allow it to rest for 24 hours at room temperature.
How to Utilize Your Natural Antibiotic:
Consume one teaspoon of the lemon-garlic mixture daily to amplify your immune defenses throughout winter.
Alternatively, infuse a teaspoon of the mixture into a cup of hot water, crafting a soothing beverage for colds and coughs.
Ensure to store the jar in the refrigerator to preserve its potency.
Note of Caution:
Should you have gastrointestinal issues or possess allergies to lemon or garlic, it is recommended to consult a healthcare expert prior to utilizing this remedy.
In a nutshell, opting for natural defenders like lemon and garlic can serve as an efficient and secure alternative to commercial antibiotics, bolstering your immune defenses and warding off seasonal illnesses. This easy-to-make recipe could become a crucial component in your winter wellness toolkit, providing a gentle yet effective shield against common wintertime afflictions.
Preheat the Oven: Preheat your oven to 450°F (230°C). Grease a 9×9-inch baking dish or a similar-sized oven-safe dish.
Mix Dry Ingredients: In a mixing bowl, combine the all-purpose flour, sugar, baking powder, and salt. Mix well.
Add Melted Butter: Pour the melted butter into the dry ingredient mixture. Stir until the butter is fully incorporated. The mixture will resemble a shaggy dough.
Add Buttermilk: Pour the buttermilk into the bowl with the dough. Stir until just combined. Be careful not to overmix; the dough should be lumpy.
Transfer to Baking Dish: Pour the biscuit dough into the greased baking dish. Spread it out evenly.
Create “Butter Pool”: Here comes the “Butter Swim” part. Take a fork or the back of a spoon and poke deep holes all over the biscuit dough. This will create pockets for the butter to pool.
Bake: Place the dish in the preheated oven and bake for 20-25 minutes or until the top is golden brown and the biscuits are cooked through. The melted butter will create a crispy, buttery crust on the bottom.
Optional Butter Brush: If you want extra buttery goodness, you can brush the top of the biscuits with additional melted butter as soon as they come out of the oven.
Serve: Allow the biscuits to cool slightly before serving. You can serve them with butter, honey, jam, or any other favorite toppings.
These Butter Swim Biscuits are a delightful treat, perfect for breakfast or as a side with dinner. Enjoy!
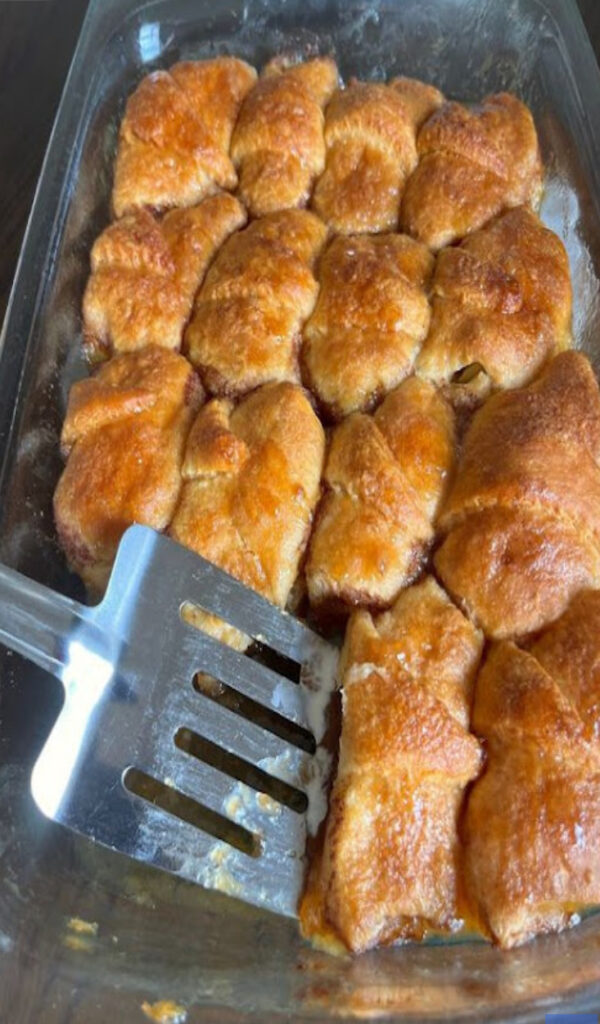
Ah, the holidays! A time when our kitchens are bustling with a myriad of activities and the sweet and savory scents of seasonal recipes. Let’s dive into a shortcut to create an enchanting classic dessert with an unexpected twist. Brace yourselves for a tantalizing secret: a splash of lemon-lime soda. Crafting these apple dumplings is incredibly straightforward and they’re destined to dazzle your guests.
What truly catapults this dessert into a realm of its own is a single can of lemon-lime soda. It not only bestows sweetness but also endows the dumplings with an irresistibly moist texture. No need to be a culinary chemist to recognize that this is a secret concoction for success! Imagine serving this freshly baked, warm delight topped with a creamy scoop of vanilla ice cream.
But let’s not pigeonhole it as merely a dessert! These versatile dumplings are equally at home on your brunch table, adorned with fresh fruit and served alongside a plate of scrambled eggs. Any reason to whip up these heavenly parcels is a splendid one!
Ingredients
2 (8oz) cans refrigerated crescent rolls
1 (20oz) can apple pie filling
1 cup (2 sticks) unsalted butter, room temperature
1 cup brown sugar
1 can lemon-lime soda
Let’s Get Baking!
Set your oven to warm up at 350°F and gently grease a 13″ x 9″ baking dish with butter or a spritz of non-stick spray.
Unwrap the crescent rolls, dividing them into the pre-cut triangles.
Deposit a hearty spoonful of apple pie filling onto the broadest part of the dough, then embark on a roll! Begin from the filled end and roll away from you to seal the delightful filling inside.
Gently place your apple-packed roll into your greased baking dish and repeat until all your dough triangles are cozily placed.
In a separate vessel, mingle butter and brown sugar together, whisking until you reach a silky smooth consistency, which should take about 2-3 minutes.
Bestow a teaspoon of your butter mixture atop each crescent roll, then cascade the lemon-lime soda into your baking dish, ensuring it fills the spaces amidst the rolls – take care to avoid pouring directly over the rolls.
Transition your baking dish into the oven and allow to bake for 35-40 minutes or until the rolls bask in a golden brown hue. Serve warm and perhaps with a crown of whipped cream or a scoop of ice cream.
This delightful recipe promises a journey of flavors, from the unexpected zest of the soda to the comforting familiarity of the apple filling. Enjoy this delicious shortcut, and may your holidays be filled with joy, love, and fabulous food!