Home Blog Page 24

The Famous Woolworth Ice Box Cheesecake

0

Looking for a dessert that’s both delicious and light? Here’s a lemony treat that’s easy to whip up. Whether it’s for a potluck or just a surprise for your family, this dessert will have everyone coming back for seconds!

About This Recipe:

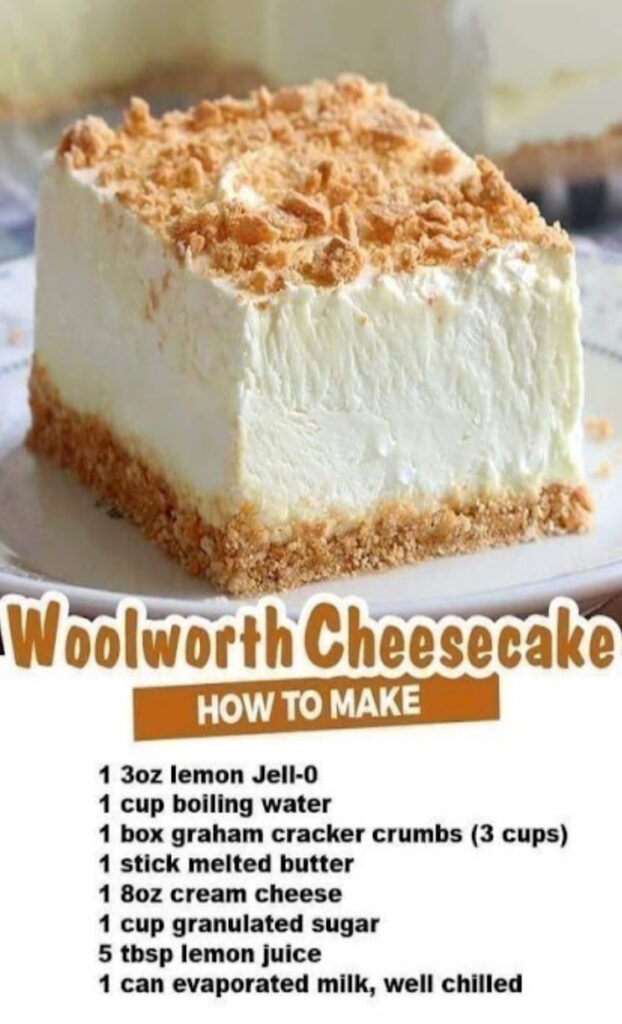
When it comes to baked cheesecakes, the tartness of lemon juice often softens with the oven’s heat. For this no-bake Lemon Icebox Cheesecake, inspired by Cook’s Country, we reduced the lemon juice for a balanced flavor. The inclusion of lemon curd provides a zesty kick without resorting to zest or lemon extract. The twist? We use lemon cookies, not graham crackers, to give that extra lemony touch to the crust.

Ingredients:

1 package (3 ounce) lemon Jell-O

1 cup boiling water

8 ounces cream cheese

1 cup granulated sugar

5 tablespoons lemon juice

1 can (12 oz) Carnation Evaporated milk, well chilled

Graham crackers, crushed (for base and topping)

Directions:

In a bowl, dissolve the lemon Jell-O in boiling water. Allow it to cool until it’s slightly thickened.

In another bowl, whisk together the cream cheese, sugar, and lemon juice until smooth. Once the Jell-O is ready, add it to this mixture and blend well.

In a separate bowl, whip the chilled Carnation milk until it turns fluffy. Gradually incorporate the cream cheese and Jell-O mixture, continuing to beat until well-combined.

Take a 9 x 13-inch pan and layer the bottom with crushed Graham crackers.

Pour the creamy filling over the cracker base, ensuring it spreads evenly.

Finish by sprinkling a generous layer of crushed Graham crackers on top.

Place the pan in the refrigerator and allow it to chill until set.

Serve this delightful lemony dessert chilled and enjoy the refreshing flavors with each bite!

Rotisserie Chicken and Stuffing Casserole

0

There’s nothing quite like a delicious rotisserie chicken and stuffing casserole recipe to get your stomach grumbling. This dish is the perfect mix of savory and comforting, making it the perfect meal for any occasion.

It’s the perfect weeknight dinner that will leave your family happy and satisfied.

Ingredients

  • 1 package of Stove Top stuffing mix (or more if you want)
  • 1 whole chicken cooked and shredded
  • 1 ½ cups water or chicken broth
  • ¼ cup butter
  • 3 stalks of celery, diced
  • 1 onion, diced
  • 1 can cream of chicken soup
  • ½ can cream of mushroom soup
  • 8 ounces sour cream
  • Salt and pepper to taste

How To Make Rotisserie Chicken and Stuffing Casserole

  1. Preheat the oven to 350*, lightly spray a 9 x 13 baking pan with cooking spray
  2. Bring the water (or chicken broth) to a boil in a medium saucepan. Add in the stuffing mix once the liquid boils.
  3. Remove the pan from the heat, cover and let sit to the side. Fluff with a fork when done.
  4. In a skillet, heat up the butter and add onion and celery, cook until softened
  5. Mix the soups and sour cream together in a bowl
  6. Place the shredded chicken at the bottom of the baking dish, layer the onions and celery over the meat.
  7. Sprinkle with salt and pepper
  8. Top the onion and celery with the soup mixture
  9. Top with the stuffing mix
  10. Bake for 1 hour, until bubbly and browned.

Enjoy!

Baked Garlic Parmesan Potato Wedges

0

This easy recipe for Baked Garlic Parmesan Potato Wedges will blow you away with its simplicity and fantastic garlic, Italian herbs, and parmesan flavors! They make a great side dish or appetizer for parties too!

Ingredients

  • 4 large Russet Potatoes, cut into wedges 
  • 2 tsp salt 
  • 2 tsp garlic powder 
  • 2 tsp Italian seasoning 
  • 4 tbsp Olive Oil 
  • ½ cup freshly shredded Parmesan Cheese 

Dipping Sauce

  • Bleu Cheese with Parsley 
  • Ketchup 
  • Queso 
  • Artichoke and spinach dip 
  • Greek Yogurt mixed with Ranch 
  • Salsa
  • Honey Mustard 

How To Make Baked Garlic Parmesan Potato Wedges

Cut the potatoes into wedges. Place the wedges into a bowl.

Drizzle with Olive oil and stir to coat well. In another bowl, mix together the Italian seasoning, salt and the garlic powder

Sprinkle the seasoning over the potato wedges. Sprinkle the wedges with parmesan cheese.

Place each wedge on the baking sheet, skin side down. Bake for 25 to 35 minutes. Test with a fork to make sure the potatoes are tender

Garnish with fresh parsley. Set a variety of dips on the table for each person to choose what they want.. Be sure to share with your friends and family. They will enjoy them just as much as you do!

Enjoy!

Grandmother’s Buttermilk Cornbread

0

Grandmother’s Buttermilk Cornbread – Here’s how to make the most delicious cornbread you’ve ever tasted. You’ll love serving this with chili or stew, or fresh peas, or simply to eat hot from the oven with loads of sweet butter.

My grandma always made the best cornbread. It had a tender crumb, lots of vanilla and sweet corn flavor, and it was so moist it literally melted in your mouth. She held onto her recipe for years and after incessant begging on my part – I finally got the recipe.

Now, my recipe has a bit of a twist and a fun special ingredient that makes my grandma’s buttermilk cornbread … dare I say, even better (sorry Gram). I wanted to make a cornbread recipe that tasted like home as soon as I took that first bite – and this is hands down the most delicious cornbread ever. It’s one of those easy recipes where after you make it, you’ll be making it over and over without even needing the recipe.

Ingredients

  • 8 Tbsp. Butter unsalted
  • ½ C. Granulated sugar
  • 1 C. Yellow cornmeal
  • 2 Large eggs
  • 1 C. Buttermilk
  • 1 tsp. Baking soda
  • 1 C. All purpose flour
  • Salt to taste

How To Make Grandmother’s Buttermilk Cornbread

  1. Preheat the oven to 375 degrees.
  2. Mix together all of the ingredients except for the butter until smooth and creamy.
  3. Place the butter into an oven safe skillet on the stove, and melt it over medium heat.
  4. Once the butter is melted, remove the skillet from the heat, and pour the batter into it. Whisk the batter in with the butter until well combined.
  5. Bake for 25-30 minutes until browned and cooked through.

Buttery Pecan Snowball Cookies

0

These delectable little Buttery Pecan Snowball Cookies may look delicate, but they will give your taste buds a winning combination of crunchy nuts and smooth butter that’ll have them begging for more.

Ingredients ( Servings 36 )

  • 2Sticks of butter softened
  • ½+ 1 C. Powdered sugar divided
  • 2tsp.Vanilla extract
  • Pinchof salt
  • 2 ¼C.All purpose flour
  • 1C.Finely chopped pecans

How To Make Buttery Pecan Snowball Cookies

  1. Preheat the oven to 350 degrees.
  2. Add the butter, ½ cup powdered sugar, vanilla extract, salt, and flour to a mixing bowl. Blend until a smooth dough forms.
  3. Fold the chopped pecans into the dough mixture.
  4. Wet your hands and form the dough into 36 evenly sized balls of dough.
  5. Place the balls of dough on a parchment-lined baking sheet and bake for 12 minutes.
  6. Allow the cookies to cool completely.
  7. Place the cup of powdered sugar in a shallow bowl.
  8. Roll the cookies in the powdered sugar and serve.

Enjoy!

Life just got easier. I can’t believe I found this recipe! Life-saver and so tasty!

0

Treat your taste buds to these savory pork chops encrusted with a crispy, cheesy layer. A modern twist on a classic Italian favorite, these chops marry Parmesan and breadcrumbs for an unforgettable flavor. Serve them with sides like garlic mashed potatoes or sautéed green beans to perfectly round out the meal.

Ingredients:

4 boneless pork chops

1 cup Parmesan cheese

1 cup Italian bread crumbs

1 tablespoon olive oil

1 teaspoon black pepper

1 teaspoon garlic powder

Instructions:

Heat oven to 350°F. Prep a baking sheet with parchment or foil.

Mix Parmesan cheese, bread crumbs, garlic powder, salt, and pepper in a bowl.

Dry pork chops with a paper towel, drizzle with oil, and spread evenly.

Press each chop into the breadcrumb mixture, ensuring a good coat.

Lay chops on the baking sheet. Bake for 40-45 minutes until they hit an internal temperature of 145°F (63°C).

Optional: Broil for 2-3 minutes for extra crispiness.

Let them sit for 5 minutes post-baking.

Serve hot with your preferred side dishes.

These chops are perfect for any dining occasion, promising a dish that’ll have guests coming back for seconds.

Easy Cream Cheese Cookies

0

There’s something magical about the delicate balance of sweetness and tanginess in these fluffy cream cheese cookies. One bite, and they simply dissolve in your mouth, leaving behind the entrancing dance of vanilla and cream cheese on your palate.

My love for cream cheese isn’t a secret. Be it the moist layers of a Carrot Cake, the rich allure of Red Velvet Cupcakes, or the classic charm of a Homemade Red Velvet Cake, cream cheese has always been the star. So, when I say these cookies have captured my heart, it’s a profound confession. They’re dreamy soft—much like clouds—with a flavor profile that’s immaculately balanced: not overly sweet, but just right, graced by the harmonious notes of cream cheese and vanilla.

These aren’t just any cream cheese mints; they’re the absolute BEST you’ll ever savor! This straightforward recipe offers delectably soft, melt-in-your-mouth mints, making each bite an indulgent experience.

Ingredients:

½ Cup unsalted butter (at room temperature)

3 oz. regular cream cheese (at room temperature)

1½ Cups confectioner’s sugar

½ tsp baking powder

1 egg (at room temperature)

½ tsp pure vanilla extract

1¾ Cups all-purpose flour

Superfine sugar or caster sugar, for dredging

Instructions:

Preparation: Preheat your oven to 375°F. Line cookie sheets with parchment paper for easy removal and cleanup.

Creaming Process: In a mixer bowl, blend the butter and cream cheese until smooth. Gradually incorporate sugar and continue beating until you achieve a fluffy consistency.

Adding the Essentials: Blend in the egg. Subsequently, add the flour, baking powder, and vanilla to the mixture, ensuring a well-integrated dough.

Chill Out: Refrigerate the dough for a minimum of 1 hour. This makes it easier to handle.

Shape and Bake: Roll the dough into 1-inch balls and coat them with superfine sugar or caster sugar. Arrange on the prepared cookie sheet, ensuring at least 1½ inches spacing between each. Gently flatten each dough ball before baking to achieve a consistent shape and texture. Bake for 8-10 minutes, or until you notice a slight golden hue on the edges. Remember, they should appear a tad under-baked for that perfect chewiness.

Cooling Time: Allow the cookies to cool on the sheet for about 1 minute before transferring them to wire racks for complete cooling.

Final Touch: If you’re feeling extra fancy, lightly sprinkle the cooled cookies with powdered sugar. But tread lightly; their inherent sweetness shines on its own.

This recipe yields roughly 2 dozen cookies. Store them in an airtight container, and they’ll remain fresh and delectable for 3-5 days.

Orange Creamsicle Moonshine

0

Get ready to fall on your butt with this Dreamsicle Moonshine recipe because it’s that good!

Very easy to make, yet delivers a hefty punch in a wrapping you can’t get enough of. This party moonshine mix is dangerously tasty and deceitfully light until you try to stand up after a couple!

The ingredients can be sourced at any decent grocery store, and even in case you don’t have any moonshine on you, this part can also be substituted with something store-bought.

Great Ways to Enjoy this Recipe

Plan the Party

This recipe is always a kick at parties! Spice up the delivery with these fun moonshine jars! Everyone gets a color!

Give the Perfect Gift

There’s some great ideas out there for your friends and family who love some good hooch!

This shirt is perfect for those who always find some time to ‘shine

A great little set to break out when the friends are over. They’ll love these moonshine-themed mini mason jars!

Ingredients

1 gallon Orange juice no pulp

1 1/2 cup Sugar

2 tbsp Vanilla extract

1/2 cup French vanilla liquid coffee creamer

3 cup 190 proof everclear

1/2 cup Vanilla vodka

Mason jars w/ lids

Instructions

Using a big pot, bring to a boil the orange juice, sugar, vanilla extract and the vanilla coffee creamer.

Stir until creamer is fully incorporated

Cool to room temp for about 1 hour

Add everclear and vodka to your orange mix

Stir

Pour your moonshine into your mason jars and seal closed

Refrigerate

Let sit for at least 2 weeks

Shake it before serving

Enjoy

INDIAN FRYBREAD RECIPE

0

If you’re in the mood for something that’s a delightful combination of soft, fluffy, and balances the sweetness with a hint of savory, then let’s dive into the flavorsome world of Indian cuisine with the delightful Indian Frybread.

INDIAN FRYBREAD RECIPE

Ingredients:

2 cups All-Purpose Flour (Maida)

1/2 teaspoon Baking Powder

1/4 teaspoon Baking Soda

2 tablespoons Yogurt

1 tablespoon Sugar

1/2 teaspoon Salt

Water (as needed for kneading)

Oil (for deep frying)

Steps to Create the Perfect Indian Frybread:

Ingredients:

2 cups All-Purpose Flour (Maida)

1/2 teaspoon Baking Powder

1/4 teaspoon Baking Soda

2 tablespoons Yogurt

1 tablespoon Sugar

1/2 teaspoon Salt

Water (as needed for kneading)

Oil (for deep frying)

Steps to Create the Perfect Indian Frybread:

Start by taking a spacious mixing bowl and add your flour, baking powder, baking soda, sugar, and salt. Give these dry ingredients a good stir.

Introduce the yogurt to your dry mix. Begin kneading, and slowly add water as you go along until your dough is just right.

Dedicate around 5-7 minutes to knead the dough until it’s smooth, supple, and elastic.

Cover your masterpiece with a moist cloth and let it sit for about an hour. This will give it some time to rise, and the gluten will work its magic.

Post-resting, mold the dough into even balls, about the size of golf balls.

Prepare a deep frying pan with oil and bring it to heat. Meanwhile, roll each dough ball into thin discs.

A little tip: To see if your oil is ready for frying, pop a tiny piece of dough into it. If it floats up almost instantly, you’re good to go.

Gently place the rolled dough into the oil. Use a slotted spoon to press it slightly, ensuring it puffs up beautifully.

Fry until each side has a lovely golden hue.

Using your slotted spoon, lift the bread out, letting it rest on paper towels to drain any excess oil.

Enjoy your Indian Frybread fresh and hot! Pair it with Chole (a spicy chickpea curry) or simply sprinkle some powdered sugar or drizzle honey over it for a sweet twist.

Pro Tips:

A well-kneaded dough is the secret to achieving that dreamy softness in the frybread.

Keep an eye on your oil’s temperature. Too hot and your bread might not puff, too cold and it’ll turn oily.

Always rest the freshly fried bread on paper towels to keep it crisp and non-greasy.

Heaven In A bowl

0

They don’t call this thing “heaven in a bowl” for nothin’! It’s got layers and layers of the tastiest treats you could find. This is great for parties, Halloween, dessert after a big dinner party or just for 1 very lonely, sad person. However, if you decide to eat this, grab a bib first! It could get messy! Here we go:

Can there really be such a thing? Heaven in a bowl? I did actually research this dilemma only to find that it is true. There really is heaven in a bowl. It involves some of my very favorite treat ingredients and it is all in one delightful dish. Having it in one dish saves me from embarrassment,

Ingredients

  • 1 Pkg.Of Fudge Brownie Mix.
  • 2 Pkgs.Of Miniature Reeses.
  • 4 Cups.Of Cold Milk; preferably 2%.
  • 2 Pkgs.Of instant vanilla pudding.
  • 1 Cup.Of creamy Peanut butter.
  • 4 Tsp.Of Vanilla extract.
  • Thawed cool whip; I used 2 cans.Of 8-oz.

How To Make Heaven In A bowl

1st Step

To make the brownie batter, just follow the directions on the box. Then, pour the batter into a 12×9-inch pan that has been buttered.

2nd Step

Set oven temperature to 350 degrees and bake for 20-25 minutes. When a toothpick inserted in the center comes out with moist crumbs, the cake is baking.

3rd Step

Put it on a wire rack to cool once you’ve taken it out of the oven. When cool, slice into 3-quarter-inch-thick slices. The peanut butter cups should be halved and used as a garnish. Place aside.

4th Step

In a large bowl, beat the pudding with the milk for 2 minutes. A thick mixture is the desired consistency. Put in the vanilla extract and peanut butter. And combine thoroughly. Mix in 1 1/2 cups of whipped topping.

5th Step

Place one-third of the brownies in a glass dish that holds 5 quarts. Top with the remaining peanut butter cups and a third of the pudding.

6th Step

Layer it again, and again. Finally, sprinkle the remaining topping and the saved peanut butter cups on top. Put in the refrigerator for a few minutes to chill before serving.