The washing machine requires hours and hours of manual labor. As a result, since its advance, there is no longer any need to climb as much as it has become inevitable. Although she herself saved a few hours and perseverance, she managed to take precautions quietly and quietly. Intellect so we share with you tips that are both effective and helpful for white vinegar to link your machine into a good list.
Why Mind the Machine?
Constant use of the washing machine can lead to accumulated grime, affecting its performance and longevity. So, the frequency of cleaning really hinges on how often it’s used. Weekly users might find a monthly deep-clean helpful, while more avid users might aim for a bi-weekly refresh.
Vibrant Vinegar Tips: Keeping it Fresh
Wash Away the Wear:
Begin by removing and cleaning all detachable parts like detergent trays and filters, ensuring all the tiny hidden spots are debris-free.
Utilize a sponge to scrub the components, and shine them up with a cloth dipped in white vinegar.
Vinegar for Victory:
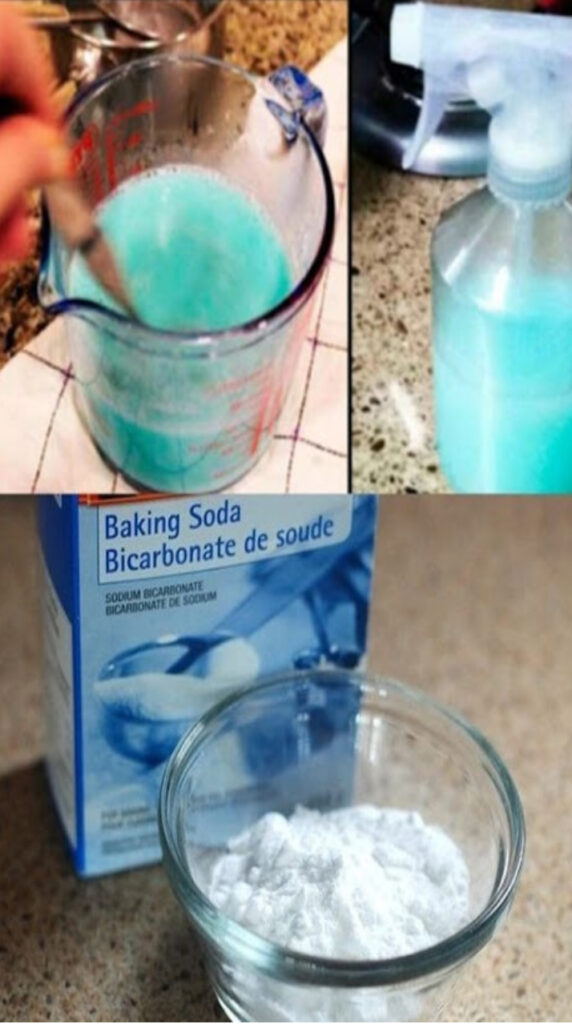
For the machine’s interior, run a standard cycle with a generous pour of white vinegar in the detergent compartment, ensuring it runs its full course without laundry.
Alternatively, halt the cycle halfway, adding a mix of baking soda and water for a deeper cleanse, and then resume.
Face-Time with the Machine:
Keeping the exterior stain-free and vibrant is key for that new-machine feel.
Wipe the entirety with a mix of white vinegar and water, letting it sit for around 10 minutes before wiping it down with a dry cloth.
White Vinegar: Not Just for Machines!
With the washing machine sparkling, let’s broaden our horizons to the rest of your space! Leveraging the versatile cleaning power of white vinegar can be extended to various aspects of your home, from maintaining shiny surfaces, purifying faucets, and ensuring your floors glisten.
It’s incredible what a dash of white vinegar can do, turning mundane household items into powerful cleaning allies. So, the next time your machine or home needs a refresh, let the humble white vinegar take the stage, proving that keeping clean doesn’t have to be complex or chemical-laden! Let’s embrace simplicity and make the most out of every drop!
“Discover the Amazing Benefits of Sun-Dried Clove Buds!
Transformed by the sun’s rays, clove flower buds turn into a rich brown, creating a spice renowned for its spicy and hot flavor. Cloves, a staple in Asian cuisine and medicine for over two millennia, gained fame in Europe during the Middle Ages, rivaling even pepper in popularity. While 95% of the world’s cloves are used in Indonesian cigarettes, their value as a spice cannot be overstated.
The rarity of cloves partly comes from the delicate nature of the clove tree. Its fruits are only harvested after eight years, and the flower buds are picked before they bloom, which makes them all the more special. These buds are then carefully dried until they achieve that characteristic brown hue.
Experience Natural Relief and Wellness with Cloves!
Soothe Digestive Woes: Brew an infusion with 4-5 cloves in boiling water for ten minutes to ease stomach aches and bloating. This simple remedy is perfect for regular consumption and offers quick relief from digestive discomfort.
Freshen Your Breath: Combat bad breath naturally by sucking on a clove after meals. This spice is not only great for breath freshness but also promotes dental health, thanks to its antibacterial and anti-inflammatory qualities.
Ease Dental Pain: Cloves contain eugenol, a natural antiseptic perfect for tackling dental pain and sore gums. Use it as an oily maceration in mouthwash or a mother tincture for best results. Remember, if the pain persists, it’s wise to consult a dentist.
Alleviate Muscle and Joint Pain: Create your own pain-relief massage oil with cloves. Mix 10 drops of clove essential oil with 30 ml of vegetable oil and apply it to the affected areas for a soothing effect.
Boost Your Immune System: Clove essential oil can be a shield against winter infections. Try ingesting a mix of clove oil and olive oil, or dissolve it on a sugar cube before meals to harness its antiviral and antibacterial powers.
Combat UTIs and Kidney Stones: An infusion of cloves can be an effective remedy. For an added boost, add a drop of lavender essential oil, but don’t forget to consult a doctor for proper treatment.
Unveil the secret to better health with the power of cloves – a small spice with mighty benefits!”
Do you find bulky phone covers unappealing and cumbersome? Good news! You can protect your phone from the everyday bumps and scrapes with a stylish, slim pouch made from just a single sock and a few sewing essentials. In just five easy steps, you can create a chic phone protector that’s both functional and fashionable.
Why settle for expensive, unattractive store-bought phone covers when you can craft your own unique pouch using upcycled materials? Customize it by choosing different sock colors and clasp designs, and before you know it, you’ll have a whole collection of pouches to match every bag or outfit!
Materials Needed:
1 Sock
Scissors
Straight Pins
Sewing Machine
Matching Thread
Pinking Shears
Pearl Bead
White Thread
Needle
Elastic Cord
Embroidery Needle
Simple DIY Instructions:
Start with a Cut: Trim the top part of the sock just above the heel and discard the bottom half.
Sew It Up: Turn the sock inside out and pin the cut sides together. Sew these edges, leaving about a ½-inch seam allowance.
Trim Neatly: Use pinking shears to trim away the excess fabric in the seam allowance, preventing fraying.
Finishing Touches: Turn the sock right-side out and sew a pearl bead onto the middle of the top edge.
Secure with a Loop: Thread an elastic cord through an embroidery needle. Attach the cord inside the sock, directly opposite the pearl bead. Tie the cord ends inside the sock, creating a loop on the outside.
There you have it! Slide your phone into this custom sock pouch, and secure it with the elastic loop around the bead. Your new, sleek phone cover is ready to go!”
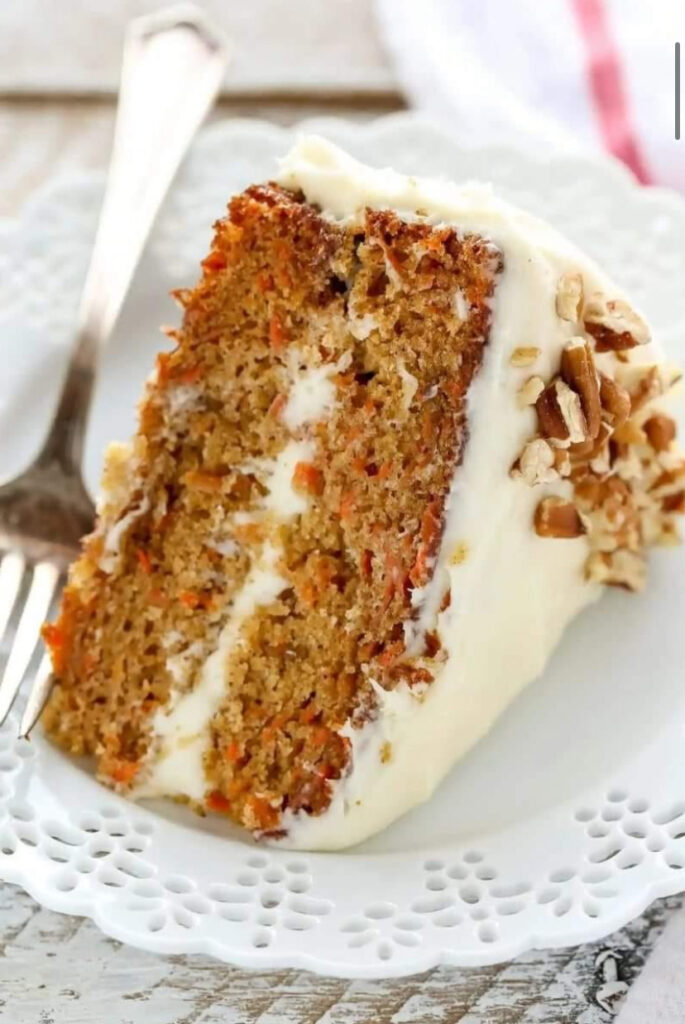
Step back in time and bring a classic to your dinner table with this Broccoli Chicken Divan recipe. A beloved dish for generations, it’s not only scrumptious but a clever way to get your family excited about eating their veggies. Imagine tender broccoli florets enveloped in a rich, creamy cheese sauce, topped with juicy chicken – a combination that has won hearts for decades.
Easy to whip up and packed with flavor, this dish is a testament to comfort food at its best. Just like the cherished memories of enjoying it during family dinners, this recipe is sure to create new moments to treasure.
Ingredients You’ll Need:
2 cups cooked chicken, cubed
2 cups broccoli florets
2 tablespoons butter
2 tablespoons all-purpose flour
1 cup chicken broth
1 cup milk
1/2 teaspoon salt
1/4 teaspoon pepper
1/2 cup shredded cheddar cheese
1/2 cup bread crumbs
Simple Steps to a Heartwarming Meal:
Preheat your oven to 350°F.
Lay chicken and broccoli in a greased 9×13-inch baking dish.
Melt butter in a saucepan, blend in flour, and cook for a minute.
Gradually add chicken broth and milk, cooking until thickened.
Stir in salt, pepper, and cheese, then pour this creamy delight over the chicken and broccoli.
Add a sprinkle of bread crumbs for that perfect crunch.
Bake for 25 minutes until it’s bubbly and golden.
Serve warm and watch it become a family favorite!
Why Broccoli Chicken Divan?
It’s a delightful blend of nutrition and taste.
Quick and easy, perfect for busy evenings.
A comforting meal that brings back memories and creates new ones.
Make this Broccoli Chicken Divan part of your family’s recipe collection and enjoy a dish that’s as rich in flavor as it is in history. Get ready for smiles around the dinner table!”
I love those recipes that we all grew up with, they are just too good to miss out on.Pecan Pie Brownies are a rich, chocolate and pecan pie Thanksgiving dessert recipe that you’re going to want all year long! I think we can all agree pecan pie is a must on Thanksgiving. I’ve tried switching it up and my Pecan Pie Cake Roll was a hit so this year I thought I’d see if I could do it again. These Pecan Pie Brownies take everyone’s favorite part of the pecan pie, the gooey, nutty filling, and bake it right on top of rich chocolate brownies. These brownies were out of this world good! The combination of chocolate and pecan pie filling is even better than your classic pecan pie.To Make this Recipe You’ Will Need the following ingredients:
INGREDIENTS:
1 box Brownie mix , must have instructions for making in 13×9 pan + ingredients listed on the package PECAN PIE FILLING: 1 cup Sugar 1 1/2 cups Light Corn syrup 4 Eggs 1/4 cup Unsalted butter 1 1/2 teaspoon Vanilla extract 2 cups Pecans, roughly chopped
INSTRUCTIONS:
Preheat oven according to brownie package instructions. Whisk together the sugar, corn syrup, eggs, butter, and vanilla in a small saucepan. Place on the stove top over medium high heat and begin to cook, stirring continuously. Mix brownies according to package instructions. Pour brownie batter into a greased 13×9 inch pan and place in oven to bake for 20 minutes. * see note about cooking time below As the brownies bake the filling in the saucepan should have thicken enough to coat your spoon (about 15 minutes). Stir the pecans into the mixture and continue to cook for 2-3 minutes until the mixture reaches the consistency of runny oatmeal. You want it to be loose enough to pour over the brownies but not liquid.
When the brownies have finished pre-baking remove them from the oven and pour the pecan pie filling over them spreading it out to cover the brownies completely.
Place them back in the oven and bake for 25-30 minutes or until the filling only jiggles slightly in the middle when you move the pan. Let cool to room temperature before cutting.
Elevate your living space with the magic of natural scents. A beautifully fragranced home not only boosts your mood but also creates a relaxing, inviting atmosphere. Forget commercial air fresheners with their artificial fragrances and chemicals. It’s time to embrace a healthier, more natural approach to scent your home. Here’s an easy, DIY way to infuse your space with delightful aromas:
What You’ll Need:
Citrus Galore: Choose from oranges, lemons, and limes for a zesty kick.
Herbal Bliss: Rosemary, lavender, and mint add a touch of nature’s freshness.
Spicy Warmth: Cinnamon sticks, cloves, and nutmeg offer cozy sweetness.
Essential Oils: Lavender, eucalyptus, or lemongrass for intense fragrance.
Water: Distilled is best to keep things pure and clear.
Simple Steps to Scent Heaven:
Mix and Match: Pick your favorite citrus, herbs, spices, and essential oils.
Citrus Slices: Thinly slice your chosen citrus for maximum scent release.
Herb Prep: Lightly crush herbs to let their natural oils come alive.
Pot of Goodness: Combine citrus, herbs, spices, and essential oils in a pot.
Water Magic: Add enough distilled water to cover, and leave room for steam.
Gentle Simmer: Let the mixture gently simmer and watch as your home fills with beautiful aromas.
Keep it Going: Regularly check and add water to keep the fragrance flowing.
Scented Bliss: Relax and enjoy as your DIY mixture transforms your home.
Save for Later: Store leftovers in the fridge and reheat for round two of fragrance.
Why Go Homemade?
Pure and Natural: Know what’s in your scent mixture – no hidden nasties.
Tailor-Made: Customize to your heart’s content – sweet, fresh, or a bit of both.
Wallet-Friendly: Save money without skimping on wonderful scents.
Earth-Loving: Used ingredients can be composted, supporting a greener planet.
Aromatherapy: Enjoy the calming and therapeutic benefits of natural scents.
In Conclusion
Creating your own home fragrance is not only simple and effective but also a delightful way to bring natural beauty into your everyday life. Say goodbye to chemical air fresheners and hello to a homemade, customizable, and eco-friendly way to keep your home smelling amazing. Ready to start your journey to a naturally fragrant home?”
As you stroll through a cemetery, have you ever spotted a shimmer of metal on a tombstone? These modest tokens, though seemingly insignificant, bear deep sentiments of honor, friendship, and memory.
Leaving coins on gravestones is a poignant gesture, symbolizing gratitude and respect for those who served their nation in the military. Witnessing these tokens, you’re engaging with a tradition that communicates immense pride and appreciation for the brave souls who stood guard over our country.
But what’s the story behind the coins? Each denomination holds a particular meaning, revealing a bond between the visitor and the departed. Let’s delve into the messages these coins convey:
Penny:
A penny suggests a visit to the gravesite. It’s a touching gesture that says, “Your memory endures.” Through this act, a connection is established between the living and the departed.
Nickel: Seeing a nickel signifies camaraderie. The person who left it likely trained alongside the departed. It celebrates the memories and friendships nurtured during military drills.
Dime: A dime is potent. It conveys that the visitor and the deceased shared time in service. It’s a nod to the unbreakable bond formed during challenging times in the line of duty.
Quarter: A quarter tells a heart-wrenching story — the person who placed it was present during the soldier’s final moments. It symbolizes shared sorrow and the memory of a devastating moment.
source: Aerotech News
The coins on gravestones aren’t just metal pieces; they are silent, yet powerful tributes. For military families, they’re a testament to the enduring respect for their loved ones. It’s comforting to know their dear ones are cherished and remembered.
This tradition mirrors the profound impact of military service on people and their communities. It emphasizes the connections formed amidst adversity and the eternal bond among comrades. When you spot these coins, pause to consider the tales they narrate and the souls they salute.
From the humble penny to the quarter, each coin carries a heartfelt message. It reminds us of the sacrifices made by soldiers and the indelible mark they leave. So, when you notice a coin on a tombstone, understand it’s not just metal; it’s a story of respect, friendship, and tribute.