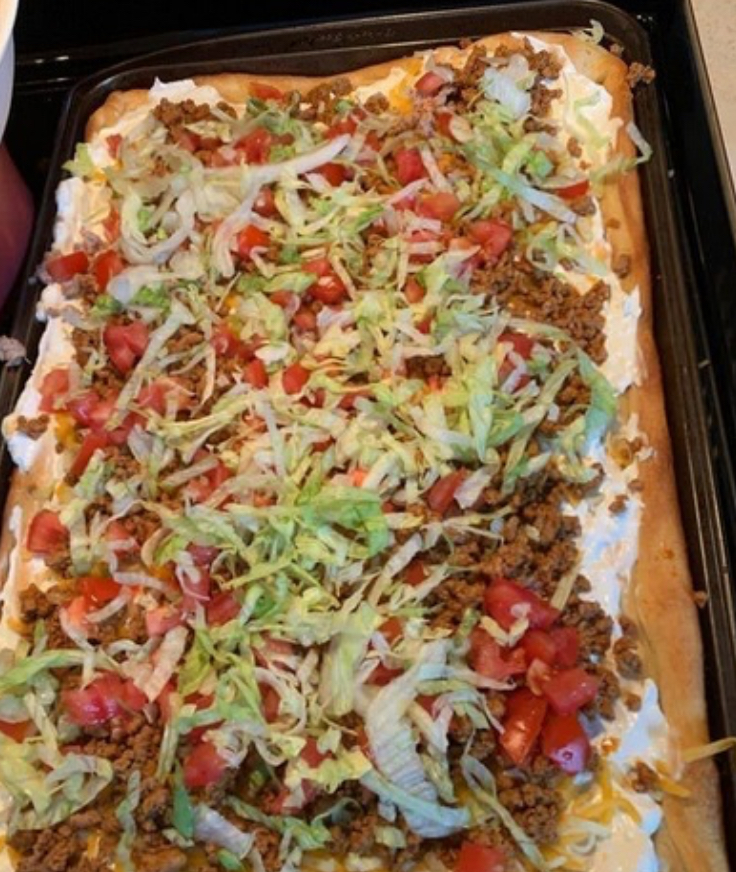
Taco Pizza is a Mexican meets Italian dinner. Pizza dough topped with beans, salsa, beef, cheese, and all the toppings. If you’re looking to switch up your Taco Tuesday, this Taco Pizza is the perfect twist on dinner!
A few years ago, I discovered this crescent roll taco pizza recipe and with a few small adaptions, it quickly became a favorite family dinner that we make once a week.
You’ll Need:
1 lb of ground beef. 1 envelope of taco seasoning mix. 2 (8 oz) cans of Pillsbury crescent rolls. 1 (16 oz) can of refried beans. 2-3 cups of shredded cheddar cheese or Mexican blend. ½ cup of chopped tomatoes. ¼ cup of sliced black olives. 4 chopped green onions.
INSTRUCTIONS
Preheat the oven to 375°. In a skillet, brown the ground beef and drain it. According to package instructions, add the taco seasoning to the beef. Place unrolled crescent rolls into rectangles in a 11 ½ inch x 16 ½ inch jelly roll pan or cookie sheet. Press the dough on the bottom and ½ inch up sides to form the crust. Bake for 11 to 13 minutes. Microwave the beans for 1 minutes and spread over the crust. Add cooked beef mixture to the top and sprinkle with cheese then tomatoes, black olive and green onion. Bake for 3 to 6 more minutes and serve hot!
Easy, peasy and delicious! This taco pizza is really good guys, so many flavors, you won’t believe it! And there’s enough for 12 people! So run to the kitchen!
Melted butter, more brown sugar than white sugar, cornstarch, and an extra egg yolk guarantee the absolute chewiest chocolate chip cookie texture. And you don’t even need a mixer! Reader Adrienne commented: “These are the best cookies I’ve ever had. Incredible. Don’t cut corners or you’ll miss out. Do everything she says and you’re in for the best cookies of your life.”
There are thousands of chocolate chip cookies recipes out there. Everyone has their favorite and this one is mine. Just a glance at the hundreds of reviews in the comments section tells me that this recipe is a favorite for many others too! In fact, if you asked me which recipe to keep in your apron pocket, my answer would be this one. (In addition to a classic cut-out sugar cookies and flaky pie crust, of course!) Just read the comments on a post in our Facebook group. These cookies are loved… and, warning: they disappear FAST.
The recipe is also included in two of my published cookbooks (in Sally’s Baking Addiction, I swap chocolate chips for M&Ms/chocolate chips combo).
Ingredients
3 stick real butter 1 c sugar 1 c packed brown sugar 3 eggs 2 tsp vanilla extract 3 c flour 1 1/2 tsp baking soda 3/4 tsp salt 4 c semi-sweet chocolate chips walnut pieces (optional)
How to make it :
Heat oven 375..In large bowl mix butter and both sugars till they are creamy..Add eggs and vanilla and beat till light and fluffy.
Mix flour ,salt and baking soda. Then gradually add flour mixture. Then add chips and nuts. I use a small cookie scoop. Cook 8- 10 minutes. (Until lightly browned)
These beautiful mini cakes are not only tasty, but they are so easy to throw together. Perfect for when you have a busy day but need an easy and fast dessert on the table. If you have not made an upside-down cake before, you should start with this. It’s as easy as devouring them!
Ingredients:
1 box yellow cake mix
2 cans pineapple slices 20 OUNCE CANS
maraschino cherries CUT IN HALF
2/3 c. brown sugar
1/3 c. butter MELTED
How to make Mini Pineapple Upside Down Cakes
Prepare the oven. Preheat it to 350 degrees F.
Using non-stick cooking spray, grease the muffin tins. Also, open the cans of pineapple and make sure to keep the juice.
Combine the melted butter with brown sugar until well blended. To the bottom of each muffin cup, add a spoonful of the mixture, evenly distributing it.
Following the package directions ready the cake mix except using the juice from the canned pineapple instead of water.
See also Chocolate Baileys Mud Cake To the bottom of each muffin cup, add a well-drained pineapple slice. Then, in the centre of each pineapple, put a cherry cut side up. Lastly, pour each muffin cup with about 1/4 to 1/3 cupcake batter.
Place in the preheated oven and bake for about 20 to 25 minutes until the tops are golden and a toothpick inserted in the centre of the cake comes out clean.
When done, remove from the oven and allow the cakes to cool for at least 5 minutes. If needed, you can loosen the edges, placing a cookie sheet on top of the muffin pan to get ready to flip the mini cakes over.
Garlic Parmesan Scalloped Potatoes layered in a creamy garlic sauce with parmesan and mozzarella is the best side dish to any meal! Simple and easy ! My whole family loves this recipe so much. If it were for them, I’d be making this every day! Give it a shot, you’ll love it!To Make this Recipe You’ Will Need the following ingredients:
The Difference between Scalloped Potatoes and Au Gratin Potatoes Why is there so much confusion about scalloped potatoes versus Au Gratin Potatoes? Well, they are very similar. So, we are calling our dish cheesy scalloped potatoes, and let me explain why we can do that. We are basically combining the best parts of both dishes.
A traditional scalloped potato dish consists of sliced potatoes layered in a casserole dish and baked with heavy cream and lots of herbs. A traditional Au Gratin Potato dish, on the other hand, has grated cheese sprinkled between the layers, resulting in a cheesy, more decadent dish. In both dishes, the potatoes are cut into rounds, but the potatoes used in scalloped potatoes are often cut a bit thicker than those in au gratin potatoes.
Ingredients
4 russet potatoes, sliced into 1/4 inch slices 1 onion, sliced into rings salt and pepper to taste 3 tablespoons butter 3 tablespoons all-purpose flour ½ teaspoon kosher salt 2 cups whole milk 1½ cups shredded Cheddar cheese salt and pepper to taste
Instructions
Preheat oven to 400°F (200 degrees C). Butter an 8×8 casserole dish. Arrange the potatoes and onions in the prepared baking dish, staggering potato and then onion. Season with salt and pepper to taste. In a medium-size saucepan, melt butter over medium heat. Mix in the flour and salt, and stir constantly with a whisk for one minute. Stir in milk. Cook until mixture has thickened. Stir in cheese all at once, and continue stirring until melted and smooth, about 30 to 60 seconds. Pour cheese over the potatoes, and cover the dish with aluminum foil. Bake 1 1/2 hours (90min.) in the preheated oven. For a crisp topping, change the oven setting to broil for 5 minutes before removing the dish.
I love those recipes that we all grew up with, they are just too good to miss out on. Looking for holiday party food and snack ideas? These candied pecans are so easy to make in the oven! They are the BEST little snacks for parties, Christmas, Thanksgiving or any time of the year when you’re craving a crunchy sweet treat.
Ingredients
1 pound pecans (and/or almonds)
1 cup sugar
1 tbsp ground cinnamon
2 tsp vanilla extract
1 egg white
1/2 tsp salt (or your preference)
2 tsp water
Instructions
Preheat oven to 250 degrees. Line a baking sheet with parchment paper or non-stick foil. Mix the sugar, cinnamon and salt in a large ziploc bag.
Whisk the egg white, vanilla and water with a fork in a large bowl until frothy.
Add the pecans (or almonds) to the egg white mixture and stir until they are well coated.
Pour the pecans into the ziploc bag, seal and shake until well coated with your cinnamon/sugar mixture.
Spread them out on your prepared baking sheet into a single layer. Bake for 1 hour, stirring every 15 minutes. Enjoy!
This Cracker Barrel Meatloaf Copycat Recipe is not only simple to prepare, but it is also bursting with flavor. One of the meatloaf recipes on their menu is a must-try for just any meatloaf enthusiast. If you like Cracker Barrel’s Meatloaf, you must make this recipe at home! Do you like Cracker Barrel’s meatloaf? This recipe may be an excellent match for you!!! The good beef loaf is one of my favorite foods!!! And this Copycat Cracker Barrel Meatloaf does not fall short of expectations either! This meatloaf dish from Cracker Barrel will undoubtedly become a staple in my cooking repertoire.
This meatloaf recipe asks for ground beef, onions, and a binder, much like the majority of meatloaf recipes. Ritz Crackers are the name of the game in this case. It also contains a little amount of finely chopped Green Bell Pepper.
The Ritz Crackers used in this recipe instead of saltines or bread as a binder give the meatloaf a buttery sweetness that I really like. I’m thinking about incorporating it into some of my other meatloaf recipes.
Ingredients:
2 eggs 2/3 cup milk 32 Ritz crackers, crushed 1/2 cup chopped onion 4 ounces shredded sharp cheddar cheese 1 teaspoon salt 1/4 teaspoon pepper 1 1/2 lbs ground beef 1/2 cup ketchup 1/2 cup brown sugar 1 teaspoon mustard
Directions:
Preheat oven to 350. Beat eggs. Add milk and crackers. Stir in onion and cheese. Add ground beef. Mix well. Shape into a loaf. Bake at 350 for 45 minutes. Combine ketchup, brown sugar and mustard to make topping. Spoon half of the topping over the meatloaf after 30 mins of baking. Return loaf to oven for 10 more mins of baking. Spoon the rest of the topping over meatloaf, return to oven and bake for 5-10 mins more.
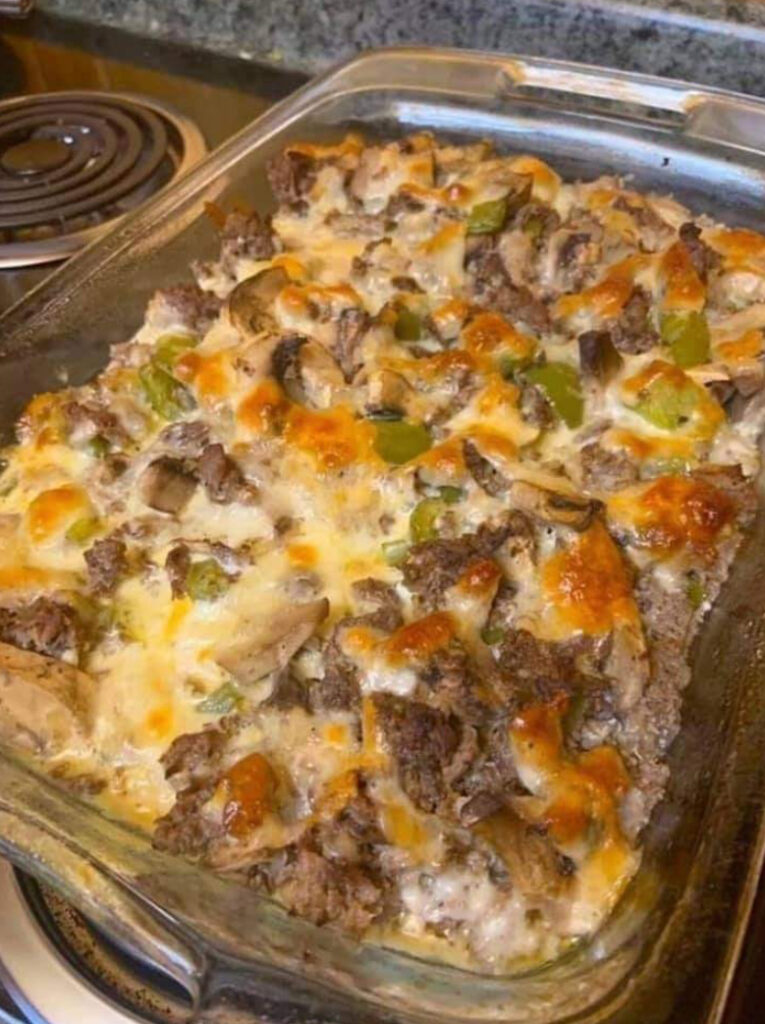
Are you looking for a delicious and easy dinner idea that your entire family will love? This simple casserole combines all the classic flavors of traditional Philly cheesesteak sandwiches into one easy-to-make dish that’s perfect for any night of the week.
Ingredients
1 ½ lb. Ground beef
2 Bell peppers chopped
½ Onion chopped
2 tsp. Minced garlic
1 tsp. Seasoned salt
8 Slices provolone cheese
4 Large Eggs
¼ C. Heavy whipping cream
2 tsp. Worcestershire sauce
How To Make Philly Cheese Steak Casserole
Preheat the oven to 350 degrees.
In a skillet over medium high heat on the stove, begin to brown the meat.
When the meat is partially browned, add the onions and peppers to the skillet. Cook until the meat is completely browned and the vegetables are beginning to soften.
Add the seasoned salt and minced garlic to the skillet and saute another 30 seconds. Drain any excess grease.
Layer the beef in the bottom of a well greased 9×9 baking dish.
Top the beef with the cheese slices.
Mix together the heavy whipping cream, worcestershire sauce and eggs in a bowl, and pour over the meat mixture in the baking dish.
Want to cook something different? This easy recipe from recyyp will teach you how to make BOSTON CREAM POKE CAKE.
This Boston Cream Poke Cake recipe is one of my husband’s favorite desserts of all time. When I told him I made it for him, I could see pure happiness on his face. So that made me happy too! Not to mention, he gobbled most of it up on his own in three days.
Ingredients:
1 box yellow cake mix (plus box ingredients)
2 boxes instant vanilla pudding mix
4 cups milk
1 container chocolate frosting
Instructions:
Prepare cake in 13 x 9″ pan according to box directions. Use spoon handle to poke holes evenly across cake. Combine milk and pudding mix and whisk until well blended. Pour pudding over cake making sure it gets down into holes. Refrigerate cake for several hours to allow pudding to settle and set up. Open frosting container and remove foil seal. Microwave for 15 seconds and stir. Repeat this until frosting is pourable. Pour over pudding layer and spread with spatula to cover completely. Refrigerate for at least several more hours.
Chicken and Dumplings are probably the ultimate comfort food. Tender juicy shredded chicken and soft dumplings in a rich creamy brothy gravy.
Ingredients
1 Onion (diced)
6 Boneless skinless chicken thighs
1 can Cream of chicken soup
1 can Cream of celery soup
2 tbsp. Fresh parsley (chopped)
1 tsp. Poultry seasoning
2 c. Chicken broth
1 can Buttermilk refrigerated biscuits
2 c. Frozen mixed vegetables (defrosted)
Black pepper to taste
How To Make Crockpot Chicken and Dumplings
Layer the chopped onion on the bottom of your crockpot.
Place the chicken thighs on top of the chopped onion in a single layer.
In a mixing bowl, place 1 can of cream of chicken soup.
Pour a can of cream of celery soup into the mixing bowl.
Add 1 tsp of poultry seasoning to the mixing bowl.
Sprinkle in 2 tablespoons of chopped fresh parsley.
Add black pepper to taste.
Stir all of the ingredients in the mixing bowl, and pour over top of the chicken thighs in the crockpot.
Pour 2 cups of chicken broth over top of the chicken.
Set the crockpot to high for 5 hours and close the lid.
Do not open the lid until you have just 1 hour of cook time left on the crockpot’s display. With 1 hour left, open the lid and pour in 2 cups of mixed vegetables that have been defrosted.
Mix them into the crockpot well, shredding the chicken thighs as you stir.
Open a can of refrigerated biscuits, and flatten each one. Cut each biscuits into 4 long slices.
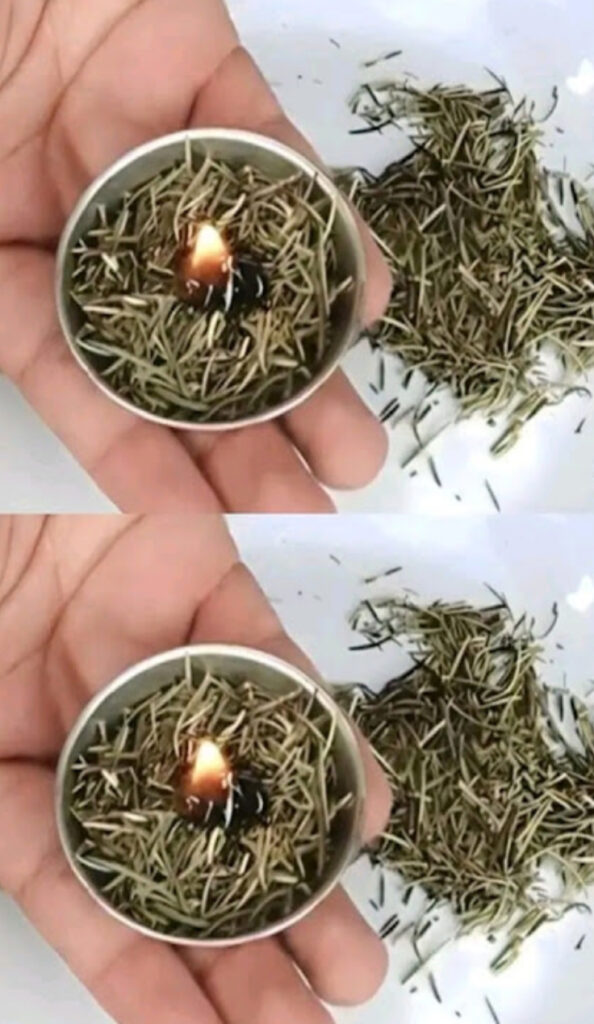
Rosemary, more than just a kitchen staple, unfolds a fragrant secret when burned at home, offering a myriad of benefits beyond its culinary use. As a member of the Lamiaceae family and indigenous to the Mediterranean, this evergreen herb has woven its way through various cultures and times due to its distinctive fresh and piercing aroma, as well as its therapeutic and culinary applications.
A Glimpse into Rosemary’s Rich Historical Tapestry
Ancient and Traditional Usage: Historically, rosemary was admired for its supposed purifying qualities, being utilized in Roman times to cleanse environments and presumably safeguard against infectious diseases.
Symbolism and Spiritual Use: In the medieval period, it was imbued with magical properties, being employed in rituals, ceremonies, and as protection against malicious spirits and infirmities.
Romantic and Protective Symbol: It was intricately tied to romantic and marital traditions, symbolizing loyalty and being used in various nuptial rituals.
Funeral Rituals: Its use extends to funeral practices in certain regions, symbolizing eternal rest and being burned in place of incense.
Burning Rosemary: Aromatic and Therapeutic Potential
Air Purification: This aromatic herb, when burned, is renowned for purifying the air, stemming from beliefs in its ability to cleanse plague-ridden areas and its recognized antimicrobial properties.
Stress Alleviation: It has been associated with creating a tranquil, stress-free environment, attributed to its calming scent.
Insect Repellent: Its smoke is known to ward off insects, offering a natural alternative to commercial repellents.
Mental and Physical Wellness: The discovery of rosemary oil, attributed to its donation to Isabella of Hungary in 1370, opened avenues in treating ailments like rheumatism and potentially, depression.
To burn rosemary, you may use an incense burner or holder, light a sprig’s tip, then gently blow out the flame, allowing it to smolder and waft its fragrance and properties through your space.
The Therapeutic Properties: A Deeper Dive
Rosemary’s smoke releases compounds like rosmarinic acid, acknowledged for their antioxidant and antimicrobial properties, aiding in air purification and potentially shielding against free radical damage. However, while considering its numerous advantages, it’s paramount to exercise caution due to the potential of burning herbs to release toxic and irritating fumes.
Always prioritize safety and controlled usage, ensuring proper ventilation and avoiding excessive inhalation of smoke. Moreover, before utilizing rosemary or any other natural remedies for health-related applications, professional medical advice should be sought.
In essence, while rosemary finds its pride of place in culinary arts, its aromatic virtues, symbolisms, and potential therapeutic and environmental benefits, herald it as an herb worthy of exploration and appreciation beyond the kitchen.