Home Blog Page 21

The moment my friend busted out this dish at the party, I was all like, “I need to make this ASAP,” and man, it was so worth it

0

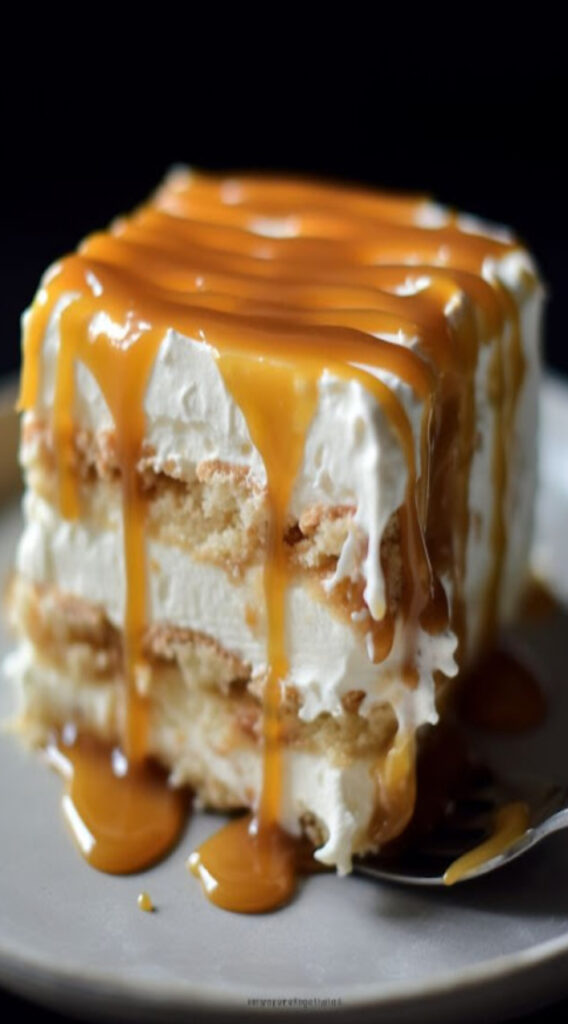
Indulgence in dessert often takes us on a delightful journey through a land where sweet and salty converge to create culinary magic. The Ritz Cracker Salted Caramel Icebox Cake encapsulates this very essence in a no-bake delight that pairs the creaminess of caramel with the distinctive crunch of Ritz crackers, crafting an exquisite dessert that tantalizes the palate with every bite. Allow me to recount a tale that may tempt you into bookmarking this delectable recipe for your own culinary adventures.

🍰 A Dessert’s Tale: Birth of the Showstopper

A warm summer afternoon, the smoky scent of BBQ burgers wafting through our backyard, set the scene for the debut of a dessert destined to steal the spotlight. In the quest for a dessert that could astound, I found inspiration in uniting the sweet, luscious caramel with the salty, crispy essence of Ritz crackers. The resultant creation – a flavor tapestry of sweet and salty, creamy and crispy – swiftly ascended to stardom amidst the gathering, thereby crowning the Ritz Cracker Salted Caramel Icebox Cake as a must-have at every festivity henceforth.

Dive into Deliciousness: Recipe Guide

Ingredients:

2 (8-oz) packages cream cheese, softened

1 cup heavy cream

1 cup granulated sugar

1 teaspoon vanilla extract

1 cup salted caramel sauce

Approximately 48 Ritz crackers (1.5 sleeves)

Steps to Sweetness:

Blend to Perfection: In a sizable bowl, meld together cream cheese, heavy cream, sugar, and vanilla extract with an electric mixer until achieving a smooth mixture.

Layer Lovingly: Begin with a layer of Ritz crackers in an 8×8 greased baking dish. Follow with layers of the cream cheese mixture and a drizzle of caramel sauce. Repeat these layers twice more, utilizing all ingredients.

Chill and Settle: Envelop the dish with plastic wrap, placing it in the fridge for a minimum of 4 hours, or optimally, overnight, allowing the crackers to soften and flavors to intertwine.

Garnish and Serve: Embellish with additional caramel, whipped cream, or crumbled Ritz crackers, slicing into this cool, sweet-and-salty delight when ready to serve.

CHEESY CHICKEN FRITTERS

0

Cheesy, Juicy and Flavorful Chicken Fritters always get glowing reviews. If you love easy chicken recipes, this is your recipe!

Ingredients for Chicken Fritters:

  • 1 1/2 lbs chicken breasts, (3 large)
  • 2 large eggs
  • 1/3 cup mayonnaise
  • 1/3 cup all-purpose flour, or cornstarch or potato starch for gluten free
  • 4 oz mozzarella cheese, (1 1/3 cups shredded)
  • 1 1/2 Tbsp chopped fresh dill
  • 1/2 tsp salt , or to taste
  • 1/8 tsp black pepper
  • 2 Tbsp Extra light olive oil, to saute (or any high heat cooking oil)

Ingredients for Garlic Aioli Dip (Optional)

  • 1/3 cup mayonnaise
  • 1 garlic clove, pressed
  • 1/2 Tbsp lemon juice
  • 1/4 tsp salt
  • 1/8 tsp black pepper

How To Make Cheesy Chicken Fritters

  • Using a sharp knife, dice chicken into 1/3″ thick pieces and place them in a large mixing bowl. Tip: If chicken breast is partially frozen, it will be a little bit easier to slice.
  • Into the mixing bowl, add remaining batter ingredients: 2 eggs, 1/3 cup mayonnaise, 1/3 cup flour, 1 1/3 cups shredded mozzarella, 1 1/2 Tbsp dill, 1/2 tsp salt and 1/8 tsp black pepper, or season to taste. Stir the mixture until well combined, cover with plastic wrap and refrigerate 2 hours or overnight.
  • Heat a large non-stick pan over medium heat and add 2 Tbsp oil. When oil is hot, add the chicken mixture a heaping Tablespoon at a time. Slightly flatten out the tops with the back of your spoon and sauté uncovered 3-4 min on the first side, then flip and saute 3 min on the second side or until outsides are golden brown and chicken is fully cooked through* Repeat with remaining fritters adding more oil as needed.
  • To make the aioli (if using), combine all ingredients in a small bowl or measuring cup and stir together until smooth.

Recipe Notes

*To test for doneness, cut a fritter in half and the chicken should be completely white inside. If your chicken patty is browning too fast, adjust your heat down.

Banana Pudding Cake

0

Banana pudding is a dessert that can be prepared in multiple ways and always retains its fresh texture. Fruit desserts are always a good option for those who want to have desserts and sweets in a healthy way. Variety is one of the characteristics of this preparation, and there are options for all tastes.

Next, we will see a very easy, tasty, and healthy recipe. It should be noted that it does not contain sugar since the sweetness of bananas replaces it. To try different options, there are other ingredients that can be very well integrated into this recipe, such as apple, chocolate, or cinnamon.to make this amazing and delicious banana pudding you’ll need the following ingredients:

Ingredients :

2 and 1/4 cup flour.
3 mashed bananas.
1/2 m p. Bicarbonate.
Baking Powder.
2 eggs.
Vanilla.
Read also: Banana Caramel Inverted Cake
A cup of Rayeb milk, an alternative is a cup of milk with MC vinegar.
3/4 cup powdered sugar.
salt.
1/2 cup unsalted butter.
1/2 cream box.
Cinnamon.
A little banana spirit “from the supermarket and dispensable”.
Vanilla.
Dried raisins with dried colored berries “1/2 cup”.

How to make :

In a blender put the butter and sugar and mix well until it becomes creamy, then add the eggs one by one with the mixing, then add the vanilla, yogurt and cream and mix all well.

Add the mashed banana and banana spirit and beat all well until combined, then mix the dry ingredients and add the liquid mixture to them, and stir well until the mixture is homogeneous.

Grease the cake tray with butter and spread a pinch of flour.

Read also: Banana Cake with delicious and crunchy cinnamon

Pour the cake mixture and spread the dried raisins and berries on top, and enter into a preheated oven at 180 degrees until fully cooked and served with tea.

Butter Swim Biscuits

0

This simple homemade recipe is TO DIE FOR! The butter makes these biscuits soft and moist on the inside, with a flaky crust on the outside. Add a little jam or jelly, and you’ve got heaven.

Simple and easy ! My whole family loves this recipe so much. If it were for them, I’d be making this every day! Give it a shot, you’ll love it!To Make this Recipe You’ Will Need the following ingredients:

Ingredients

• 2 1/2 cups all-purpose flour

• 2 cups buttermilk

• 1 stick butter

• 4 tsp baking powder

• 4 tsp sugar

• 2 tsp sal

Instructions

1) Preheat the oven to 450 degrees.
2) Combine all of the dry ingredients in a medium sized bowl.
3) Next, add the buttermilk and mix all of the ingredients together until a moist dough is formed.
4) Melt the butter in a microwave safe bowl, and then pour it into an 8×8 or 9×9 baking dish (make sure that your pan is not too small or shallow so that the butter doesn’t drip out of the pan while it’s baking).
5) Place the dough right on top of the melted butter and use a spatula to spread it evenly across the pan until it touches the sides.
6) Cut the unbaked dough (it should be swimming in butter at this point) into 9 evenish squares.
7) Bake for 20-25 minutes or until golden brown on top.

Ribeye Steak 

0

Ingredients:

  • 2 Ribeye steaks (1 to 1.5 inches thick)
  • 2 tablespoons olive oil
  • 2 cloves garlic, minced (optional)
  • Salt and freshly ground black pepper, to taste
  • 2 tablespoons butter (optional)
  • Fresh rosemary or thyme sprigs (optional)
  • Meat thermometer

Instructions:

  1. Prepare the Steaks: Take the Ribeye steaks out of the refrigerator and let them sit at room temperature for about 30 minutes before cooking. This allows for more even cooking.
  2. Season the Steaks: Season both sides of the steaks generously with salt and freshly ground black pepper. You can add minced garlic at this point for extra flavor.
  3. Preheat the Grill or Pan: If you’re grilling, preheat your grill to high heat. If you’re using a skillet, heat it over medium-high heat. You want it to be very hot.
  4. Oil the Steaks: Brush both sides of the steaks with olive oil. This helps prevent sticking and promotes a nice sear.
  5. Cook the Steaks: Place the steaks on the grill or in the hot skillet. Cook for about 4-5 minutes on each side for medium-rare, or adjust the cooking time to your desired level of doneness. You can use a meat thermometer to check the internal temperature. For medium-rare, it should be around 130°F (54°C).
  6. Add Butter and Herbs (Optional): In the last minute or so of cooking, you can add a pat of butter and some fresh rosemary or thyme sprigs to the skillet. Tilt the skillet and spoon the melted butter over the steaks for extra flavor.
  7. Rest the Steaks: Remove the steaks from the grill or skillet and let them rest for a few minutes on a cutting board. This allows the juices to redistribute and keeps the steaks juicy.
  8. Slice and Serve: After resting, slice the Ribeye steaks against the grain and serve immediately.

Enjoy your perfectly cooked Ribeye steaks! They pair wonderfully with mashed potatoes, grilled vegetables, or a fresh salad.

GARLIC & LEMON CHICKEN W/GREEN BEANS & RED POTATOES!

0

Ingredients:

  • 4 boneless, skinless chicken breasts
  • 1 pound fresh green beans, trimmed
  • 1.5 pounds red potatoes, quartered
  • 4 cloves garlic, minced
  • 2 lemons, one juiced and one sliced
  • 2 tablespoons olive oil
  • 1 teaspoon dried oregano
  • Salt and pepper to taste
  • Fresh parsley, chopped for garnish (optional)

Instructions:

  1. Preheat the Oven: Preheat your oven to 400°F (200°C).
  2. Prepare the Chicken: Season the chicken breasts with salt, pepper, and dried oregano. Set aside.
  3. Prepare the Vegetables: In a large mixing bowl, combine the trimmed green beans, quartered red potatoes, minced garlic, and olive oil. Toss to coat the vegetables with the oil and garlic.
  4. Assemble in a Baking Dish: Place the chicken breasts in a single layer in a large ovenproof baking dish. Arrange the seasoned vegetables around the chicken.
  5. Lemon and Seasoning: Squeeze the juice of one lemon over the chicken and vegetables. Place lemon slices on top of the chicken for added flavor. Season everything with additional salt and pepper to taste.
  6. Bake: Cover the baking dish with aluminum foil and bake in the preheated oven for 20 minutes.
  7. Uncover and Finish: Remove the foil and bake for an additional 20-25 minutes or until the chicken is cooked through (reaches an internal temperature of 165°F or 74°C) and the vegetables are tender.
  8. Garnish and Serve: Once done, garnish with chopped fresh parsley for a burst of color and flavor. Serve hot.

This Garlic & Lemon Chicken with Green Beans and Red Potatoes is a wholesome and flavorful meal that’s easy to prepare and perfect for a family dinner. Enjoy!

PECAN UPSIDE DOWN CAKE

0

Ingredients:

For the Pecan Topping:

  • 1/2 cup unsalted butter
  • 1 cup brown sugar, packed
  • 1 1/2 cups pecan halves

For the Cake Batter:

  • 1 1/2 cups all-purpose flour
  • 1 1/2 tsp baking powder
  • 1/4 tsp salt
  • 1/2 cup unsalted butter, softened
  • 1 cup granulated sugar
  • 2 large eggs
  • 1 tsp vanilla extract
  • 1/2 cup whole milk

Instructions:

  1. Preheat the Oven: Preheat your oven to 350°F (175°C). Grease a 9-inch round cake pan and line the bottom with parchment paper.
  2. Prepare the Pecan Topping: In a small saucepan over medium heat, melt 1/2 cup of unsalted butter. Stir in the brown sugar until it’s well combined and begins to bubble. Remove from heat.
  3. Pour the caramelized mixture into the bottom of the prepared cake pan. Sprinkle the pecan halves evenly over the caramel.
  4. Prepare the Cake Batter: In a medium bowl, whisk together the flour, baking powder, and salt. Set it aside.
  5. In a separate large bowl, cream together the softened butter and granulated sugar until light and fluffy.
  6. Beat in the eggs, one at a time, ensuring each is fully incorporated before adding the next. Stir in the vanilla extract.
  7. Gradually add the dry ingredients to the wet ingredients, alternating with the milk. Begin and end with the dry ingredients, mixing until just combined.
  8. Assemble and Bake: Pour the cake batter over the pecan topping in the cake pan. Smooth the top with a spatula.
  9. Place the cake pan in the preheated oven and bake for approximately 35-40 minutes, or until a toothpick inserted into the center comes out clean.
  10. Cool and Invert: Remove the cake from the oven and allow it to cool in the pan for about 10 minutes. Then, run a knife around the edge of the pan to loosen the cake. Place a serving plate upside down over the top of the cake pan, and quickly invert the cake onto the plate. Carefully remove the cake pan, leaving the pecan topping on top.
  11. Serve: Your Pecan Upside Down Cake is now ready to be served. Enjoy a slice of this delicious treat with a dollop of whipped cream or a scoop of vanilla ice cream.

This cake is a delightful blend of caramelized pecans and moist, tender cake. It’s perfect for dessert or a special occasion. Enjoy!

BEEF AND CHEESE MEXICAN SANCHILADAS

0

Ingredients:

For the Beef Filling:

  • 1 pound ground beef
  • 1 small onion, finely chopped
  • 2 cloves garlic, minced
  • 1 (14.5 oz) can diced tomatoes, drained
  • 1 (4 oz) can diced green chilies
  • 1 tsp ground cumin
  • 1 tsp chili powder
  • Salt and pepper to taste

For the Sauce:

  • 2 cups enchilada sauce (store-bought or homemade)
  • 1/2 cup sour cream

For the Assembly:

  • 12 small corn tortillas
  • 2 cups shredded Mexican blend cheese
  • Chopped fresh cilantro (for garnish)
  • Sliced jalapeños (optional, for garnish)

Instructions:

  1. Prepare the Beef Filling: In a large skillet, cook the ground beef over medium-high heat until it’s browned and cooked through. Drain any excess fat.
  2. Add the finely chopped onion and minced garlic to the skillet with the cooked beef. Sauté for a few minutes until the onion is translucent.
  3. Stir in the diced tomatoes, diced green chilies, ground cumin, chili powder, salt, and pepper. Cook for another 5 minutes, allowing the flavors to meld. Remove from heat and set aside.
  4. Make the Sauce: In a separate bowl, mix the enchilada sauce and sour cream until well combined. This will be your delicious sauce for the sanchiladas.
  5. Assemble the Sanchiladas: Preheat your oven to 350°F (175°C). Take each corn tortilla and spoon a generous portion of the beef filling into the center. Sprinkle some shredded cheese on top of the beef.
  6. Roll up the tortilla tightly and place it seam side down in a greased 9×13-inch baking dish. Repeat this process with the remaining tortillas.
  7. Pour the enchilada sauce mixture evenly over the rolled tortillas. Make sure they are well coated.
  8. Sprinkle the remaining shredded cheese over the top.
  9. Bake: Cover the baking dish with foil and bake in the preheated oven for about 20-25 minutes, or until the cheese is melted and the sanchiladas are heated through.
  10. Garnish and Serve: Remove the foil and bake for an additional 5 minutes to lightly brown the cheese. Garnish with chopped cilantro and sliced jalapeños, if desired.
  11. Serve: Serve your Beef and Cheese Mexican Sanchiladas hot. They are great with a dollop of sour cream and a side of guacamole or salsa.

Enjoy your delicious homemade sanchiladas with the rich beef filling and cheesy goodness!

CHERRY BARS

0

Ingredients

For the Bars:

  • 1 1/2 cups butter, softened
  • 3 cup granulated sugar
  • 1 1/2 teaspoon salt
  • 5 large eggs
  • 1 1/2 teaspoon vanilla extract
  • 1 1/2 teaspoon almond extract
  • 5 1/2 cups all-purpose flour
  • 1 1/2 teaspoon baking powder
  • 2 cans (21 oz.) cherry pie filling

For the Glaze:

  • 1 cup confectioner’s sugar
  • 3 tablespoons milk

How To Make Cherry Bars

Preheat oven to 350 degrees F. Line a jelly roll pan (12×17) with aluminum foil. Spray with nonstick spray. Set aside.In the bowl of your stand mixer, cream together butter and sugar, about 1-2 minutes. Add salt, eggs, and vanilla and almond flavorings and continue stirring until fully incorporated.

Add flour and baking powder and mix until just combined. Reserve 1 3/4 cup of dough. Spread/Press remaining dough into the prepared baking pan. Top with cherry pie filling. Drop remaining batter in small pieces over the cherry filling.Place in the oven and bake for 50-60 minutes or until golden brown.

Remove from the oven and place pan on a wire rack to cool completely. Once cooled prepare the glaze. Whisk together confectioners’ sugar and milk until smooth and drizzle over the bars. Cut into 35 squares and serve.

Deep Fried Apple or Peach Pies

0

This delicious dish will allow you to indulge in the warm, comforting feeling of nostalgia that comes from eating homemade baked apples or fried peaches. These golden, flaky pockets of heaven are filled with a sweet and tangy fruit filling and then fried to just the right amount of crunch. These handmade cakes offer a wonderful combination of flavors and textures that will make your taste buds dance. Whether you’re reminiscing about your childhood or starting new traditions, you’ll want to make
of these cakes.
The delights of classic Southern home cooking can be found in the recipe for deep-fried apple or peach pancakes, whose crispy crust encloses a filling of warm, spiced fruit.The cake can be made with apple or peach filling. When you bite into one of these fried patties, you’ll be transported back in time and enjoy the perfect combination of softness, crunchiness, and comfort they provide.

INGREDIENTS LIST:

FOR FILLING:
– 2 cups. Diced apples or peaches (peeled and cored if using apples).
– 1/4 cup.Made with granulated sugar (adjust to taste).
– 1 teaspoon ground cinnamon.
– 1/4 teaspoon ground nutmeg.
– 1 tablespoon lemon juice.
– 1 tablespoon cornstarch.
FOR THE CAKE: 
– 2 cups.Made from all-purpose flour.
– 1/2 teaspoon salt.
– 1/2 cup cold butter, cut into cubes.
– 1/2 cup cold water.
FOR FRYING: 
– Vegetable oil, for frying.
– Powdered sugar for dusting.

PREPARATION:

First step

Mix the diced apples or peaches with the sugar, ground cinnamon, ground nutmeg, lemon juice and cornstarch in a medium-sized saucepan. To evenly saturate the fruits with aromatic spices and thickeners, mix them thoroughly.

Step 2

Mix all-purpose flour and salt in a large bowl.Add the cooled butter cubes and work them into the flour using a pastry knife or your fingertips until the mixture resembles large crumbs. Gradually add the warm water and stir until smooth. Form a disk of dough, wrap it in aluminum foil and put it in the fridge for 30 minutes.

Step 3

Roll out the chilled dough on a lightly floured work surface to about 3 mm thick. For tarts, use a round cookie cutter (approx. 10 to 12 cm in diameter) to cut out circles.

4th Step

On one half of each pastry circle, place a dollop of the prepared fruit filling, leaving a border around the margins. Fold the remaining pastry half over the filling to create a half-moon shape. The tarts are sealed with a fork by pressing the borders together. Ensure that they are well-sealed to prevent filling leakage during frying.

5th Step

Heat sufficient vegetable oil to submerge the pies in a deep, heavy-bottomed skillet or saucepan.Using a thermometer, heat the oil to about 175 degrees Celsius.

Step 6

Depending on the size of your mold, carefully place a handful of sealed cookies into the heated oil. Fry the cakes for about two to three minutes on each side until golden brown and crispy. Transfer the fried cakes to a plate lined with absorbent paper and use a perforated baking dish to absorb excess oil.

Step 7

While the fried cakes are still hot, sprinkle them with powdered sugar to add flavor and improve their appearance.Then, serve the warm Fried Apple or Peach Pies as a delectable dessert or a satisfying refreshment. These delights are ideal for sharing and savoring with family and friends.