Home Blog Page 2

Baked Cajun Shrimp

0

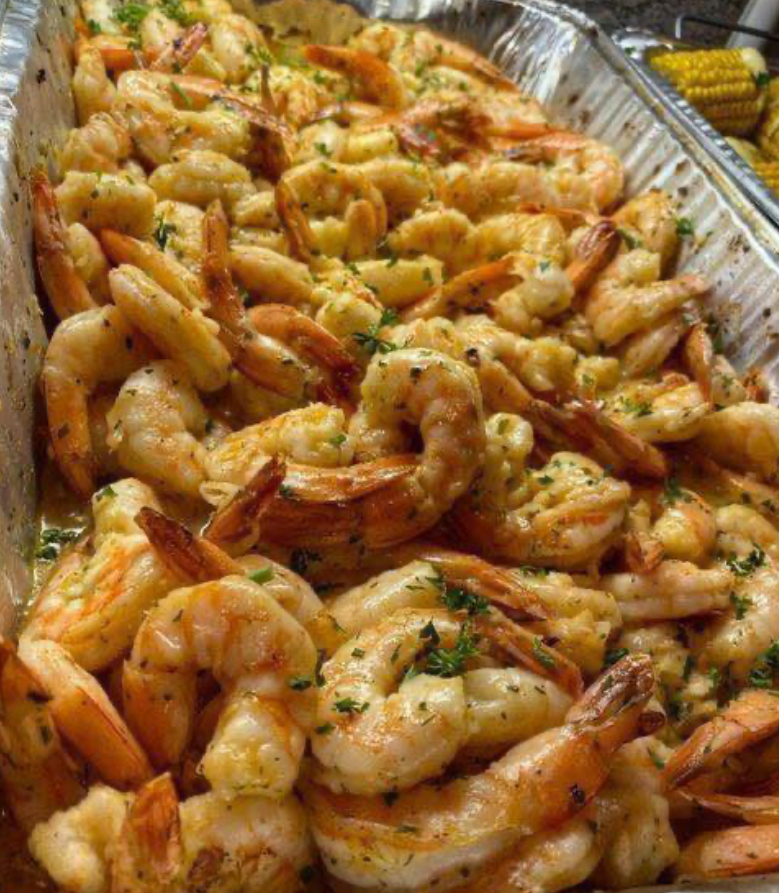
Baked Cajun shrimp is a flavorful and easy-to-make dish that’s perfect for a quick weeknight dinner or as a crowd-pleasing appetizer. The Cajun seasoning adds a zesty kick to the succulent shrimp, creating a dish that’s both spicy and satisfying. Here’s a simple recipe for baked Cajun shrimp:

Ingredients:

  • 1 pound large shrimp, peeled and deveined
  • 2 tablespoons olive oil
  • 2 tablespoons Cajun seasoning
  • 1 teaspoon smoked paprika
  • 1 teaspoon garlic powder
  • 1 teaspoon onion powder
  • 1/2 teaspoon dried thyme
  • 1/2 teaspoon dried oregano
  • 1/4 teaspoon cayenne pepper (adjust to taste)
  • Salt and black pepper to taste
  • 2 tablespoons unsalted butter, melted
  • 1 lemon, sliced
  • Fresh parsley, chopped (for garnish)

Instructions:

  1. Preheat the Oven:
    • Preheat your oven to 400°F (200°C).
  2. Prepare the Shrimp:
    • Pat the shrimp dry with paper towels. In a large bowl, toss the shrimp with olive oil, Cajun seasoning, smoked paprika, garlic powder, onion powder, dried thyme, dried oregano, cayenne pepper, salt, and black pepper. Ensure the shrimp are well coated with the seasoning.
  3. Marinate the Shrimp:
    • Allow the shrimp to marinate for about 15-20 minutes. This allows the flavors to infuse into the shrimp.
  4. Arrange in Baking Dish:
    • Place the marinated shrimp in a single layer in a baking dish. Drizzle the melted butter over the shrimp for added richness.
  5. Bake in the Oven:
    • Bake in the preheated oven for approximately 12-15 minutes or until the shrimp are opaque and cooked through. Be cautious not to overcook to maintain the shrimp’s tenderness.
  6. Broil for Crispiness (Optional):
    • If you prefer a slightly crisp texture on the top, switch the oven to broil for the last 1-2 minutes, keeping a close eye to prevent burning.
  7. Garnish and Serve:
    • Remove the baked Cajun shrimp from the oven. Squeeze fresh lemon juice over the top and garnish with chopped parsley.
  8. Serve Warm:
    • Serve the baked Cajun shrimp over rice, pasta, or with crusty bread to soak up the flavorful juices. Enjoy!

Tips:

  • Cajun Seasoning: Adjust the amount of Cajun seasoning and cayenne pepper based on your spice preference. If you prefer less heat, reduce the cayenne pepper or Cajun seasoning.
  • Shell-On Shrimp: You can also prepare this dish with shell-on shrimp for added flavor. Just be sure to adjust the cooking time accordingly.
  • Side Suggestions: Pair the baked Cajun shrimp with a side of steamed vegetables, a fresh green salad, or a cool cucumber salad for a well-balanced meal.

This baked Cajun shrimp recipe is quick, flavorful, and a great way to enjoy the bold tastes of Cajun cuisine. It’s a fantastic option for busy days when you want a delicious meal without spending too much time in the kitchen.

7 things you can do if you have rosemary at home

0

If you’re lucky enough to have a thriving rosemary plant at home, you’re sitting on a treasure trove of possibilities. This fragrant and versatile herb isn’t just for garnishing dishes; it can elevate your culinary creations, enhance your well-being, and even find its way into your beauty routine. Here are seven delightful things you can do if you have rosemary at home.

1. Culinary Creations: Elevate Your Cooking

Rosemary-Infused Olive Oil:

  • Create a gourmet touch by infusing olive oil with rosemary. Simply place a few sprigs of fresh rosemary into a bottle of olive oil and let it sit for a week. The result is a flavorful oil perfect for drizzling on salads, bread, or roasted vegetables.

Rosemary Roasted Potatoes:

  • Tossing potatoes with olive oil, minced garlic, and fresh rosemary before roasting adds a fragrant and savory dimension to this classic dish.

Rosemary-Infused Cocktails:

  • Elevate your cocktail game by adding a sprig of rosemary to drinks like gin and tonic or a refreshing lemonade. The herb’s aromatic essence can enhance the overall flavor.

2. Herbal Tea: Embrace the Soothing Brew

Rosemary Tea:

  • Steep fresh rosemary sprigs in hot water to create a soothing herbal tea. Rosemary tea is believed to have various health benefits, including improved digestion and a boost to the immune system.

3. Aromatic Home: Create a Scented Sanctuary

DIY Potpourri:

  • Combine dried rosemary with other aromatic ingredients like citrus peels, cinnamon sticks, and cloves to make your own potpourri. Place it in bowls around your home for a natural and invigorating scent.

Homemade Room Spray:

  • Make a simple room spray by infusing water with a few drops of rosemary essential oil. Spritz it in your living spaces for a refreshing and uplifting aroma.

4. Natural Beauty: Pamper Your Skin and Hair

Rosemary Hair Rinse:

  • Steep fresh rosemary in hot water, let it cool, and use the infused liquid as a hair rinse. Rosemary is believed to promote hair health and shine.

Rosemary Infused Oil for Skin:

  • Mix dried rosemary with a carrier oil (like almond or jojoba oil) and let it infuse for a few weeks. The resulting oil can be used as a moisturizer for skin, providing a subtle herbal scent.

5. Pest-Repellent Potions: Ward Off Unwanted Guests

Natural Insect Repellent:

  • Create a natural insect repellent by combining rosemary essential oil with water and a splash of witch hazel. Spray this mixture on your skin for a refreshing and effective bug deterrent.

6. Gardening Companion: Support Your Plants

Rosemary Companion Planting:

  • Use rosemary as a companion plant in your garden. It’s believed to repel certain pests and can complement the growth of vegetables like cabbage, beans, and carrots.

7. Relaxing Rituals: Unwind with Rosemary

Aromatherapy Bath:

  • Add a few drops of rosemary essential oil to your bath for a rejuvenating and aromatic soak. This simple ritual can help relax your mind and body.

Final Thoughts: Embracing the Versatility of Rosemary

From enhancing your culinary endeavors to becoming a staple in your beauty and wellness routines, rosemary proves itself to be an invaluable herb. With these seven delightful uses, you can fully unlock the potential of your homegrown rosemary and infuse your life with its aromatic and beneficial qualities. Whether you’re cooking up a storm in the kitchen, creating a spa-like atmosphere at home, or tending to your garden, let rosemary be your fragrant companion on this delightful journey.

Cheese Steak Quesadillas

0

Cheese Steak Quesadillas

 INGREDIENTS

  •  1 pound sirloin, thinly sliced
  •  1 bell pepper, sliced
  •  1 onion, sliced
  •  2 teaspoons Lawry seasoning salt, divided symbol
  •  1 teaspoon McCormick Montreal Seasoning Steak Grill Mates 98 7 1 teaspoon pepper , divided
  •  16 slices provolone cheese
  •  4 large flour tortillas
  •  canola oil
  •  nonstick cooking spray

PREPARATION

To prepare steak, combine steak slices, 1 teaspoon  salt, steak seasoning, and 1/2 teaspoon pepper in bag -top- Bag. Stir until the spices evenly coat the steak. Heat 1 tablespoon  oil in a cast iron skillet over medium-high heat.

Sear the steak, cut into portions, for 1 to 2 minutes per side, depending on how  you like your steak. Do not overcrowd the pan.If the pan is dry, add 1 tablespoon oil. Remove the  steak from the pan. In the same skillet, heat 1 tablespoon oil over medium-high heat. Add the chopped onion and  pepper. Sprinkle with 1 teaspoon seasoned salt and 1/2 teaspoon pepper.Fry the vegetables, stirring frequently, until soft, 5 minutes.

Now put the quesadillas together. Heat a large skillet or skillet over medium-high heat.

Spray with non-stick cooking spray. Add the flour tortilla to the pan.Spread 4 slices of provolone cheese evenly over the flour tortilla. Place steak on one side. On the opposite side, place the fried peppers and onions. Once the cheese is melted, fold the flour tortilla in half.

Remove from the pan and cut into 4 pieces.Eat and enjoy!

HAVE FUN!

WENDY’S CHILI RECIPE

0

WENDY’S CHILI RECIPE

Prep: 15 mins
Cook: 1 hr 20 mins
Total: 1 hr 35 mins
Servings: 10
Yield: 10 servings

Although this recipe is very good, I have decided to share my favorite Wendy’s chili recipe. It’s the perfect dish for any winter or fall season, and it can be made all year round. After trying many different recipes, I came up with the best one. It’s topped with shredded cheese and finely diced white onions.

INGREDIENETS :

° 2 pounds beef fresh ground
° 1 liter tomato juice 1 (29 oz) …
° 1 can tomato (15 ounces)
° can red kidney beans, drained 1 (15 ounce)
° can beans, drainer 1
° 1 onion, chop (about 1 1/2 cups)
° 1/2 cup celery cut into cubes
° 1/4 cup green pepper, cut into cubes
° 1/4 cup chili powder (use less for mild chili)
° 1 teaspoon ground cumin (use more for true flavor)
° 1 1/2 teaspoon garlic powder
° 1 teaspoon salt
° 1/2 teaspoon ground black pepper
° 1/2 teaspoon dried oregano
° 1/2 teaspoon sugar
° 1/8 teaspoon cayenne pepper

Directions

  1. In a large pot, heat the olive oil. Press the ground beef into the oil to form one large patty. Let it brown in the oil for 8 to 10 minutes.
  2. Break the beef into crumbles and continue to cook it until it’s no longer pink, about five minutes.
  3. Add the celery, bell pepper, and onion into the beef and cook until the onion is translucent. Add the tomatoes, water, and green chiles and break apart the large chunks of tomatoes. In a separate bowl, combine the pinto beans and kidney. Add the spices and salt and pepper to the mixture.
  4. Reduce the heat to low and cook the beef until it’s tender, about 1 hour. Then, add the vinegar and stir well.

Note :

To adjust the heat, feel free to add cayenne pepper. The real chili has more beans in it, so you could just double the amount above.

Nutrition Facts

Per Serving: 326 calories; protein 22.6g; carbohydrates 28.8g; fat 14.8g; cholesterol 55.1mg; sodium 1521mg.

CHICKEN BREAST STUFFED WITH HOT BACON,SPINACH

0

Stuffed chicken breast is a versatile and delicious dish, and when you add the smoky flavor of hot bacon and the freshness of spinach, you get a flavorful and impressive main course. Here’s a simple recipe for Chicken Breast Stuffed with Hot Bacon and Spinach:

Ingredients:

For the Chicken:

  • 4 boneless, skinless chicken breasts
  • Salt and black pepper to taste
  • 1 tablespoon olive oil

For the Stuffing:

  • 6 slices bacon, diced
  • 2 cups fresh spinach, chopped
  • 1 cup shredded mozzarella cheese
  • 1/4 cup grated Parmesan cheese
  • 2 cloves garlic, minced
  • 1 teaspoon dried oregano
  • 1 teaspoon dried thyme
  • 1/2 teaspoon red pepper flakes (adjust to taste)

For the Sauce:

  • 1 cup chicken broth
  • 1/2 cup heavy cream
  • 2 tablespoons unsalted butter
  • 1 tablespoon all-purpose flour (for thickening, if desired)
  • Salt and black pepper to taste

Instructions:

1. Preheat the Oven:

  • Preheat your oven to 375°F (190°C).

2. Prepare the Chicken:

  • Butterfly the chicken breasts by making a horizontal cut through the center, leaving the edges intact, to create a pocket. Season the chicken with salt and black pepper.

3. Cook the Bacon:

  • In a skillet over medium heat, cook the diced bacon until crispy. Remove excess fat, leaving about 1 tablespoon in the pan.

4. Sauté Spinach and Garlic:

  • Add chopped spinach and minced garlic to the skillet. Sauté until the spinach is wilted.

5. Prepare the Stuffing:

  • In a bowl, combine the cooked bacon and spinach mixture with shredded mozzarella, grated Parmesan, dried oregano, dried thyme, and red pepper flakes. Mix well.

6. Stuff the Chicken:

  • Stuff each chicken breast with the bacon and spinach mixture. Secure with toothpicks if needed.

7. Sear the Chicken:

  • In the same skillet, heat olive oil over medium-high heat. Sear the stuffed chicken breasts for 2-3 minutes on each side until golden brown.

8. Transfer to Oven:

  • Transfer the skillet to the preheated oven and bake for 20-25 minutes or until the chicken is cooked through and reaches an internal temperature of 165°F (74°C).

9. Make the Sauce:

  • In the same skillet, add chicken broth, heavy cream, and butter. Bring to a simmer and cook for a few minutes. If desired, whisk in flour to thicken the sauce. Season with salt and black pepper to taste.

10. Serve: – Spoon the sauce over the stuffed chicken breasts and serve immediately. Remove toothpicks before serving.

Tips:

  • Cheese Variations: Feel free to experiment with different cheese blends for the stuffing, such as Swiss, cheddar, or provolone.
  • Vegetable Additions: Enhance the stuffing with diced tomatoes, mushrooms, or artichoke hearts for added flavor.
  • Side Dish Suggestions: Serve the stuffed chicken with a side of roasted vegetables, mashed potatoes, or a fresh salad.

This Chicken Breast Stuffed with Hot Bacon and Spinach is a flavorful and satisfying dish that’s perfect for a special dinner or when you want to impress your guests. The combination of savory bacon, vibrant spinach, and creamy cheese makes this stuffed chicken a standout meal. Enjoy!

Old Fashioned Stew

0

Old Fashioned Stew

The Old Fashioned Stew recipe is one I grew up with. You cook everything on the stovetop and then cook it until all the flavors combine and it’s bubbly and hot. It has a million different names, but that’s what they called it in Minnesota.

This recipe is totally different from the rest of the world. This is a hearty, meaty pasta dish with lots of tomatoes.It’s also called chop suey or slumgullion, depending on what part of the US you grew up in.
If you’re looking to go easy on your grocery budget, goulash is a great choice. A pound of ground beef can be served in multiple servings when served with pasta and a richly flavored tomato sauce. It has become a popular standard for many not only for its taste but also for its practicality and affordability.
Since most of these recipes fit easily in my pantry, I often decide to make it at the last minute when I don’t feel like doing anything else.It’s easy enough even for my teenager to figure it out for us if it’s his weeknight dinner.

Ingredients

or 1/2 lb. pasta
or 1 1/2 lbs. ground beef
or 1 large onion, diced
or garlic salt, pepper, chili powder & hot sauce to taste
or 2 cans whole steamed tomatoes, undrained
or 2 tablespoons tomato ketchup
or tomato juice of your choice

To Prepare Old Fashioned Stew

Cook pasta al dente according to package directions. While cooking, sear the ground beef and onions together in a very large skillet or Dutch oven.
Drain and season to taste.In a large bowl, mash the tomatoes with a potato masher and mix with the meat and ketchup. Drain the noodles and add to the beef mixture and mix well. Taste and add more spices if needed.
I didn’t need to add tomato juice, but if you like it juicier, you can add as much tomato juice as you like. Phyllis adds it to her leftovers, which I also recommend since noodles tend to soak up all the juice over time.

Hershey’s Cocoa Fudge

0

Ingredients

2/3 cup Hershey’s Cocoa
3 cups powdered sugar
1/8 tsp. salt
or 1 1/2 cup milk
or 1/2 stick butter (1/4 cup)
or 1 tbsp. Vanilla Extract

To make Hershey’s

Cocoa Fudge: 1. In a large saucepan, combine sugar, cocoa powder, and salt and stir until combined.
2Pour the milk into the saucepan and stir. Turn the heat to medium and continue stirring until the mixture begins to boil.
3. When the mixture begins to boil, stop stirring and place a thermometer on the edge of the pan.
4Cook until the mixture reaches 234 degrees or forms a soft ball in cold water.
5. Remove from heat and add butter and vanilla. DO NOT MIX!
6Let cool to about 130 degrees and stir until fudge is opaque. This can take a few minutes.
7. Pour into a buttered casserole dish.
8Gently run a knife through the fondant to remove any air bubbles and let it sit for a few hours.
9. Relax and enjoy!

How to whiten your laundry and get rid of old yellow stains

0

Over time, our favorite white garments can lose their brightness, and unsightly yellow stains may appear, leaving us puzzled and frustrated. However, fear not! With a few simple tips and tricks, you can rejuvenate your laundry and bid farewell to those stubborn yellow marks. Let’s explore how to whiten your laundry and say goodbye to old stains.

Understanding Yellow Stains:

Yellow stains on white clothing are a common issue and can be caused by a variety of factors, including:

  1. Sweat and Body Oils: The natural oils produced by our bodies, combined with sweat, can contribute to yellowing over time.
  2. Deodorant and Antiperspirant: Residue from deodorant or antiperspirant can build up on clothing, leading to discoloration.
  3. Detergent Buildup: The use of too much detergent or inadequate rinsing can result in detergent residue, contributing to yellowing.
  4. Mineral Deposits: Hard water can leave mineral deposits on clothing, affecting their color.

Whitening Your Laundry:

1. Sort Your Laundry:

  • Before starting the whitening process, sort your laundry. Keep whites separate from colored items to prevent color bleeding.

2. Pre-Treat Yellow Stains:

  • For targeted stain removal, pre-treat yellow stains with a mixture of equal parts lemon juice and salt. Apply the mixture to the stain, let it sit for 15-30 minutes, and then launder as usual.

3. Baking Soda Boost:

  • Add 1/2 cup of baking soda to your laundry load along with your regular detergent. Baking soda is a natural brightening agent that helps lift stains and freshen fabrics.

4. White Vinegar Rinse:

  • During the rinse cycle, add 1/2 to 1 cup of white vinegar to the washing machine. White vinegar helps break down detergent residues and contributes to overall whiteness.

5. Oxygen Bleach (Optional):

  • If your whites need an extra boost, consider using oxygen bleach (not chlorine bleach) as directed on the product label. Oxygen bleach is gentler on fabrics than chlorine bleach.

6. Sunlight Exposure:

  • Take advantage of the natural bleaching properties of sunlight. Hang your whites to dry in direct sunlight, and the sun’s rays will help brighten and whiten your laundry.

Tips for Maintaining Whiteness:

  1. Avoid Overloading: Overloading the washing machine can prevent clothes from getting adequately clean. Ensure there’s enough space for water and detergent to circulate.
  2. Use the Right Detergent: Choose a detergent specifically designed for whites, and follow the recommended usage instructions.
  3. Regular Maintenance: Incorporate a regular laundry maintenance routine to prevent yellowing. Treat stains promptly, and don’t let them set in.
  4. Address Hard Water Issues: If you have hard water, consider using a water softener or adding vinegar to your laundry routine to combat mineral deposits.
  5. Check Care Labels: Always check the care labels on your clothing for specific washing instructions to preserve their quality.

Bid Adieu to Yellow Stains:

By following these simple steps and incorporating these tips into your laundry routine, you can revive the brilliance of your whites and say goodbye to those pesky yellow stains. A combination of natural brightening agents, targeted stain treatments, and proper care can make a significant difference in restoring the vibrancy of your wardrobe. Embrace the confidence of wearing crisp, white clothing that looks and feels like new!

Butter Garlic  Chicken

0

Butter Garlic  Chicken

 INGREDIENTS

Chicken:

  •  2 boneless chicken breasts, halved lengthwise
  •  ½ cup grated Parmesan
  •  2 grated garlic cloves
  •  1 teaspoon Italian seasoning
  •  1 teaspoon smoked paprika
  •  4 tablespoons butter
  •  Salt and pepper to taste

CAULIFLOWER RICE:

  •  3 cups cauliflower, risotto
  •  1 small onion, chopped
  •  2  garlic cloves, chopped
  •  2 tablespoons chicken stock
  •  1 lemon, squeezed to extract juice
  •  ¼ cup chopped parsley
  •  Chili flakes of your choice

PREPARATION

WAY

In In one In a shallow bowl, mix together Parmesan, Italian spices, paprika, salt and pepper to taste.

Stir well.

Season  four pieces of chicken with salt and pepper, then add each piece to the Parmesan mixture in a shallow bowl.

Melt 2 tablespoons of butter in a pan and add the chicken.

Fry on both sides and brown well in the middle.

Remove from the pan and keep warm.

In the same pan, add 2 tablespoons of butter, the  chopped onion and the chopped garlic.

Mix and cook for a minute.

Add the rice, add the cauliflower to the pan and let it cook for 1 minute.

Add the chicken stock, the juice of a lemon and half  the parsley.

Let it cook for 2 minutes, then sprinkle with some of the remaining Parmesan.

Put the chicken back in the pan with the Sprinkle remaining parsley and cook for another 1 minute and 2 minutes.

Season with salt and pepper

Serve chicken over rice

ENJOY!

How to Remove Dirt and Grease from Wooden Kitchen Cabinets Effortlessly

0

Wooden kitchen cabinets add warmth and charm to any kitchen, but they can also become magnets for dirt, grease, and grime. Over time, these elements can dull the appearance of your cabinets. The good news is that restoring the shine and cleanliness of your wooden kitchen cabinets doesn’t have to be a daunting task. With the right approach and a bit of effort, you can remove dirt and grease effortlessly, bringing back the natural beauty of your wood. Let’s dive into an easy-to-follow guide on how to revitalize your wooden cabinets.

Materials You’ll Need:

  1. Dish Soap or Castile Soap: A gentle, effective cleaner for wood surfaces.
  2. Warm Water: To create a soapy cleaning solution.
  3. Microfiber Cloth or Sponge: Soft materials to avoid scratching the wood.
  4. Baking Soda: A natural abrasive for stubborn stains.
  5. White Vinegar: Effective for cutting through grease and removing odors.
  6. Olive Oil or Mineral Oil: To restore the luster of the wood.
  7. Soft Towels or Paper Towels: For drying and polishing.

Step-by-Step Cleaning Guide:

1. Remove Items from Cabinets:

  • Clear the cabinets of any items, including dishes, pots, and pans. This ensures you have full access to all surfaces.

2. Create a Soapy Cleaning Solution:

  • Mix a few drops of dish soap or castile soap with warm water. This mild solution is gentle on wood but effective in cutting through grease.

3. Wipe Down Surfaces:

  • Dip a microfiber cloth or sponge into the soapy water, wring out excess liquid, and gently wipe down the cabinet surfaces. Pay extra attention to areas with visible grease or grime.

4. Tackle Stubborn Stains with Baking Soda:

  • For persistent stains, make a paste using baking soda and water. Apply the paste to the stain, let it sit for a few minutes, and then scrub gently with a soft cloth or sponge.

5. Address Greasy Buildup with White Vinegar:

  • Mix equal parts white vinegar and water. Dip a cloth into the solution and wipe down the cabinets. The vinegar helps cut through grease and leaves a fresh scent.

6. Dry Cabinets Thoroughly:

  • After cleaning, use a clean, dry cloth or paper towel to thoroughly dry the cabinet surfaces. Avoid leaving any excess moisture on the wood.

7. Restore Shine with Olive Oil or Mineral Oil:

  • Apply a small amount of olive oil or mineral oil to a soft cloth and gently rub it onto the cabinet surfaces. This step helps restore the natural luster of the wood.

Tips for Maintaining Wooden Cabinets:

  1. Regular Cleaning Routine:
    • Establish a routine for cleaning your cabinets, especially in areas prone to grease buildup, like near the stove.
  2. Use Cabinet Liners:
    • Consider using cabinet liners to protect the interior shelves from spills and stains.
  3. Avoid Harsh Cleaners:
    • Steer clear of abrasive cleaners or products containing harsh chemicals that can damage the wood finish.
  4. Be Gentle with Hardware:
    • When cleaning around cabinet handles and knobs, be gentle to avoid damaging the hardware.
  5. Ventilate Your Kitchen:
    • Adequate ventilation can help prevent the buildup of cooking residues on cabinet surfaces.

Closing Thoughts: Enjoy the Radiance of Refreshed Cabinets

With a little time and the right cleaning approach, you can effortlessly remove dirt and grease from your wooden kitchen cabinets, revealing the natural beauty of the wood. Regular maintenance and gentle cleaning will keep your cabinets looking pristine, allowing you to enjoy a clean and welcoming kitchen for years to come. Now, step back and admire the radiant glow of your refreshed cabinets – a testament to the transformative power of a little care and attention.